15 Creative Back to School Crafts for Preschoolers
Starting school feels exciting when your child helps make their own classroom treasures. These handmade pieces add comfort, spark pride, and give little hands a chance to practice fine motor skills while creating something they’ll truly use.
Each craft is designed with preschoolers in mind. Simple steps, safe materials, and joyful results make these projects perfect for crafting together before the first bell rings.
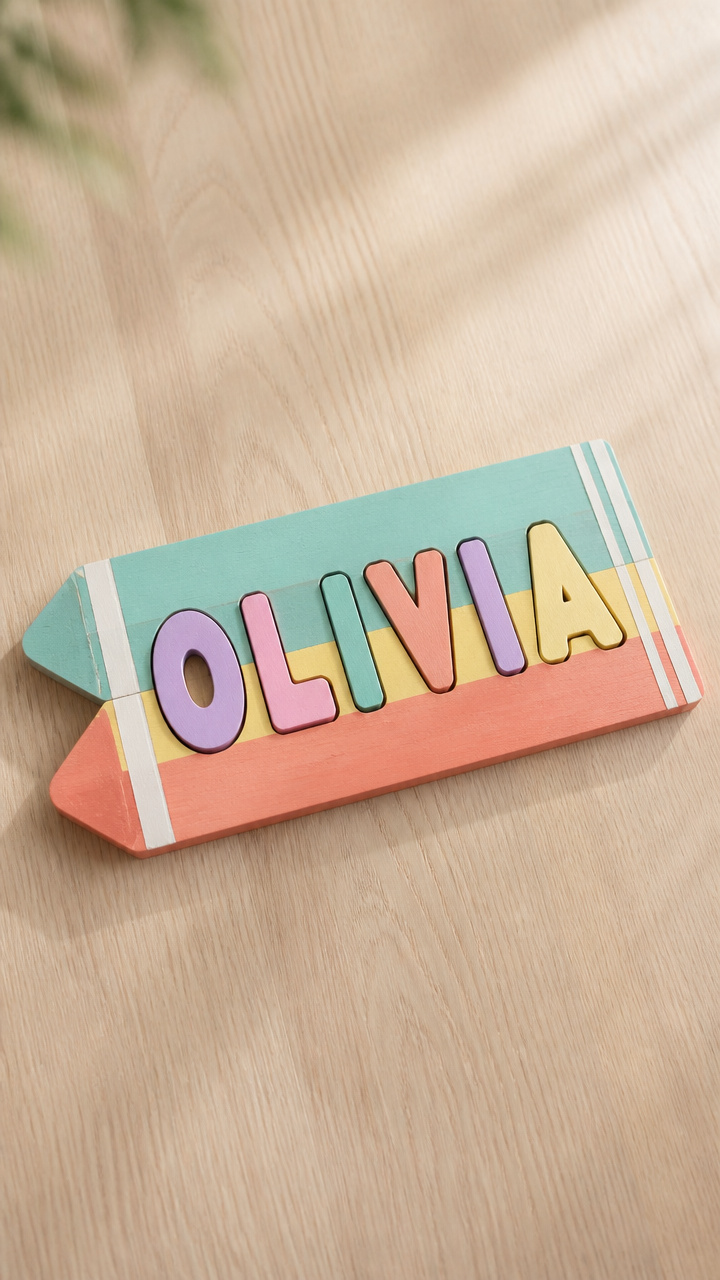
1. Personalized Name Plates

Smooth cardstock tags with your child’s name help them recognize their spot at school. Adding stickers and drawings makes each one uniquely theirs.
Materials Needed
- A4 white cardstock, 1 sheet per child
- Black fine-tip permanent marker
- Washable sticker sheets, 1 pack
- Washable crayons, assorted colors
- 12-inch plastic laminating pouches, 1 per plate
- Laminator
How to Make It
- Write your child’s name in bold letters across the center of the cardstock using the permanent marker.
- Let your child decorate the borders with crayons and fill empty spaces with stickers.
- Trim the edges to leave a half-inch border, then run the plate through the laminator for durability.


2. Pencil Topper Animals
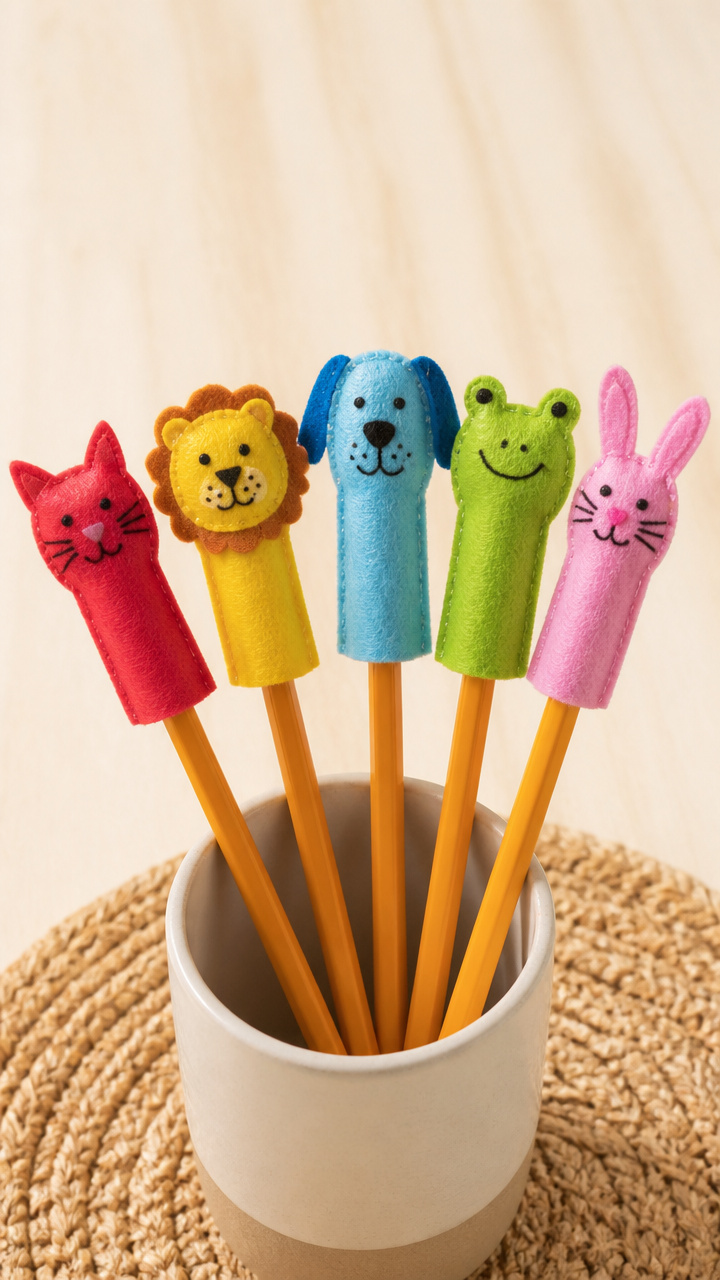
Fuzzy felt animals perch on top of pencils to make writing time more fun. These tiny creatures stay put with a snug slit design.
Materials Needed
- 1/4-inch thick craft felt sheets in assorted colors, 1 sheet each of red, yellow, blue, green, pink
- Scissors
- Fine-tip black marker
- Pencil with eraser
- Glue dots, 1 pack
How to Make It
- Cut a 2 by 1.5 inch rectangle from felt for the animal body, then shape ears or wings from contrasting colors.
- Draw eyes and details with the marker, then attach ears with a glue dot.
- Cut a 0.5-inch vertical slit on the bottom edge and slide it onto the pencil’s eraser end.


3. Crayon Name Puzzle
Chunky wooden letters fit into a custom tray so your child can build their name again and again. Sanding and painting make it smooth and bright.
Materials Needed
- 1/2-inch thick pine board, 6 by 8 inches
- Wood glue
- Numbered stencil set
- Acrylic paint in turquoise, yellow, and coral
- Fine-grit sandpaper
- Paintbrush, 1/2 inch flat
How to Make It
- Sand the board surface until smooth, then wipe away dust with a dry cloth.
- Paint the board with one color and let dry completely, about two hours.
- Glue wooden letters spelling your child’s name onto the board, spacing them evenly, and let set overnight.


4. Lunchbox Pop-Out Cards
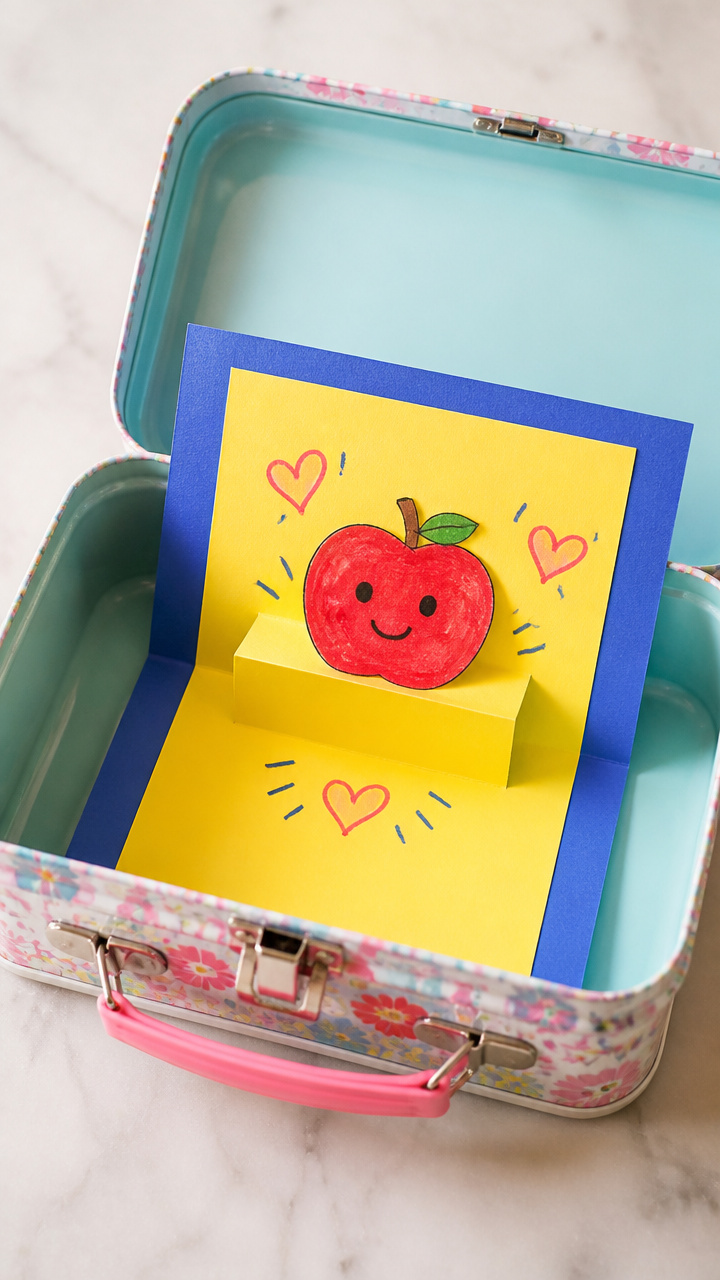
Bright folded cards with surprise flaps hide sweet messages inside. Tucking one into a lunchbox brings a smile at mealtime.
Materials Needed
- 6 by 6 inch construction paper, 1 sheet per color
- Glue stick
- Washable markers, assorted
- Scissors
- Ruler
How to Make It
- Fold a paper square in half to make a 3 by 6 inch card, creasing sharply with your fingernail.
- Cut three 0.25-inch slits across the center fold, then push the middle section forward to form a pop-out tab.
- Draw a picture on the front and write a message like 'Have fun today!' on the hidden flap.


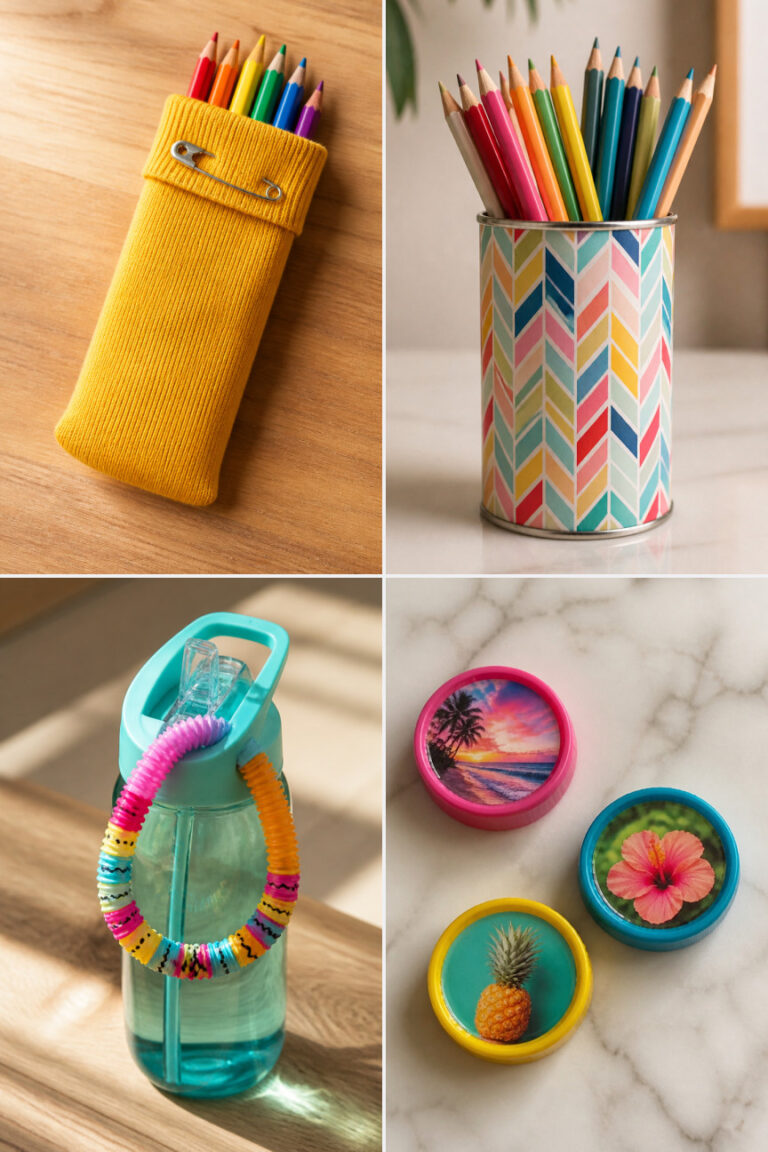
5. Glitter Glue Water Bottles
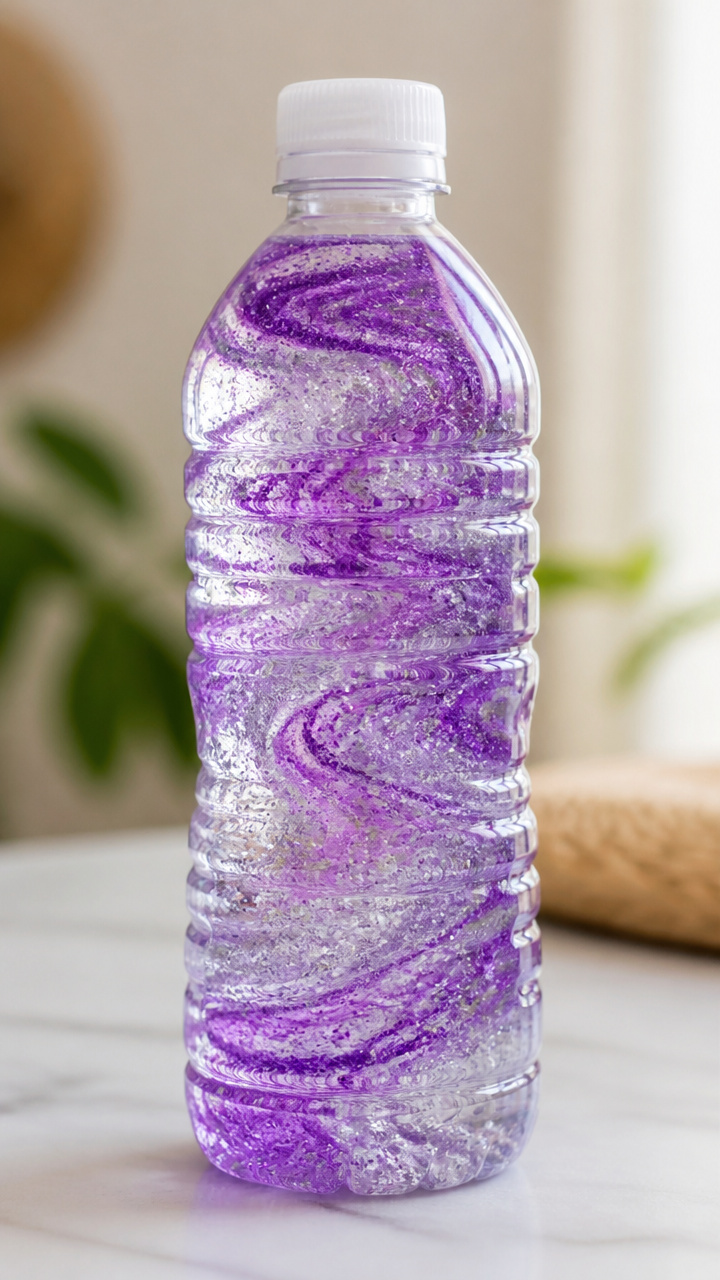
Clear plastic bottles shimmer with swirling color when you add glue and glitter. A tight lid keeps the magic inside.
Materials Needed
- Clear 12-ounce plastic water bottle with screw-top lid
- White school glue, 4 ounces
- Fine glitter in purple and silver, 1 tablespoon each
- Funnel
- Water, 1 cup
How to Make It
- Use the funnel to pour glue into the bottle, then add glitter on top.
- Fill the rest of the bottle with water, leaving a half-inch space at the top.
- Screw the lid on tightly, then shake well to mix. Seal the lid with clear tape for extra security.


6. Paper Plate Clocks
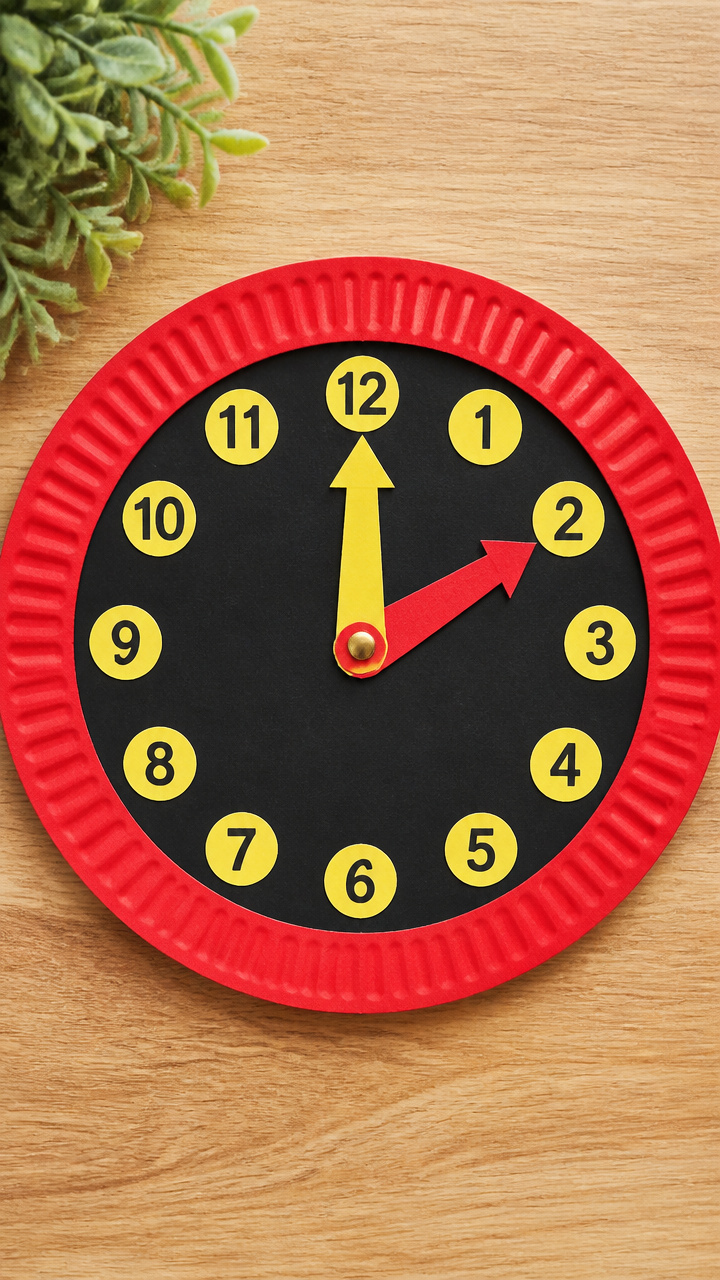
A working clock with moveable hands teaches time basics. Bright numbers and a spinning arrow make learning hands-on.
Materials Needed
- 9-inch paper plate, 1 per child
- Brass fastener, 1 per clock
- Cardstock in black, red, and yellow
- Scissors
- Black marker
How to Make It
- Write numbers 1 through 12 evenly spaced around the edge of the plate with the marker.
- Cut a short hour hand from black cardstock and a long minute hand from red.
- Poke a hole through the center of the plate and both hands, then secure them with the brass fastener.


7. Sock Puppet Pals
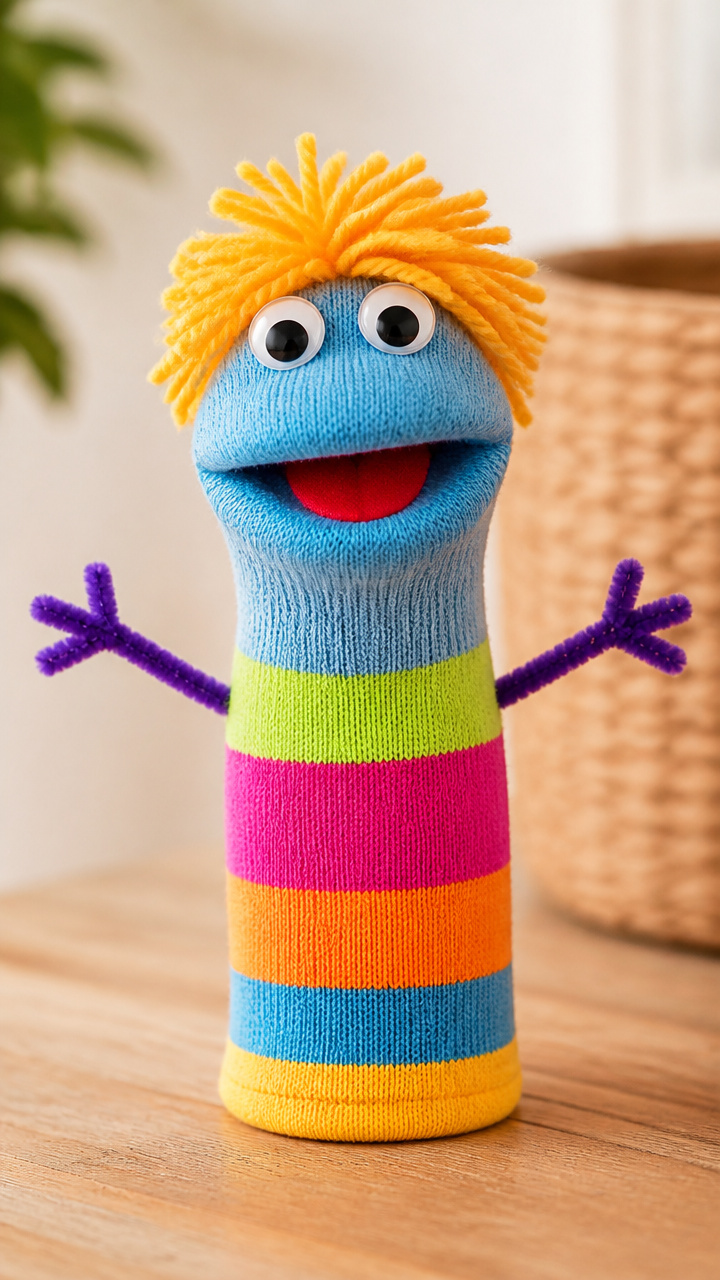
Old socks become classroom-ready characters with button eyes and yarn hair. These puppets help shy children share stories.
Materials Needed
- Clean cotton sock with heel, 1 per puppet
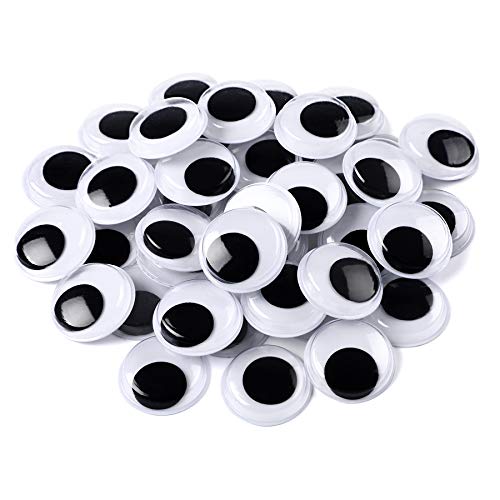
- Googly eyes, 10mm, 2 per puppet
- Craft glue
- Chenille stems in assorted colors
- Scissors
- Yarn scraps, 6 inches each
How to Make It
- Glue on googly eyes just above the heel of the sock and let dry for 15 minutes.
- Twist chenille stems into mouth shapes and tuck into the sock’s toe opening.
- Thread yarn through the top of the sock and knot to make hair, trimming ends evenly.


8. Crayon Holders from Jeans
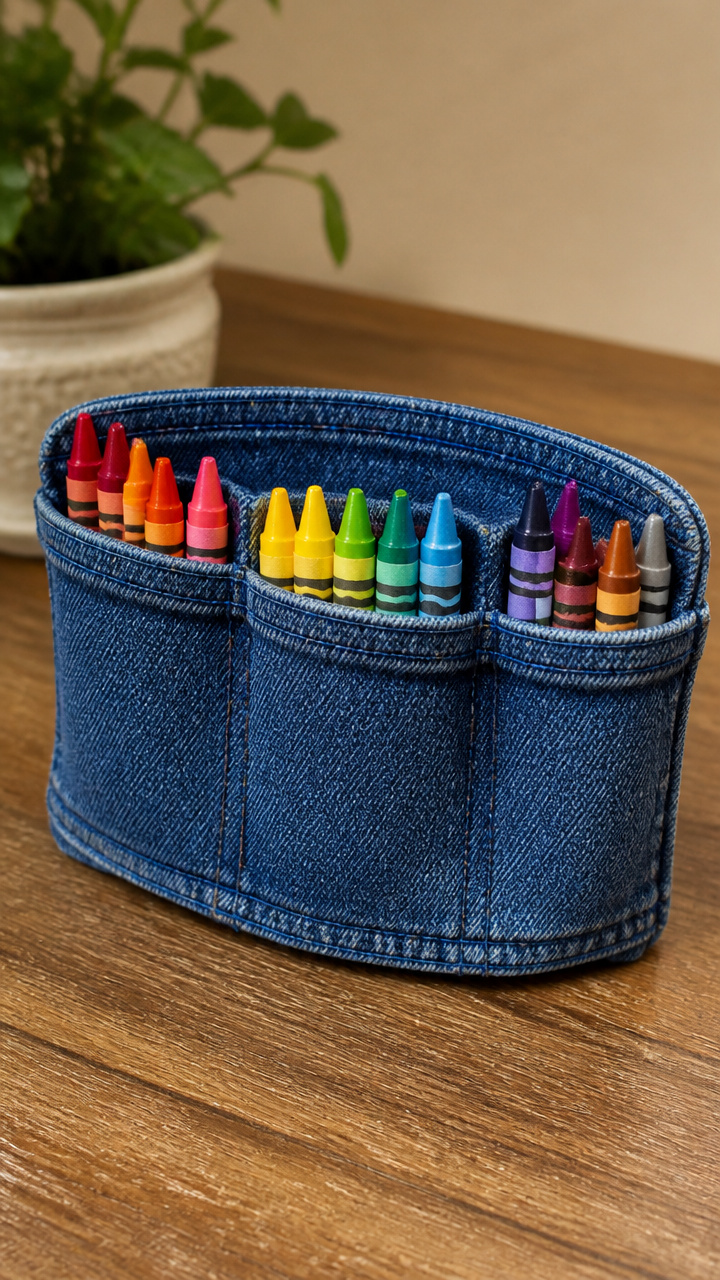
Soft denim pockets hold crayons neatly and fit right in a desk drawer. Upcycled fabric gives them a sturdy, homespun feel.
Materials Needed
- Old pair of blue jeans
- Fabric scissors
- Ruler
- Fabric marker
- Needle and blue thread
How to Make It
- Cut a 4 by 6 inch rectangle from the back pocket area of the jeans, including the seam.
- Fold the piece in half with right sides together and stitch up the side with a 0.5-inch seam.
- Turn right side out and leave the top open to slide in four standard crayons.
![OKKOSTAR Montessori Crayon Holder for Kids - Craft Supply Organizer - Classroom Storage Caddy Case - Perfect for Colored Pencils [Crayons or Pencils NOT Included] (Standard)](https://m.media-amazon.com/images/I/31WTtp5eRoL._SL500_.jpg)


9. Painted Rock Eraser Toppers

Smooth river rocks wear tiny paper hats that slide over erasers. Acrylic paint makes each one colorful and chip-resistant.
Materials Needed
- Smooth river rocks, 1.5 inches wide, 1 per child
- Acrylic paint in red, blue, and yellow
- Paintbrush, size 4 round
- White glue
- Cardstock scraps
- Scissors
How to Make It
- Paint each rock with one solid color and let dry completely, about one hour.
- Cut a 1 by 2 inch strip of cardstock and roll it into a tiny cylinder to fit over the eraser.
- Glue the cylinder to the flat side of the rock and let sit for 30 minutes before use.


10. Felt Backpack Tags
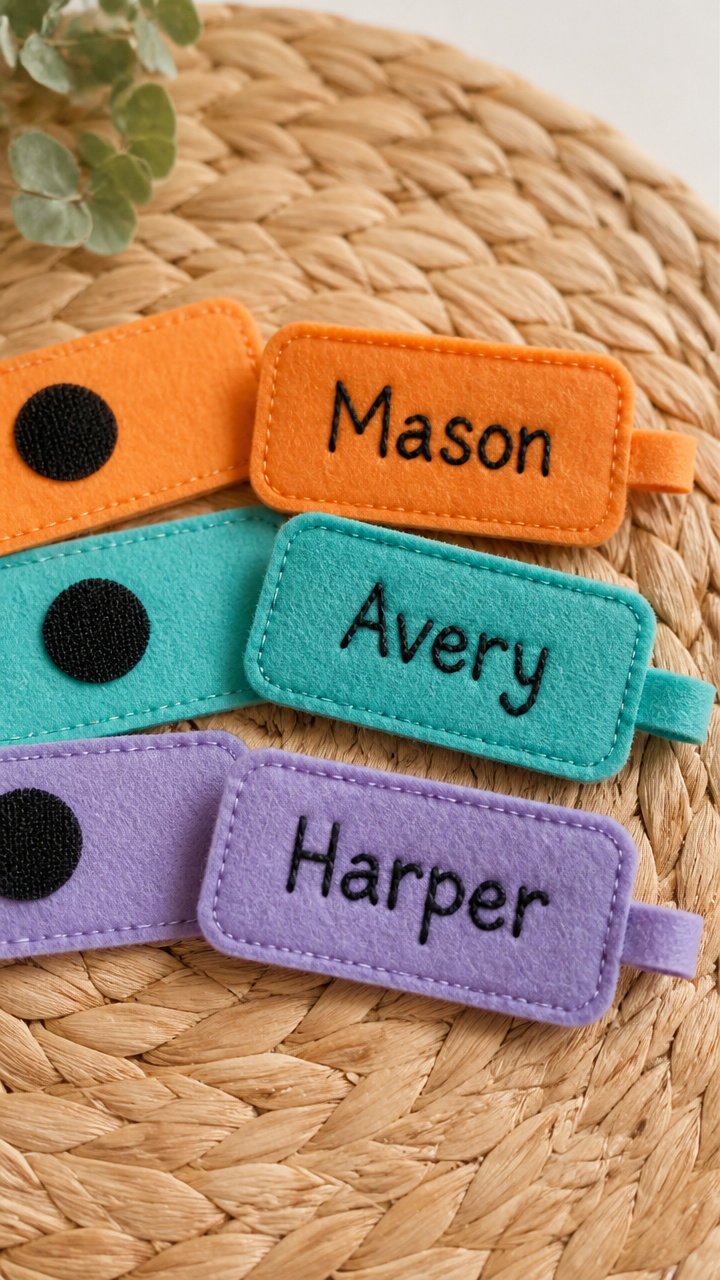
Soft tags with embroidered names stick to backpacks with Velcro. Felt resists wear and comes in cheerful colors.
Materials Needed
- Felt sheets in orange, teal, and lavender, 9 by 12 inches
- Embroidery floss in black
- Tapestry needle
- Scissors
- Hook-and-loop dots, 1-inch, 1 pair per tag
How to Make It
- Cut a 3 by 4 inch rectangle from felt and punch two holes at the top with scissors.
- Thread the needle and stitch your child’s name in block letters across the center.
- Glue one side of a hook-and-loop dot to the back of the tag and the other to the backpack.


11. Pasta Necklaces for Names
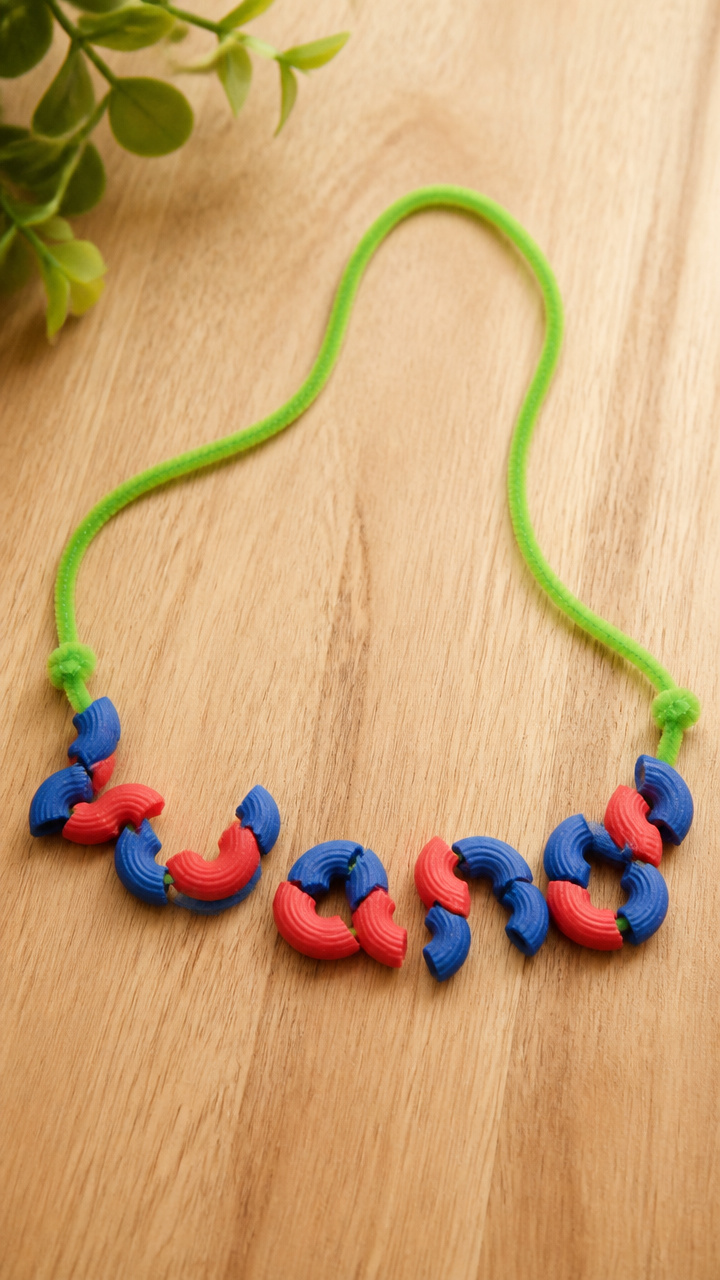
Colored macaroni forms each letter of a name on a soft cord. Painting and stringing builds focus and hand control.
Materials Needed
- Elbow macaroni, 20 pieces
- Red and blue food coloring
- Water, 1/2 cup
- Small bowls, 2
- Chenille stem, 1 per necklace
- Paper towels
How to Make It
- Mix 1/4 cup water with 5 drops of red food coloring in one bowl and blue in another. Soak 10 macaroni pieces in each for 10 minutes.
- Spread dyed pasta on paper towels to dry for one hour, flipping once.
- Bend the chenille stem in half and twist the ends to form a loop, then thread painted pasta to spell your child’s first name.


12. Tissue Paper Apple Jars
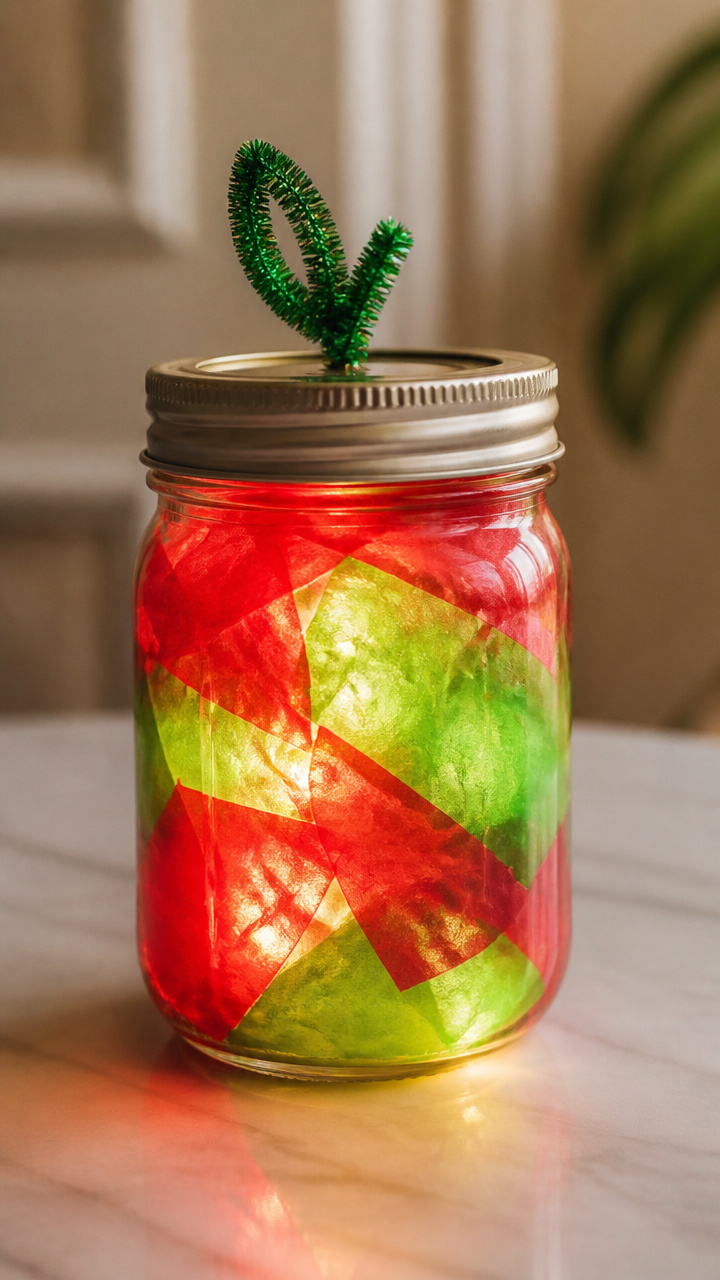
Clear jars glow with layered red and green tissue paper. A pipe cleaner stem finishes the look of a shiny apple.
Materials Needed
- Clear glass jar with lid, 4 ounces
- Red and green tissue paper, 2 sheets each
- Scissors
- Glue stick
- Green chenille stem, 1
How to Make It
- Cut tissue paper into 1-inch squares and layer them inside the jar, alternating red and green.
- Press each layer lightly with your finger to fill the jar to the top.
- Twist the chenille stem around the lid to make a stem and screw the lid back on.


13. Handprint Leaf Mobile
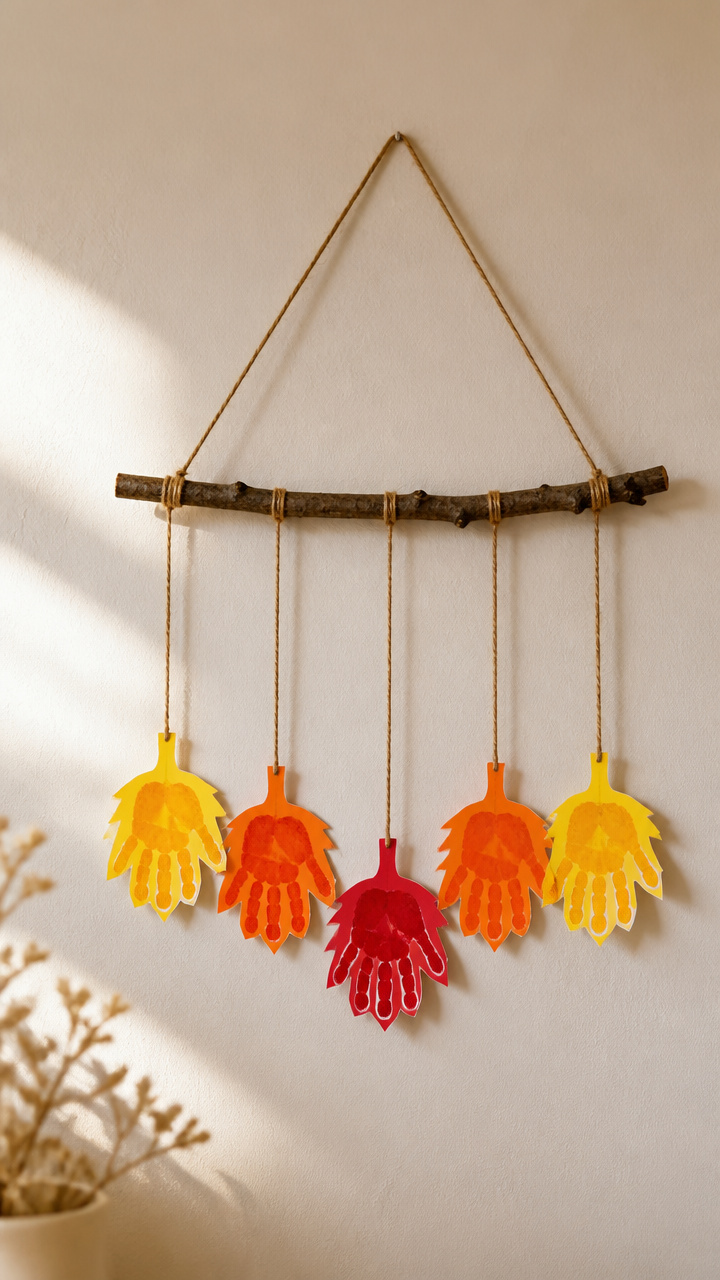
Five handprints on paper become autumn leaves that dangle from a stick. A quick-dry paint means little hands stay clean.
Materials Needed
- Fingerprint paint in yellow, orange, and red
- White drawing paper, 9 by 12 inches
- Natural twig, 8 inches long
- Jute string, 12 inches
- Hole punch
- Scissors
How to Make It
- Press your child’s hand into paint and stamp five prints on the paper, letting each dry for 10 minutes.
- Cut around each print to shape a leaf, then punch a hole near the wrist line.
- Cut five 8-inch string pieces, tie one to each leaf, then knot all to the twig for hanging.


![Crayola Washable Finger Paints (6ct), Teacher Classroom Must Haves, Toddler Paint Set, Nontoxic Finger Paint for Kids, Arts & Crafts Supplies for Toddlers [Amazon Exclusive]](https://m.media-amazon.com/images/I/51BwKeRZEBL._SL500_.jpg)
14. Button Backpack Charm
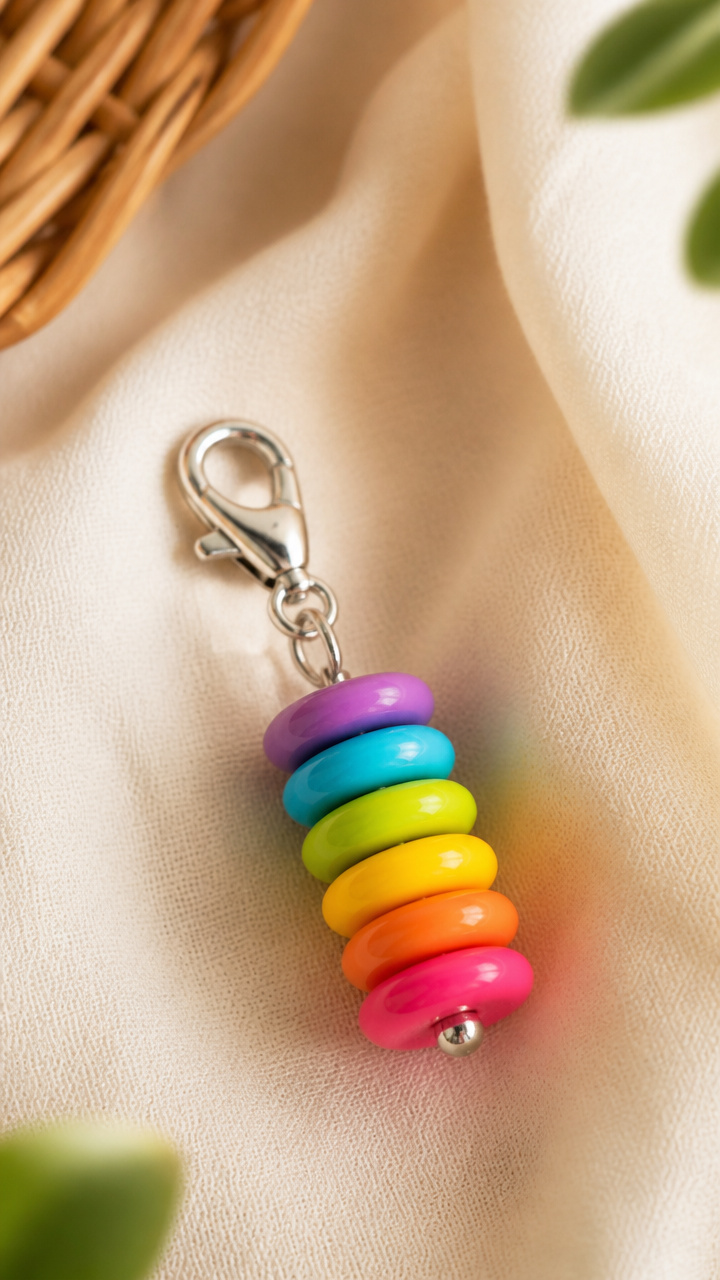
Colorful buttons stack on a headpin to make a jiggly charm. A lobster clasp lets it snap right onto zippers.
Materials Needed
- Plastic buttons in assorted sizes and colors, 5 per charm
- Headpin, 1.5 inches, 1 per charm
- Pliers
- Lobster clasp with jump ring, 1 per charm
How to Make It
- Slide buttons onto the headpin in your child’s favorite order, starting with the largest at the bottom.
- Use pliers to bend the top of the pin into a loop just above the last button.
- Attach the jump ring to the loop, then clip the lobster clasp to the ring for easy fastening.


15. Chalkboard Pencil Labels
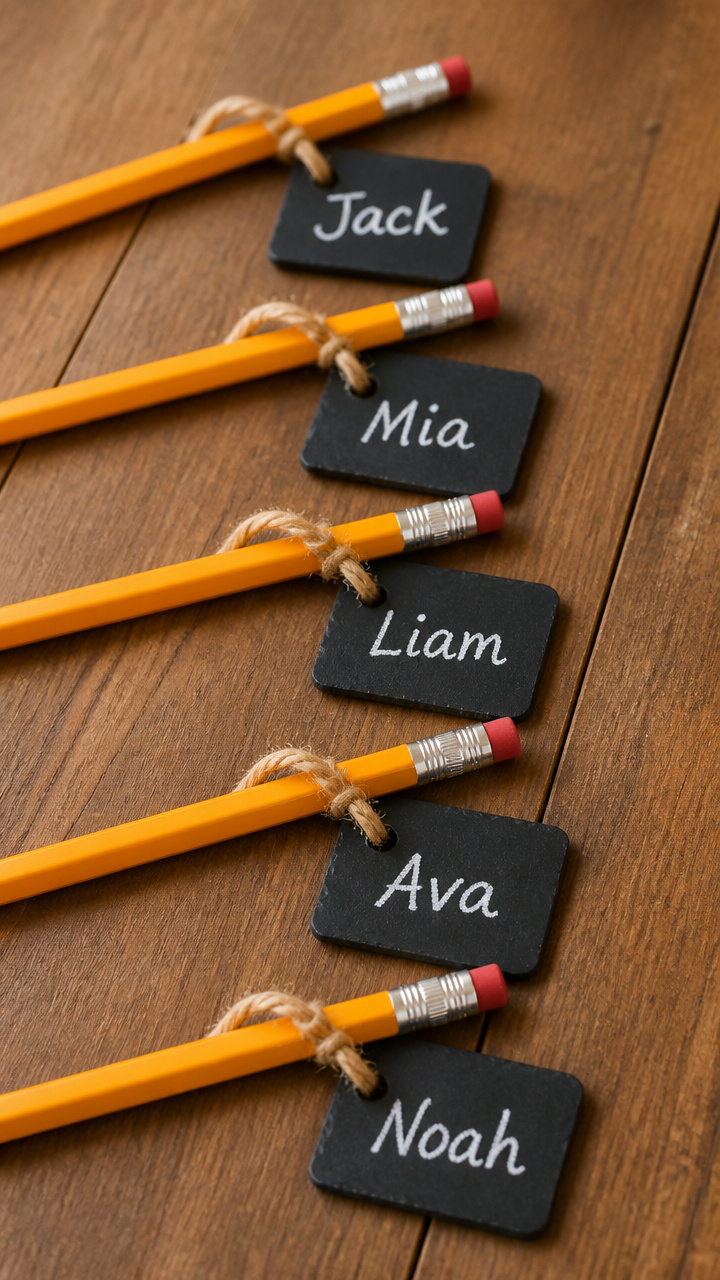
Mini chalkboard tags tie onto pencils with twine. Chalk lets your child change their name whenever they like.
Materials Needed
- Small chalkboard tiles, 1.5 by 2 inches, 1 per pencil
- White chalk
- Twine, 6 inches per label
- Black permanent marker
How to Make It
- Write your child’s name in chalk across the center of the tile, using block letters.
- Cut a 6-inch piece of twine and tie it around the pencil, then knot the ends through the tile’s pre-drilled hole.
- Let your child erase and rewrite their name each day with fresh chalk.


These crafts bring a little bit of home into the classroom and let your preschooler shine with pride. With each finished piece, you’re not just making supplies—you’re building confidence, one snip, paint stroke, and sticker at a time.