15 Summer Paper Crafts for Preschoolers That Build Fine Motor Skills
Summer is the perfect time to slow down and create with your little ones. Simple paper crafts offer more than just fun, they help preschoolers strengthen hand muscles, improve coordination, and practice focus.
Each of these projects uses basic supplies you likely have at home. They’re designed to be engaging for young hands while building real skills through folding, cutting, gluing, and coloring.
1. Paper Plate Sun with Ray Strips
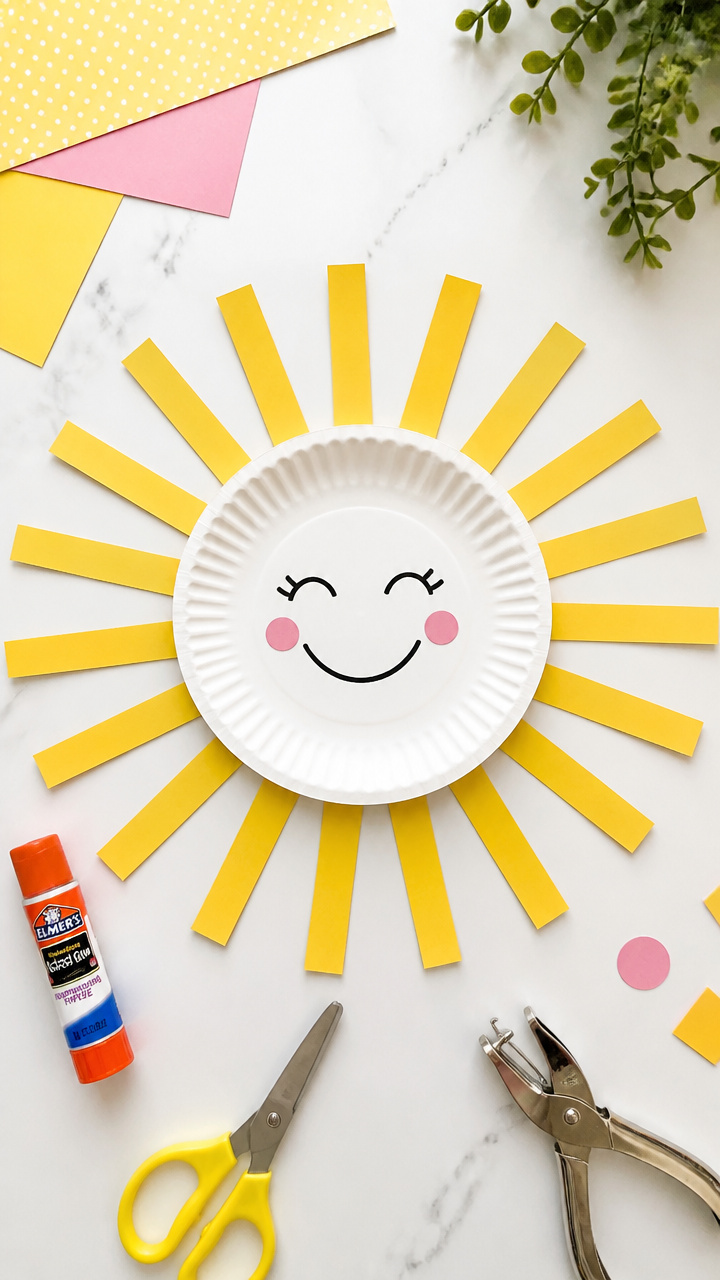
Bright yellow rays fan out from a smiling sun made on a paper plate. This craft strengthens pincer grasp during fringe cutting and encourages pattern making.
Materials Needed
- 1 white paper plate per child
- Yellow construction paper
- Child-safe scissors
- Glue stick
- Black marker
- Hole punch
How to Make It
- Cut strips 1 inch wide and 6 inches long from yellow construction paper, about 12 per sun.
- Make small snips along one long edge of each strip, every half inch, to create fringe rays.
- Apply glue to the unfringed end of each strip and press around the outer edge of the paper plate.
- Draw a face in the center with a black marker and punch two holes at the top for hanging.
2. Pasta Collage Butterflies

Butterfly wings come alive with dyed pasta shapes glued in symmetrical patterns. This activity builds precision and hand-eye coordination.
Materials Needed
- A4 white cardstock
- Cooked elbow macaroni, dyed red and blue (1 tablespoon each color)
- Glue stick
- Black pipe cleaner
- Scissors
- Pencil
How to Make It
- Fold cardstock in half and draw half a butterfly wing shape along the fold using pencil.
- Cut along the line while folded to make a symmetrical butterfly shape.
- Open the paper and apply glue to one wing section, then place dyed pasta pieces in a pattern.
- Repeat on the other side to mirror the design and twist a cut pipe cleaner into antennae at the top.
3. Tissue Paper Ocean Window
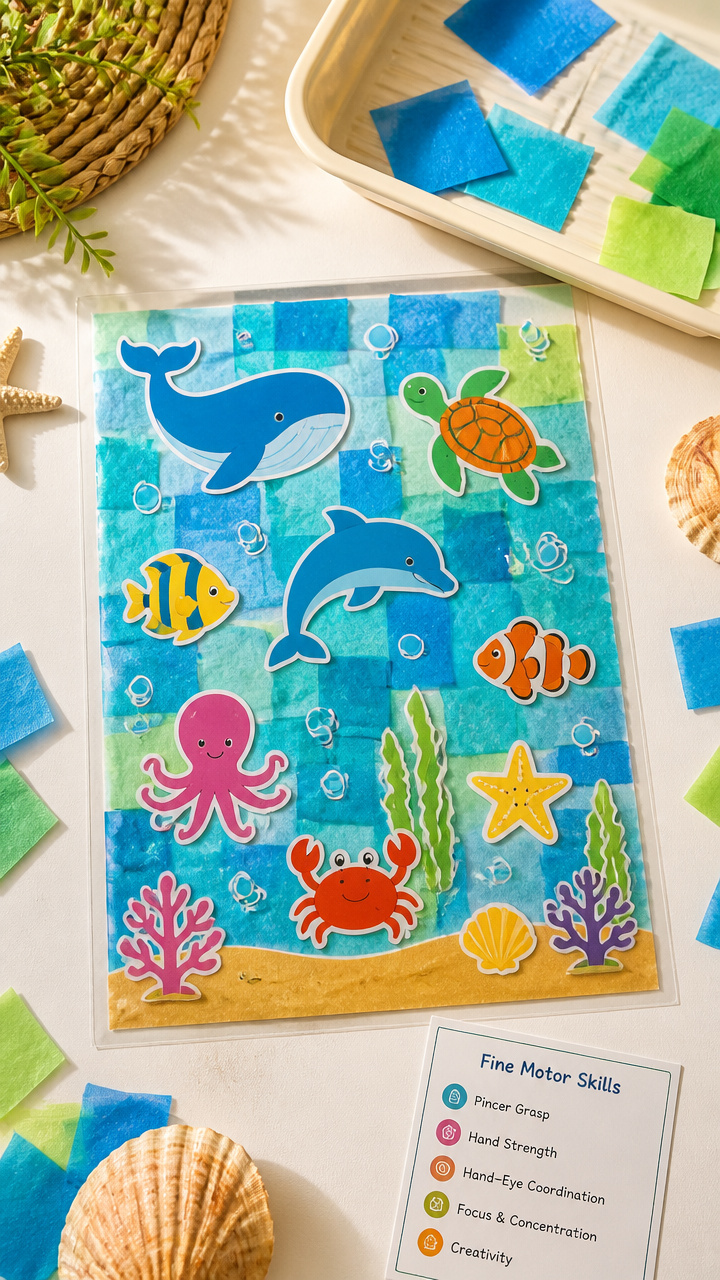
Wavy layers of blue tissue paper create an underwater scene that sticks to windows. Crumpling and placing small pieces boosts fingertip control.
Materials Needed
- 8.5 x 11 clear contact paper sheet
- Blue and green tissue paper squares, 1 inch each (20 per child)
- Child-safe scissors
- Plastic tray
- Ocean animal stickers
How to Make It
- Peel the backing off the contact paper and lay it sticky side up on the tray.
- Tear or cut tissue paper into 1 inch squares and crumple each into a tiny ball.
- Press the tissue balls onto the sticky surface in wavy layers to mimic water.
- Add ocean animal stickers and seal with another sheet of contact paper if needed.
4. Straw Blown Paint Creations
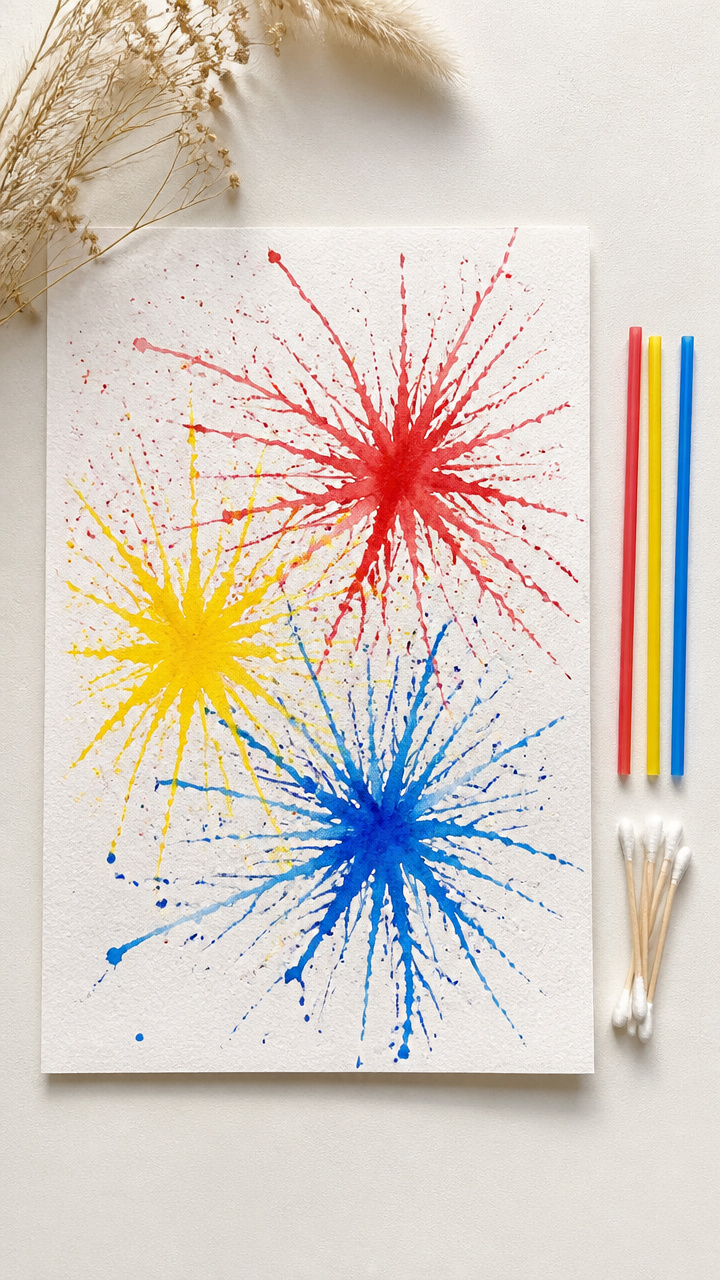
Swirling paint lines made by blowing through straws develop breath control and hand stability. Each artwork is unpredictable and full of motion.
Materials Needed
- A4 heavy white drawing paper
- Red, yellow, and blue liquid watercolor (1 teaspoon each color in cups)
- Plastic drinking straws
- Cotton swabs
- Smock
How to Make It
- Place a drop of each color near the center of the paper using a cotton swab.
- Dip one end of the straw into a color drop and blow gently across the page to spread paint.
- Repeat with other colors, switching straws or wiping with a paper towel between colors.
- Let dry flat for 20 minutes before displaying.
5. Cardboard Tube Caterpillars
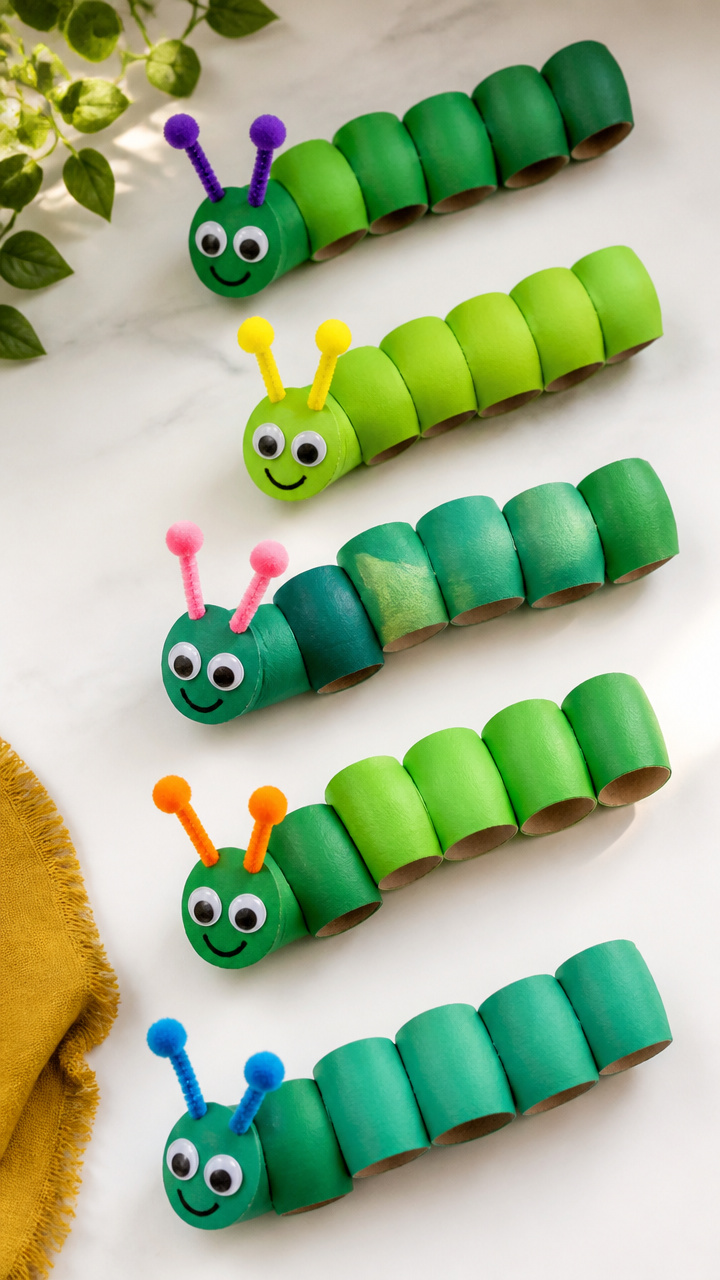
Rolled cardboard tubes link together to form bumpy caterpillars. Rolling and taping supports bilateral coordination and finger strength.
Materials Needed
- Toilet paper rolls (5 per caterpillar)
- Green tempera paint
- Paintbrush
- White glue
- Chenille stems (2 per child)
- Googly eyes, 0.5 inch (2 per child)
How to Make It
- Paint each roll solid green and let dry for 15 minutes on a drying rack.
- Overlap the ends of two rolls slightly and secure with a dab of glue.
- Continue gluing rolls in a curved line until all five are connected.
- Glue on googly eyes and twist chenille stems into antennae at the head.
6. Lacing Card Frogs
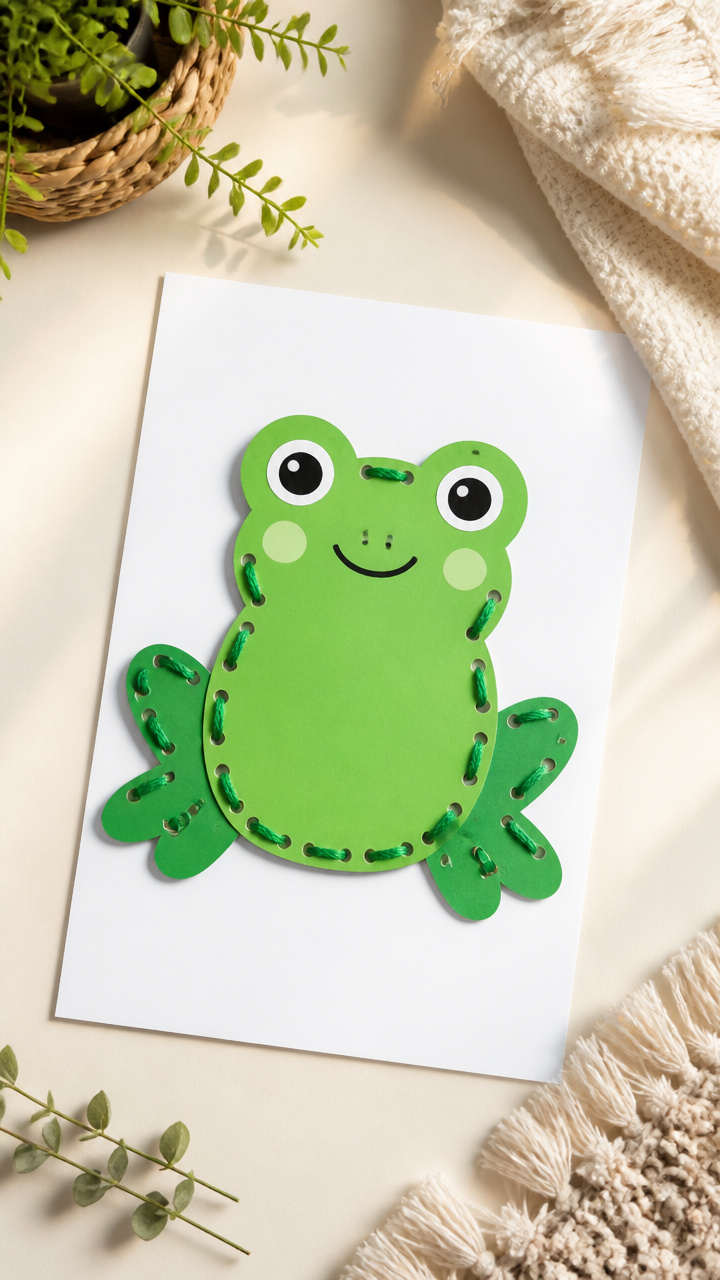
Sturdy frog-shaped cards with punched holes invite lacing with yarn. Threading improves hand dominance and concentration.
Materials Needed
- Green cardstock, A4 size
- Frog template (3 inch tall)
- Hole punch
- Yarn, 18 inches long per child
- Tape
- Scissors
How to Make It
- Trace and cut out a frog shape from green cardstock using the template.
- Punch holes evenly around the edge, about 0.5 inch apart, using the hole punch.
- Tape one end of the yarn to make a stiff tip for easier threading.
- Thread the yarn in and out of the holes all the way around the frog shape.
7. Tong Transfer Beach Buckets
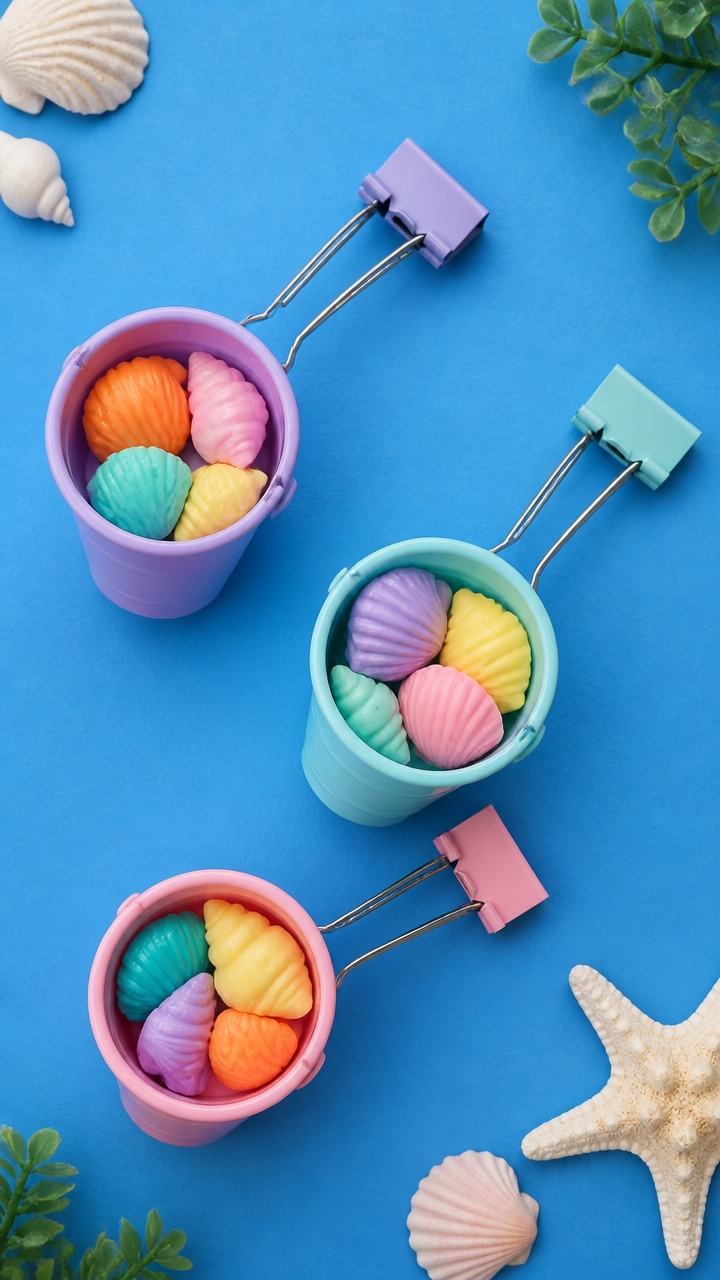
Mini seashells move from bowl to bucket using tongs. This sensory game builds grip strength and control.
Materials Needed
- Small plastic buckets (3 oz, 1 per child)
- Plastic seashells (10 per child)
- Medium binder clips (1 per child)
- Blue construction paper
- Glue stick
How to Make It
- Cut a handle shape from blue construction paper and glue it to both sides of the bucket.
- Place shells in a bowl next to the decorated bucket.
- Use the binder clip as a tong to pick up one shell at a time and place it in the bucket.
- Empty and repeat for continued practice.
8. Folded Fan Fish
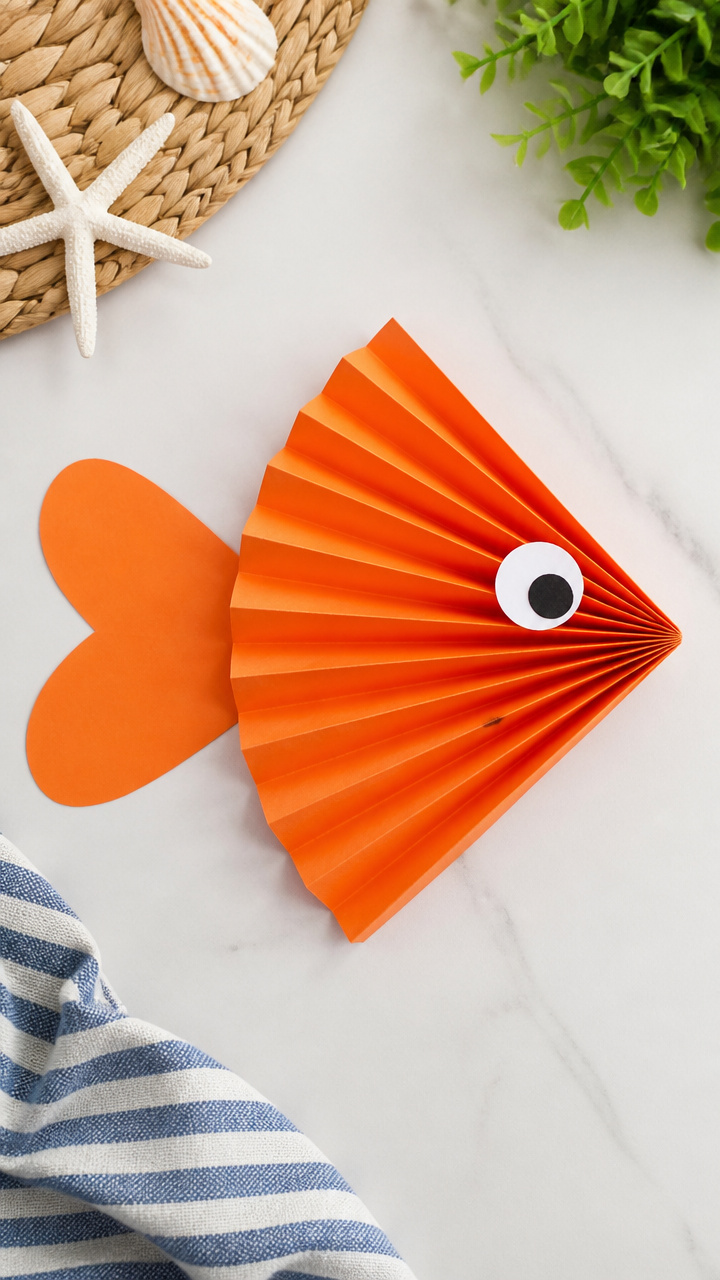
Accordion folds form a fish body that fans open and closed. Folding teaches spatial awareness and finger isolation.
Materials Needed
- 6 x 9 inch orange construction paper
- Ruler
- Pencil
- Glue stick
- White paper for eye
- Scissors
How to Make It
- Use the ruler and pencil to mark lines every 0.75 inch along the short edge of the paper.
- Fold each line back and forth in opposite directions to create an accordion fold.
- Glue the outer panels together to form a circle that can open like a fan.
- Cut and glue a paper eye and triangle tail to complete the fish.
9. Crumpled Paper Pineapples
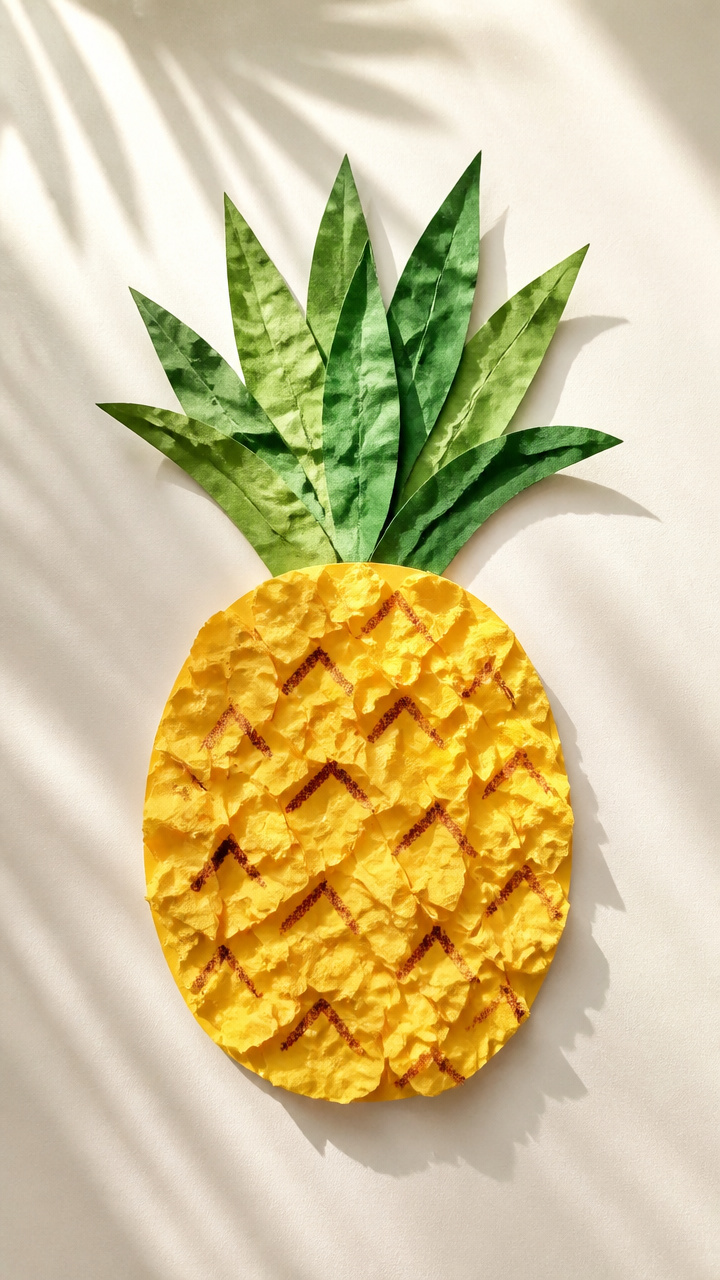
Golden yellow paper balls cover a pineapple shape for a tactile collage. Crumpling strengthens whole-hand grip.
Materials Needed
- A4 yellow construction paper
- Brown crayon
- Pineapple template (vertical oval, 5 inch tall)
- Glue stick
- Scissors
How to Make It
- Cut the pineapple shape from white paper using the template.
- Tear yellow paper into 1 inch pieces and crumple each into a tight ball.
- Dot glue over the pineapple shape and press each crumpled ball into place side by side.
- Color the leaf area at the top with the brown crayon.
10. Paper Chain Kites
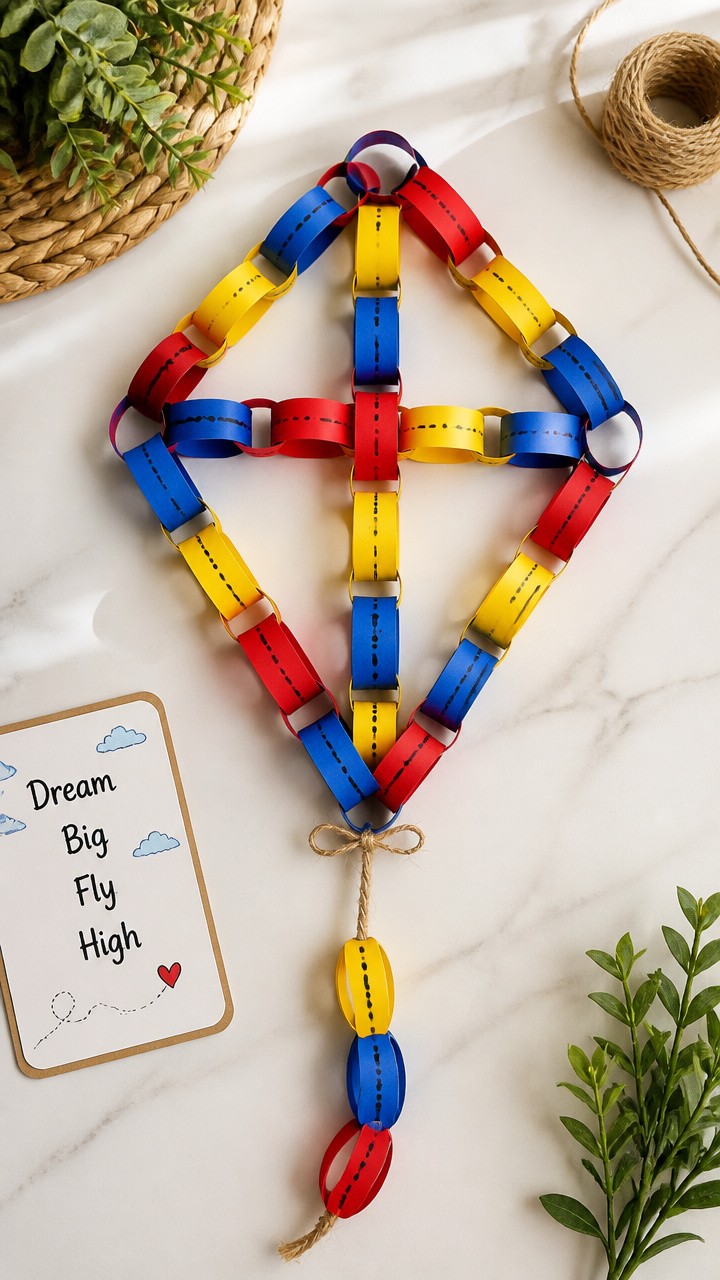
Linked loops of colorful paper flutter like kites in the wind. Cutting and linking build sequencing and attention.
Materials Needed
- Red, blue, and yellow construction paper (1 sheet each)
- Child-safe scissors
- Glue stick
- Black marker
- String, 12 inches
How to Make It
- Cut each sheet into 1 inch wide strips, about 12 inches long.
- Form a loop with one strip and glue the ends together.
- Thread a second strip through the first loop before gluing it shut to link.
- Continue linking different colors into a chain of 8 loops and draw a face on the first loop.
11. Thumbprint Flower Gardens
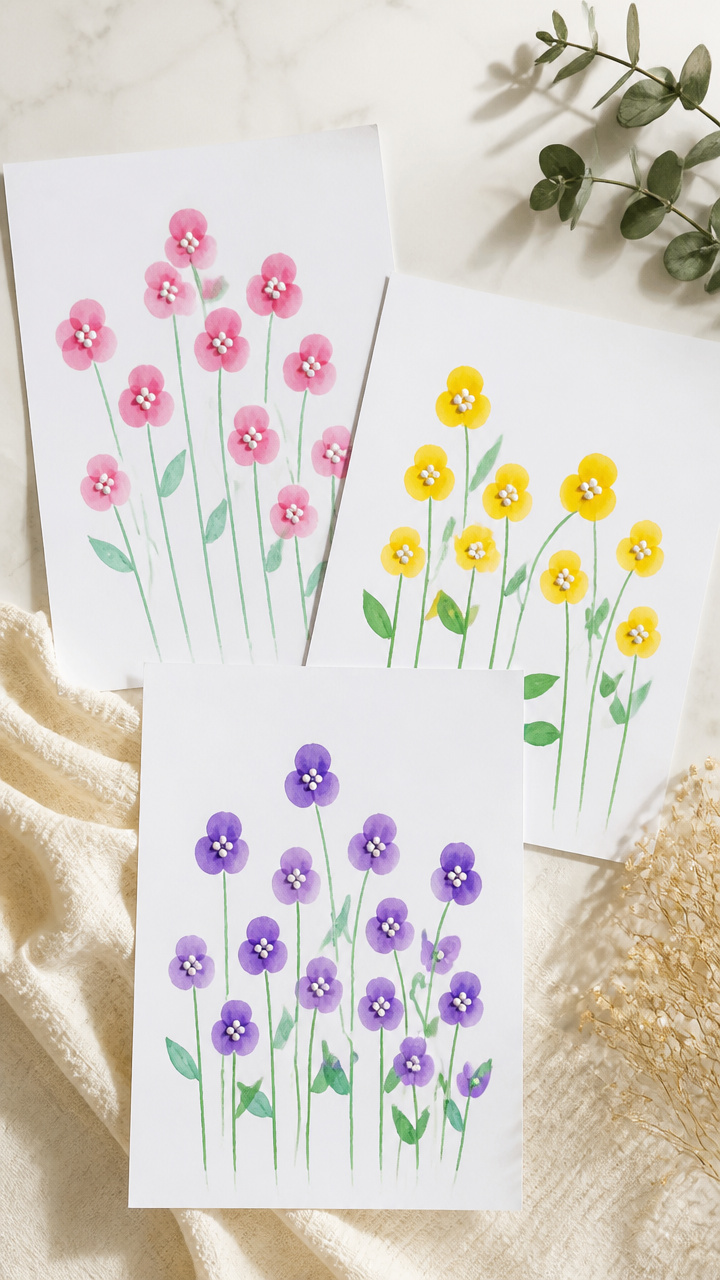
Garden scenes grow from colorful thumbprints and drawn stems. Pressing thumbs builds pressure awareness.
Materials Needed
- A4 white drawing paper
- Pink, yellow, and purple washable ink pads
- Green washable marker
- Cotton swab
- Water cup
How to Make It
- Press a clean thumb into one ink pad and stamp several dots in a cluster to form a flower.
- Repeat with different colors to make multiple flowers on the page.
- Draw a stem and leaves with the green marker from each flower to the bottom.
- Dip the cotton swab in water and gently dot centers of flowers for detail.
12. Popcorn Box Boats
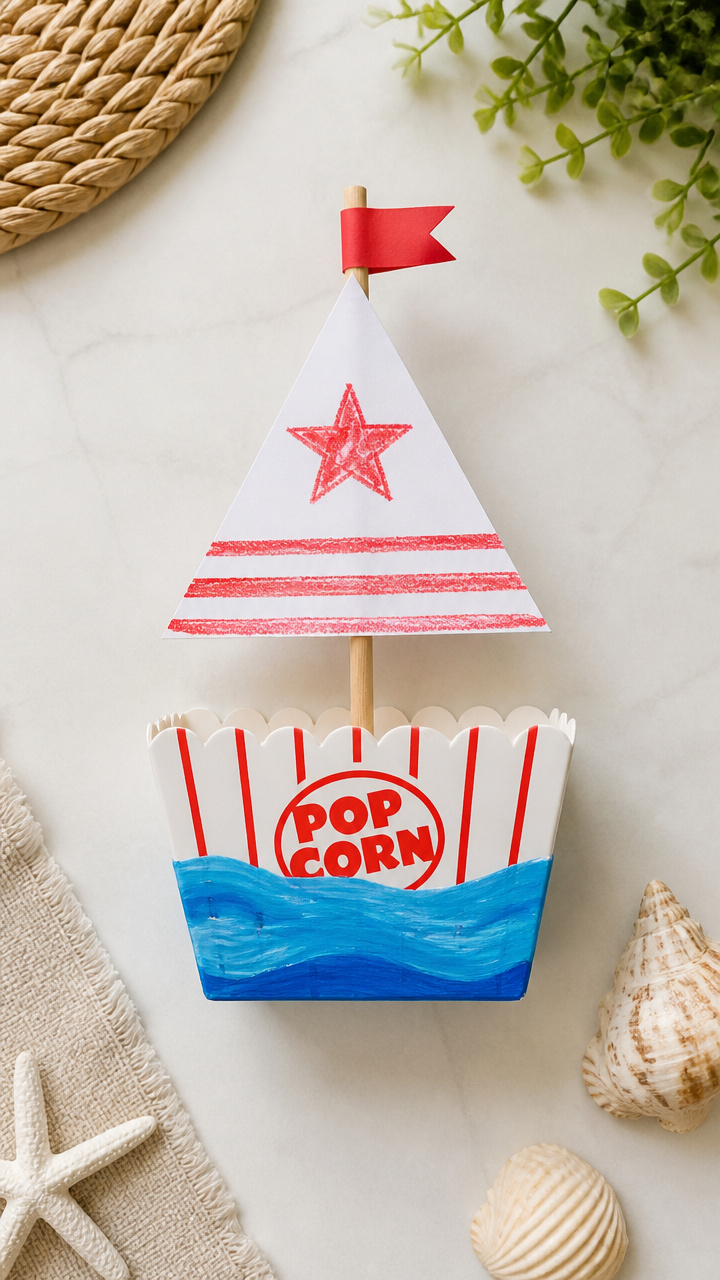
Mini cardboard boxes become sailboats with paper sails. Gluing and decorating support sustained focus.
Materials Needed
- Empty popcorn gift boxes (5 inch long, 1 per child)
- White construction paper
- Blue paint
- Paintbrush
- Glue stick
- Red crayon
How to Make It
- Paint the box blue and let dry for 15 minutes on a tray.
- Cut a triangle sail from white paper and color the edges red with the crayon.
- Glue the sail to the inside center of the boat so it stands upright.
- Draw waves on the sides of the boat with leftover blue paint.
13. Shredded Paper Turtles
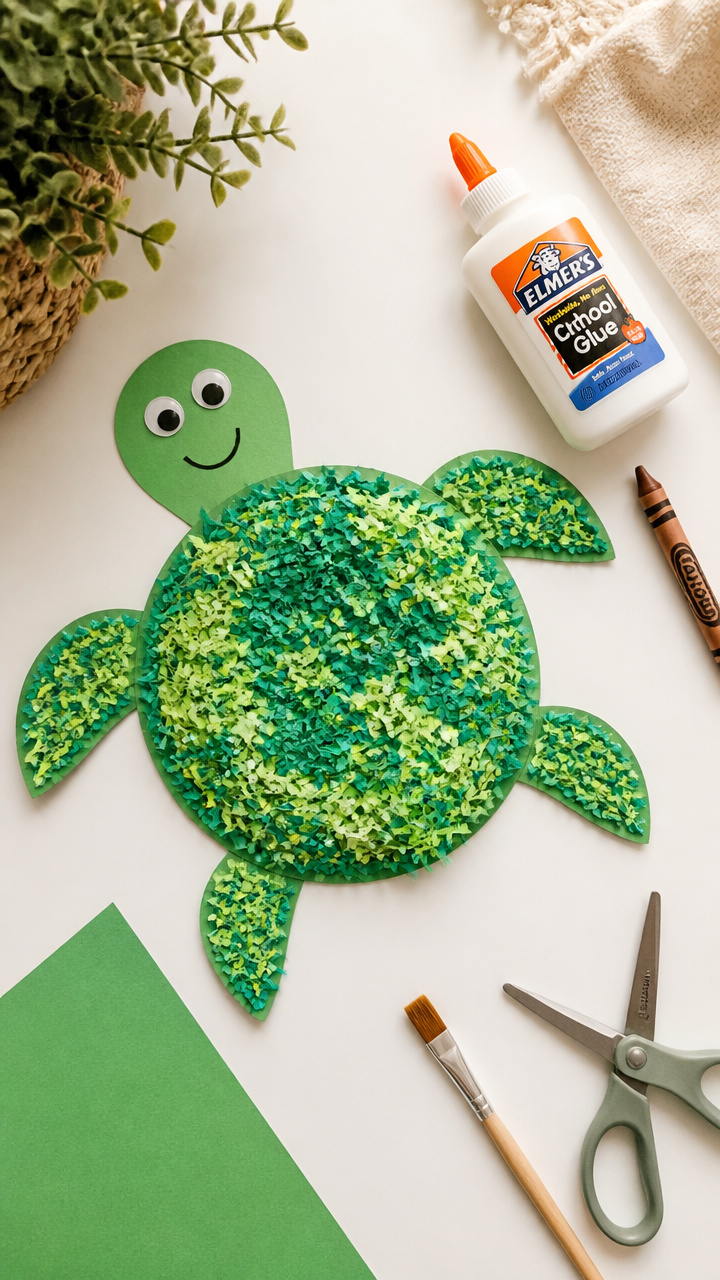
Turtle shells take shape with shredded green paper pressed into place. Shredding and placing boost manual dexterity.
Materials Needed
- A4 green construction paper
- Turtle template (circular body, 6 inch diameter)
- White glue
- Brown crayon
- Scissors
- Paintbrush
How to Make It
- Cut the turtle body from white paper using the template.
- Use scissors to carefully shred green paper into 0.25 inch wide strips, about 2 inches long.
- Brush glue over the turtle shape and press shredded pieces tightly together to fill the shell.
- Color the head and legs with the brown crayon after the glue dries.
14. Clothespin Flip Crocodiles
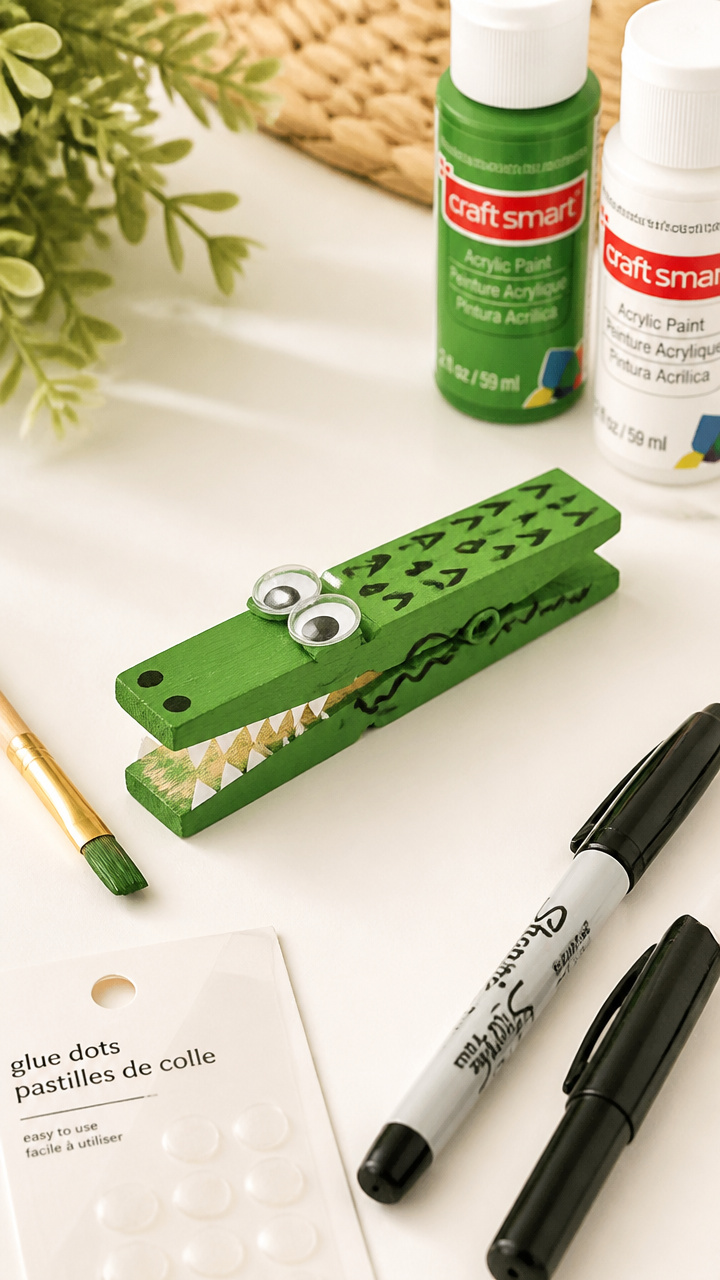
Wooden clothespins open and close like crocodile jaws. Painting and clipping builds fine motor endurance.
Materials Needed
- Wooden clothespin (1 per child)
- Green acrylic paint
- Paintbrush
- White googly eyes (2 per child)
- Glue dot
- Black marker
How to Make It
- Paint the entire clothespin green and let dry for 10 minutes on wax paper.
- Stick a glue dot on each side of the top and attach a googly eye.
- Draw teeth along the inner jaw edges with the black marker.
- Squeeze and release the clothespin to make the crocodile snap.
15. Sandpaper Star Paths
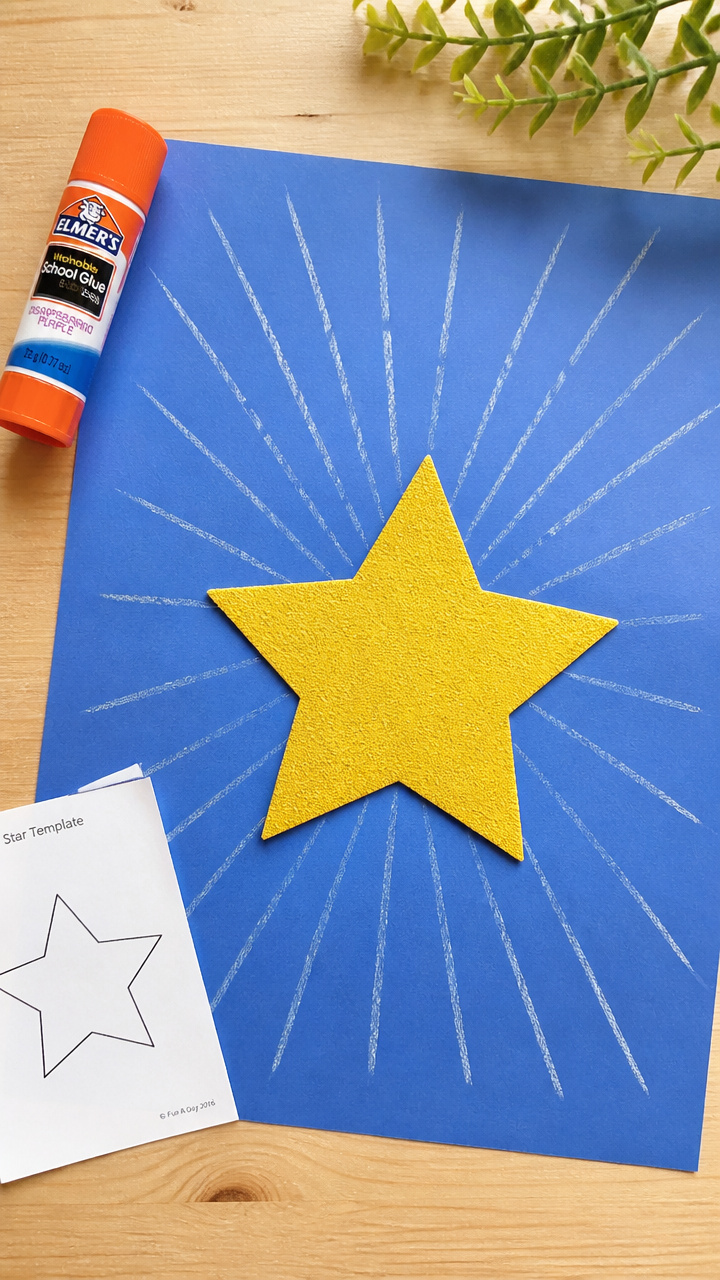
Bumpy star shapes guide finger tracing over textured lines. Tracing supports pre-writing muscle memory.
Materials Needed
- Yellow sandpaper sheets (9 x 12 inch)
- Star template (4 inch wide)
- White chalk
- Glue stick
- Blue construction paper
How to Make It
- Trace and cut a star from yellow sandpaper using the template.
- Glue the star to the center of blue construction paper.
- Use white chalk to draw a dotted path starting at one point and spiraling toward the center.
- Trace the path slowly with your index finger, following the bumpy texture.
These simple paper crafts bring summer joy while quietly strengthening the small muscles your child needs for writing and daily tasks. Pick one that matches their mood today and start creating together.