15 No-Mess Summer Crafts for Kids Under 30 Minutes
Summer days with little ones call for simple, joyful activities that spark creativity without taking over the house. These crafts use easy-to-find supplies and wrap up fast, leaving more time for play, snacks, and naps.
Each idea is designed to be clean, quick, and fun for tiny hands. You’ll find surprises in everyday materials and moments of pride in every finished piece.
1. Cotton Ball Sun Art
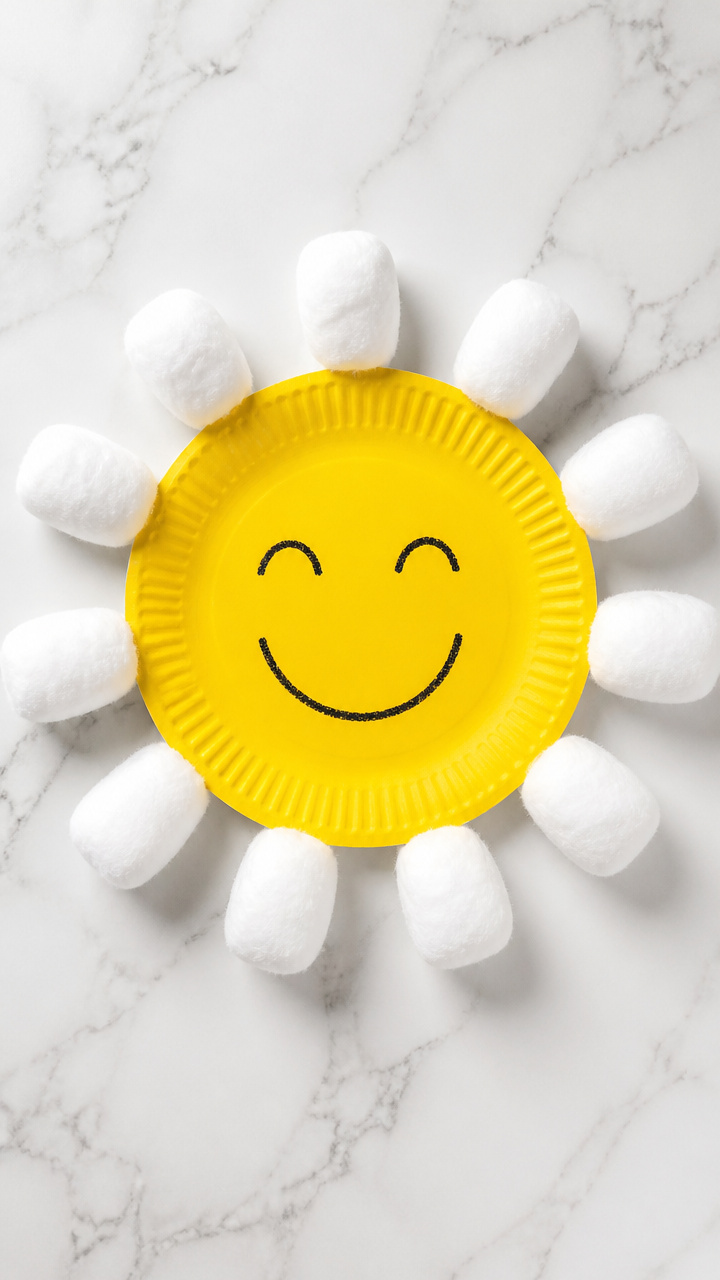
Bright yellow suns made with fluffy cotton balls bring soft texture and bold color to any wall. This craft builds fine motor skills while keeping sticky fingers at bay.
Materials Needed
- 1 large yellow paper plate per child
- 12 white cotton balls per child
- Yellow washable glue (2 oz bottle)
- 1 black crayon
- Scissors
How to Make It
- Cut out the center of the paper plate to leave a ring, forming the sun’s outer edge.
- Draw a smiling face on the ring with the black crayon.
- Squeeze small dots of glue around the back of each cotton ball.
- Press the cotton balls onto the outer rim of the plate to create fluffy rays.
2. Popsicle Stick Butterflies
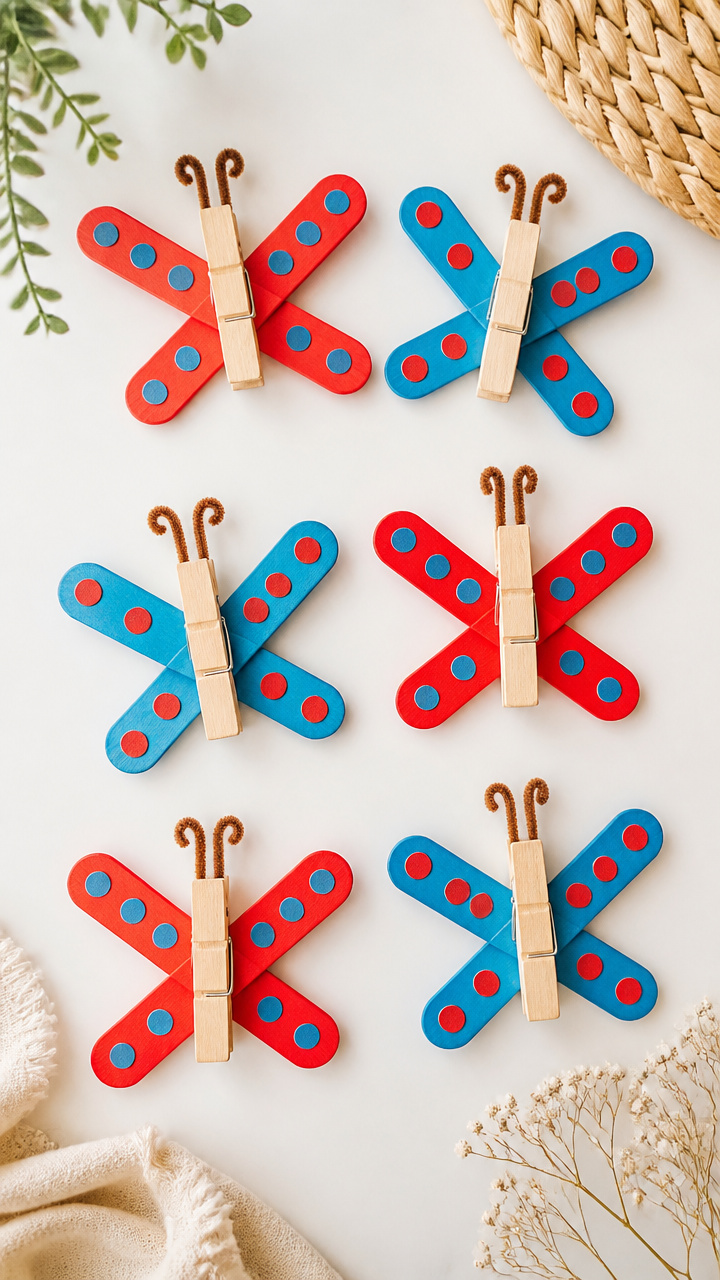
Lightweight butterflies with colorful wings flutter when held on sticks. Kids love making them dance in front of fans or windows.
Materials Needed
- 2 popsicle sticks per child
- 1 clothespin per child
- Red dot stickers (1 sheet)
- Blue dot stickers (1 sheet)
- Glue stick
How to Make It
- Place one popsicle stick vertically and clip the clothespin horizontally across its center.
- Use the glue stick to attach red and blue dot stickers in a pattern on both sides of the clothespin to form wings.
- Let the glue set for two minutes before opening and closing the wings to make them flap.
3. Tissue Paper Flower Jars
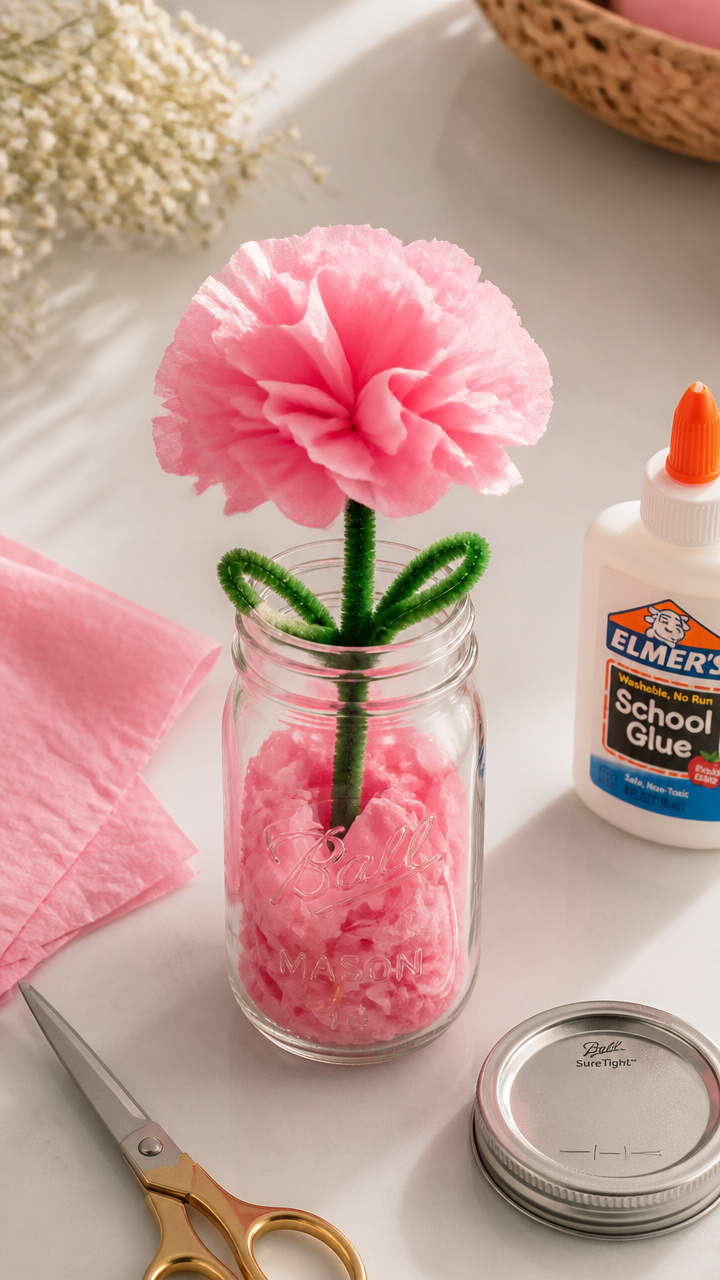
Mini mason jars bloom with crinkled tissue paper flowers that stay fresh forever. The soft colors catch the light beautifully on shelves or tables.
Materials Needed
- 4 oz clear glass mason jar with lid
- Pink tissue paper (1 full sheet)
- Green pipe cleaner (1 per child)
- White school glue (4 oz bottle)
- Scissors
How to Make It
- Cut the tissue paper into 6-inch squares, then layer three squares together.
- Accordion-fold each stack lengthwise into 1-inch folds, then pinch the center with your fingers.
- Twist the green pipe cleaner around the pinched center to secure it.
- Gently pull apart each tissue layer to form a fluffy flower and glue the base to the outside of the jar lid.
4. Aluminum Foil Boats
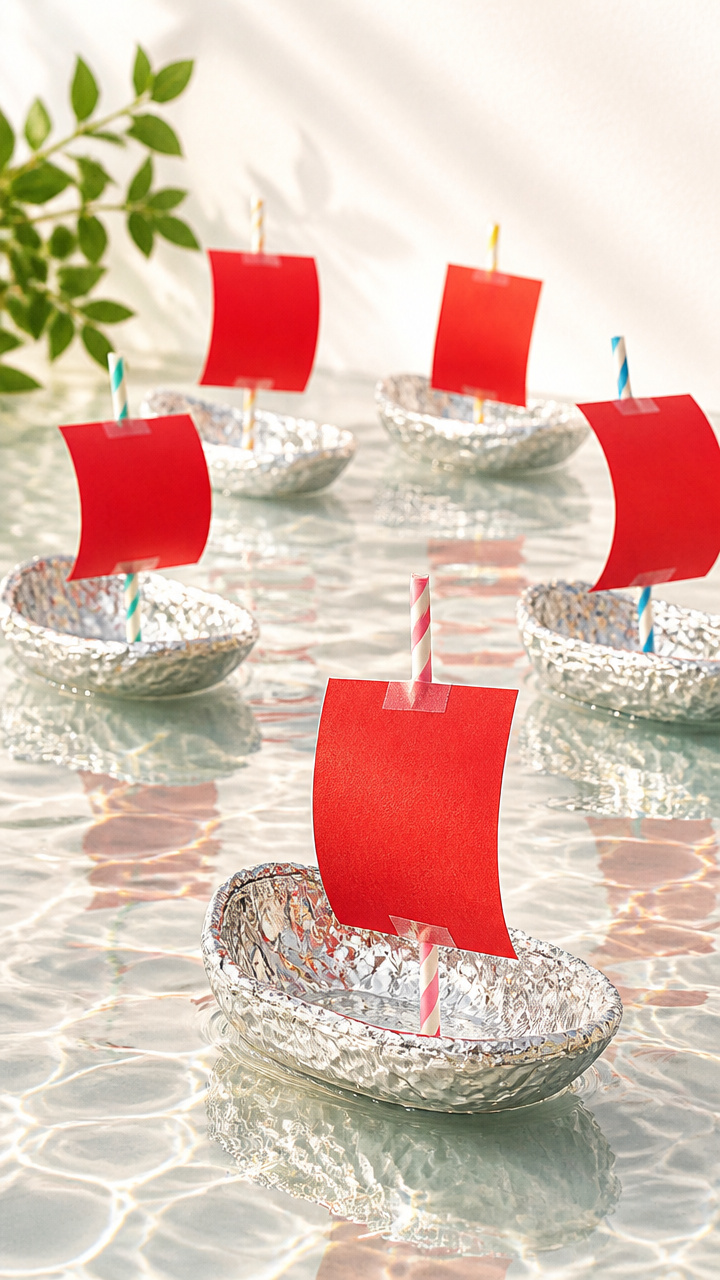
Shiny boats shaped from foil sail across puddles or sinks without leaving a trace. This craft combines imagination with basic engineering.
Materials Needed
- Heavy-duty aluminum foil (12-inch square per child)
- Plastic straws (2 per child)
- Construction paper (red, 6×6 inch sheet)
- Tape (small roll)
How to Make It
- Fold the foil square in half and press the edges to form a boat shape with raised sides.
- Cut a small triangle from the red paper to make a sail.
- Slide one straw through the sail and tape the ends of the straw to the inside edges of the boat.
- Test the boat in a sink of water and adjust the balance by bending the foil edges.
5. Sticker Scene Cards
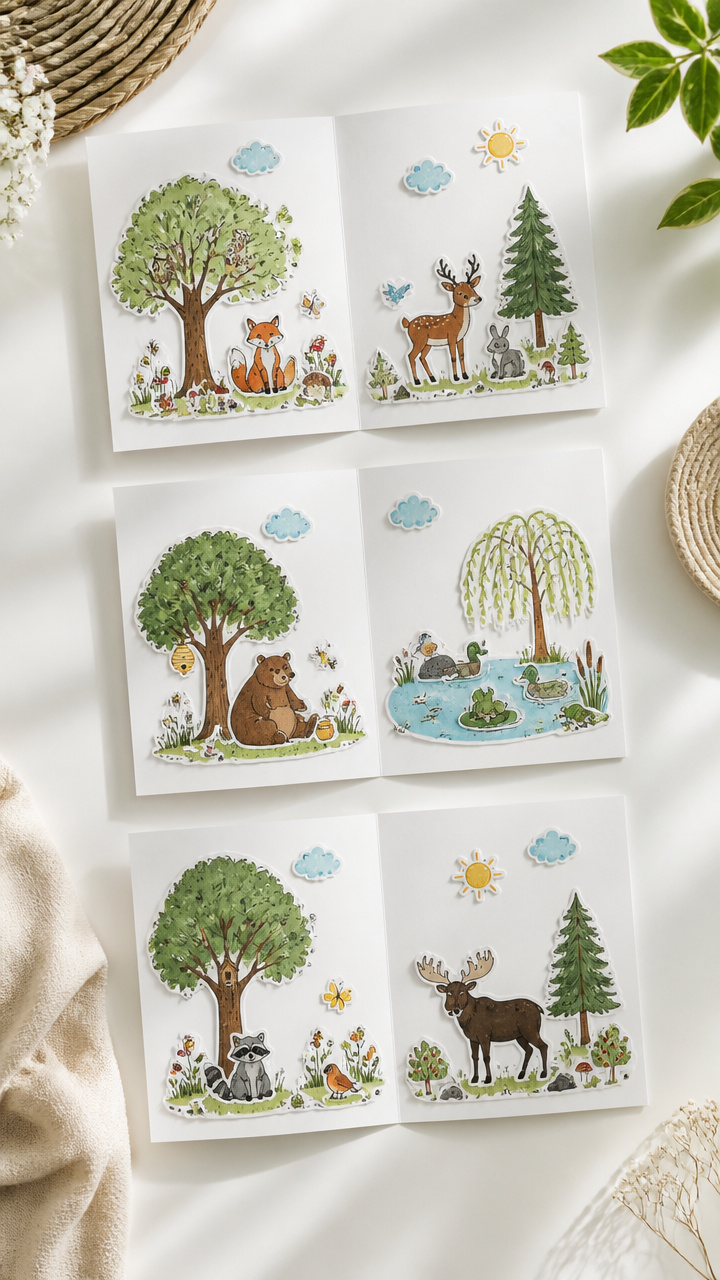
Custom greeting cards come alive with themed stickers arranged on bright backgrounds. These double as sweet gifts for family members.
Materials Needed
- A4 white cardstock (folded in half, 1 per child)
- Animal sticker sheet (1 per child)
- Tree and sky sticker sheet (1 per child)
- Fine-tip black marker
How to Make It
- Open the folded card and lay it flat on the table.
- Peel and place animal stickers on the bottom half and tree or sky stickers on the top half to create a scene.
- Draw a simple horizon line across the middle with the black marker to anchor the layout.
6. Washi Tape Frames
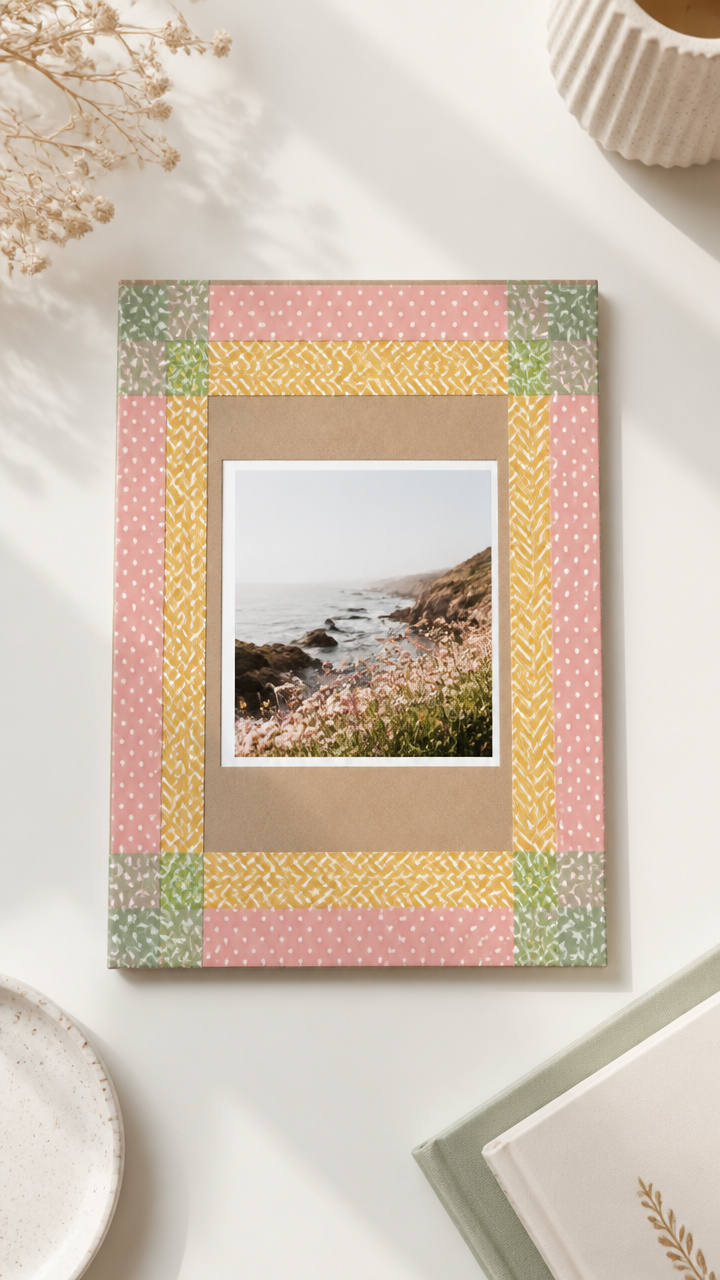
Colorful washi tape turns plain cardboard into instant picture frames. They hold tiny drawings or photos and don’t need glue.
Materials Needed
- Cardboard rectangle (5×7 inches, 1 per child)
- Assorted washi tape rolls (3 different patterns)
- Child-safe scissors
- Small photo or drawing (3×3 inch)
How to Make It
- Cut a centered window in the cardboard, 3 inches wide and tall, leaving a frame border.
- Apply washi tape strips along the outer edges of the frame, pressing firmly to adhere.
- Slide the photo or drawing behind the window and tape it lightly in place on the back.
7. Paper Plate Rainbows
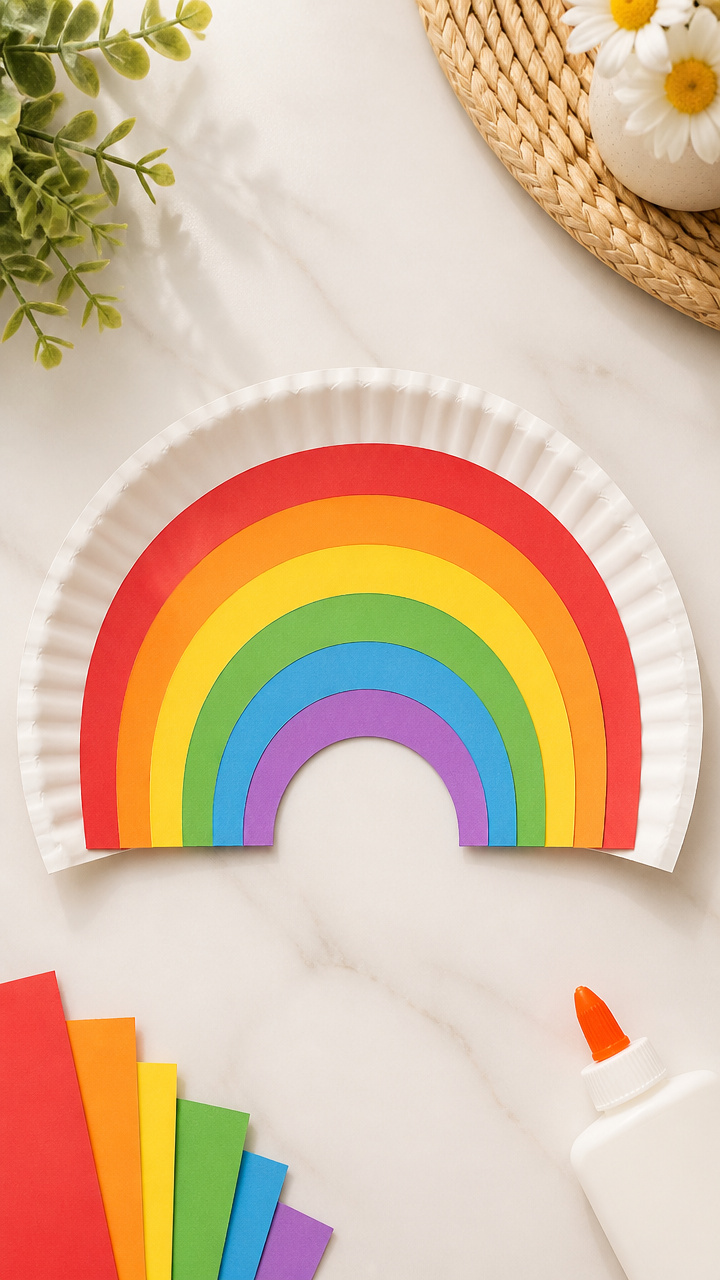
Vibrant arcs made from layered construction paper fit perfectly on a paper plate base. These rainbows dry flat and hang easily.
Materials Needed
- 1 white paper plate per child
- Red, orange, yellow, green, blue, purple construction paper (1 sheet each)
- Glue stick
- Scissors
How to Make It
- Cut each color of construction paper into 1-inch wide strips, same width as the plate rim.
- Starting with red, glue the longest strip along the outer edge of the plate rim.
- Layer each shorter color inside the previous one to form a rainbow, pressing each down with your palm.
8. Pom-Pom Ice Cream Cones
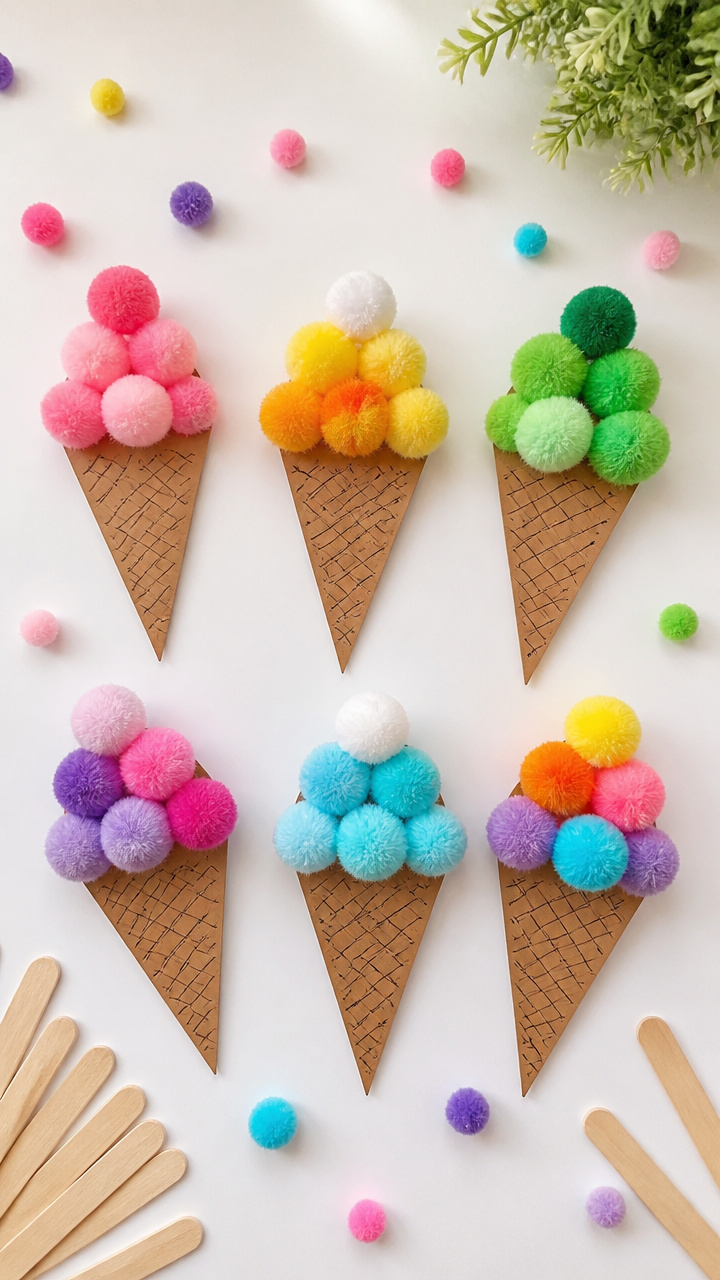
Fuzzy pom-poms become scoops stacked high on paper cones. These stay cool and never melt, even in summer heat.
Materials Needed
- Brown construction paper (6×6 inch square per child)
- Multicolored pom-poms (10 per child, assorted sizes)
- White school glue (4 oz bottle)
- Craft stick (1 per child)
- Scissors
How to Make It
- Cut the paper square into a circle, then snip a straight line from edge to center.
- Roll the circle into a cone shape and glue the overlap seam, letting it dry for three minutes.
- Glue pom-poms on top of the cone, stacking them like scoops, and insert the craft stick into the bottom for holding.
9. Bubble Wrap Stamping
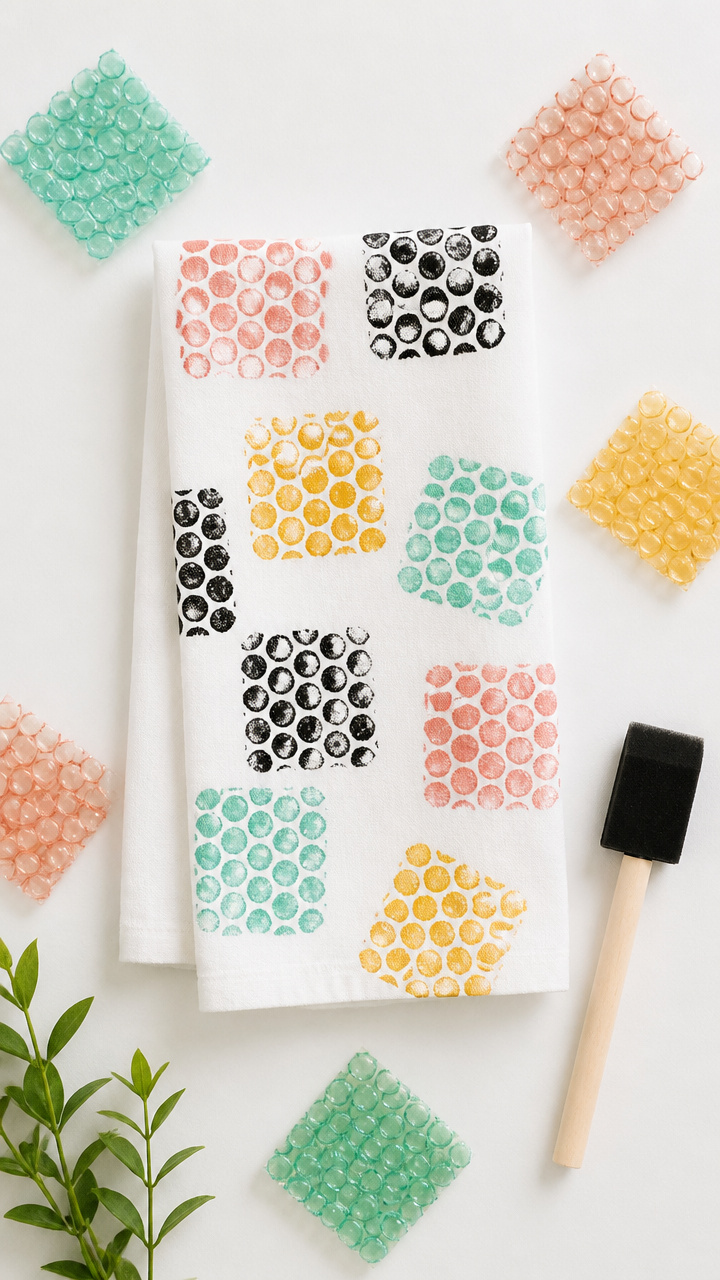
Bubble wrap transforms into textured stamps that print neat rows of circles. This version uses paint-free ink pads for zero cleanup.
Materials Needed
- Small bubble wrap squares (4×4 inches, 1 per child)
- Foam brush (1 per child)
- Black fabric ink pad
- White cotton napkin (1 per child)
How to Make It
- Press the bubble side of the wrap firmly onto the ink pad until all bubbles are coated.
- Place the napkin flat on the table and press the inked bubble wrap straight down without sliding.
- Lift the wrap straight up to reveal a perfect circle pattern and let the napkin dry for four minutes.
10. Clothespin Alligators
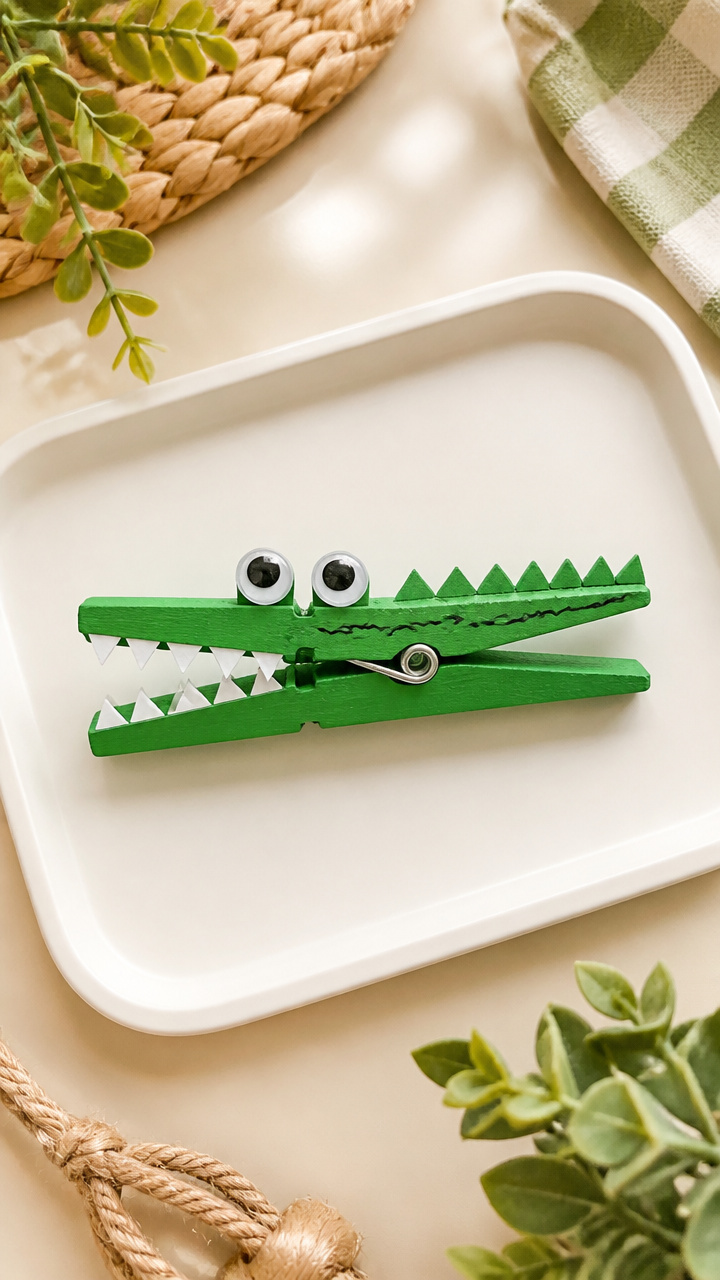
Wooden clothespins open and snap shut like hungry gator jaws. Sharp googly eyes and green markers make them look ready to play.
Materials Needed
- Wooden clothespin (1 per child)
- Green washable marker
- Two 10mm googly eyes
- White school glue
- Small plastic tray
How to Make It
- Color the entire clothespin with the green marker, covering both sides and the spring, and let it dry for two minutes.
- Glue one googly eye on each side of the clothespin’s top end.
- Rest the clothespin on the tray while the glue dries for three minutes before playing.
11. Straw Windsocks
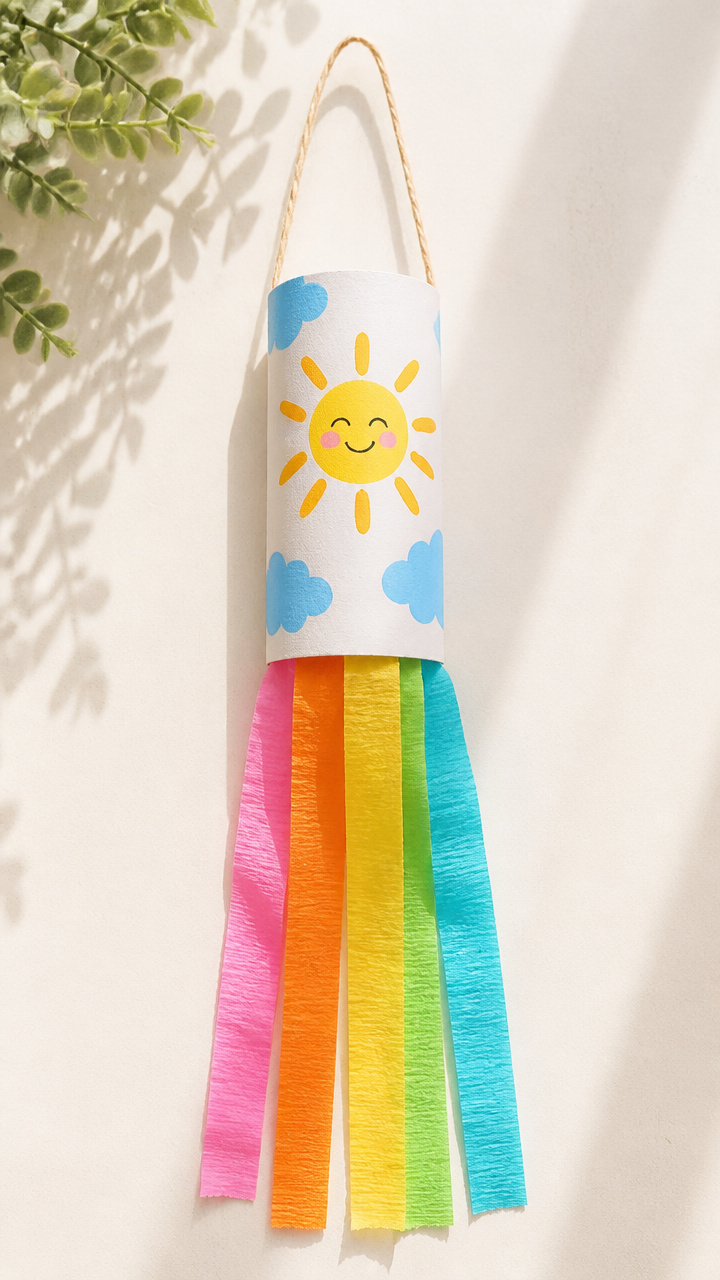
Streamers tied to a cardboard tube catch breezes and swirl in the wind. Lightweight and easy to assemble, they hang anywhere outdoors.
Materials Needed
- Toilet paper roll (1 per child)
- Five 12-inch crepe paper streamers (assorted colors)
- Hole punch
- Yarn (18 inches)
- Glue stick
How to Make It
- Glue one end of each streamer to the inside bottom of the toilet paper roll, spacing them evenly.
- Turn the roll over and punch two holes near the top edge, opposite each other.
- Thread the yarn through both holes and tie the ends to form a hanging loop.
12. Sponge Shape Prints
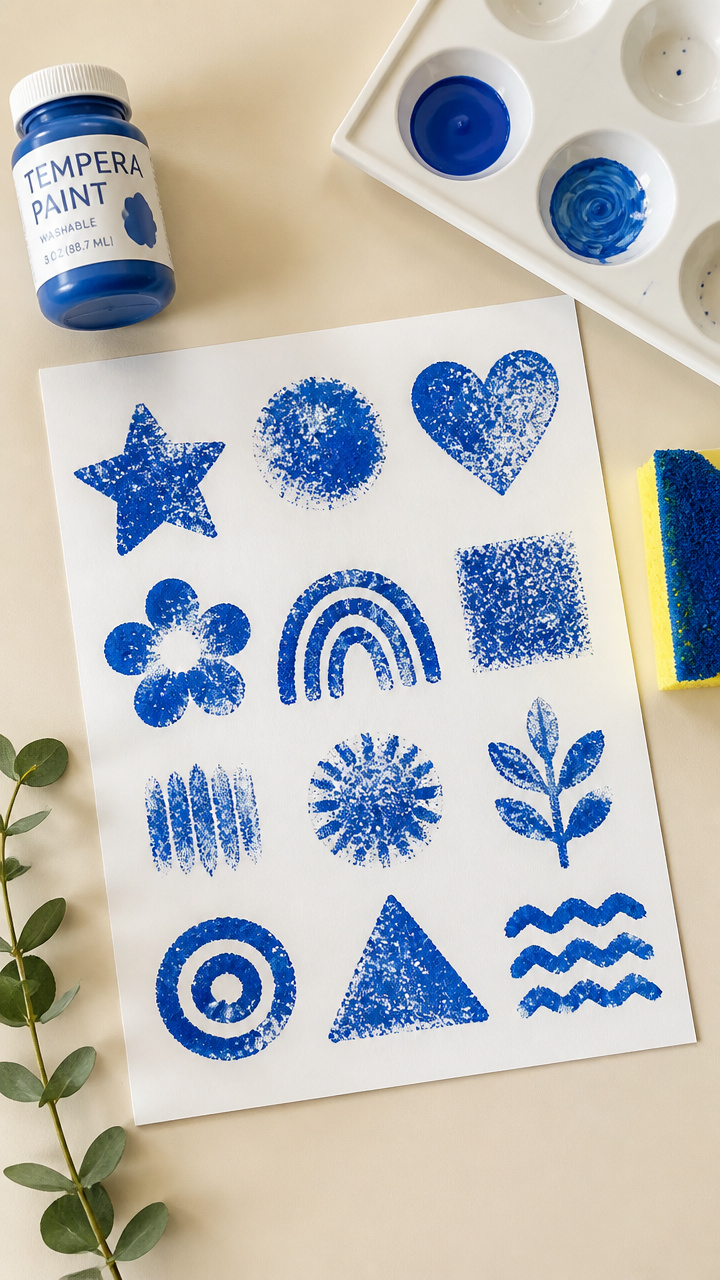
Cut sponges act as custom stamps that transfer paint in crisp shapes. This method controls mess and boosts recognition skills.
Materials Needed
- Kitchen sponge (1 per child)
- Scissors
- Tempera paint (blue, 3 oz container)
- Paint tray (1 per child)
- White drawing paper (8.5×11 inch, 1 sheet)
How to Make It
- Cut the sponge into a star shape using scissors, trimming edges smooth.
- Pour a dime-sized amount of blue paint into the tray and press the sponge star into it evenly.
- Press the sponge straight down onto the paper and lift straight up to leave a clean print.
- Rinse the sponge under water and repeat with new shapes if desired.
13. Yarn-Wrapped Letters
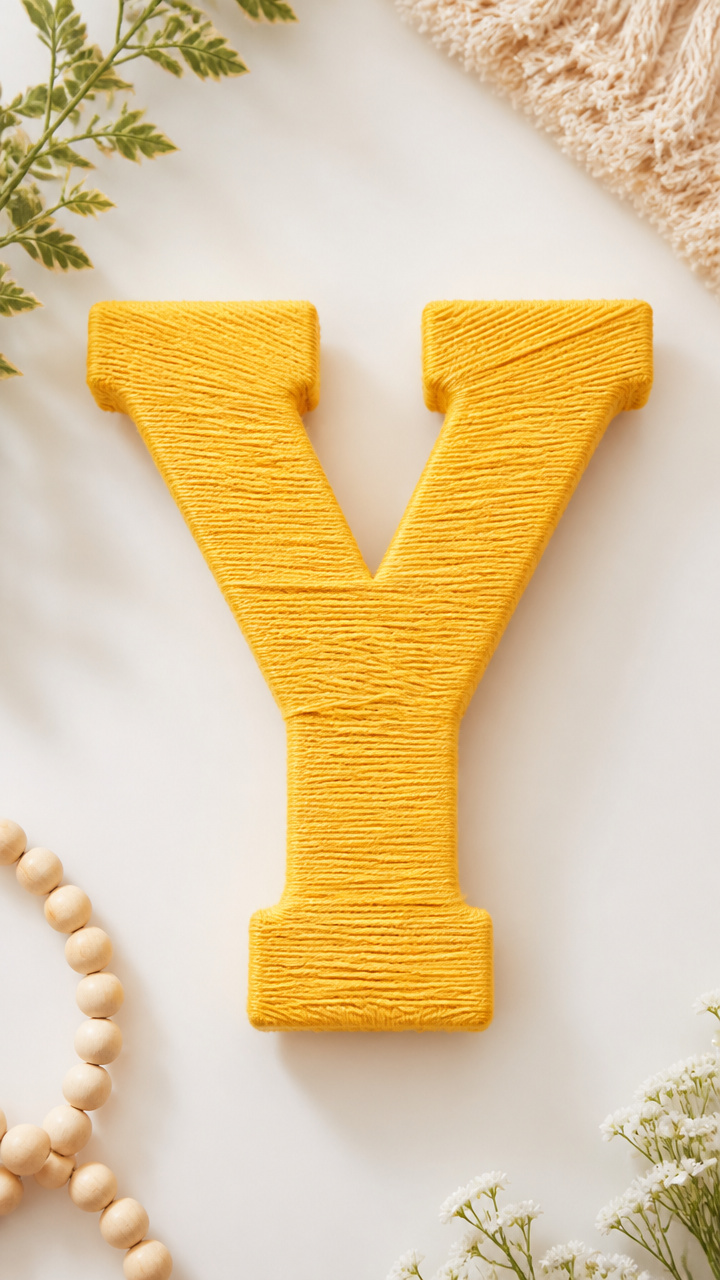
Thick yarn wraps tightly around cardboard letters to form soft, tactile names. Great for practicing first letters without glue.
Materials Needed
- Cardboard letter (uppercase, 4 inches tall, 1 per child)
- Cotton yarn (yellow, 10-foot length)
- Double-sided tape (small strip)
How to Make It
- Press one end of the yarn into the double-sided tape on the back of the letter’s base.
- Wrap the yarn snugly around the entire outline of the letter, moving slowly around curves.
- Press the final end under the last wrap to secure it without knots or glue.
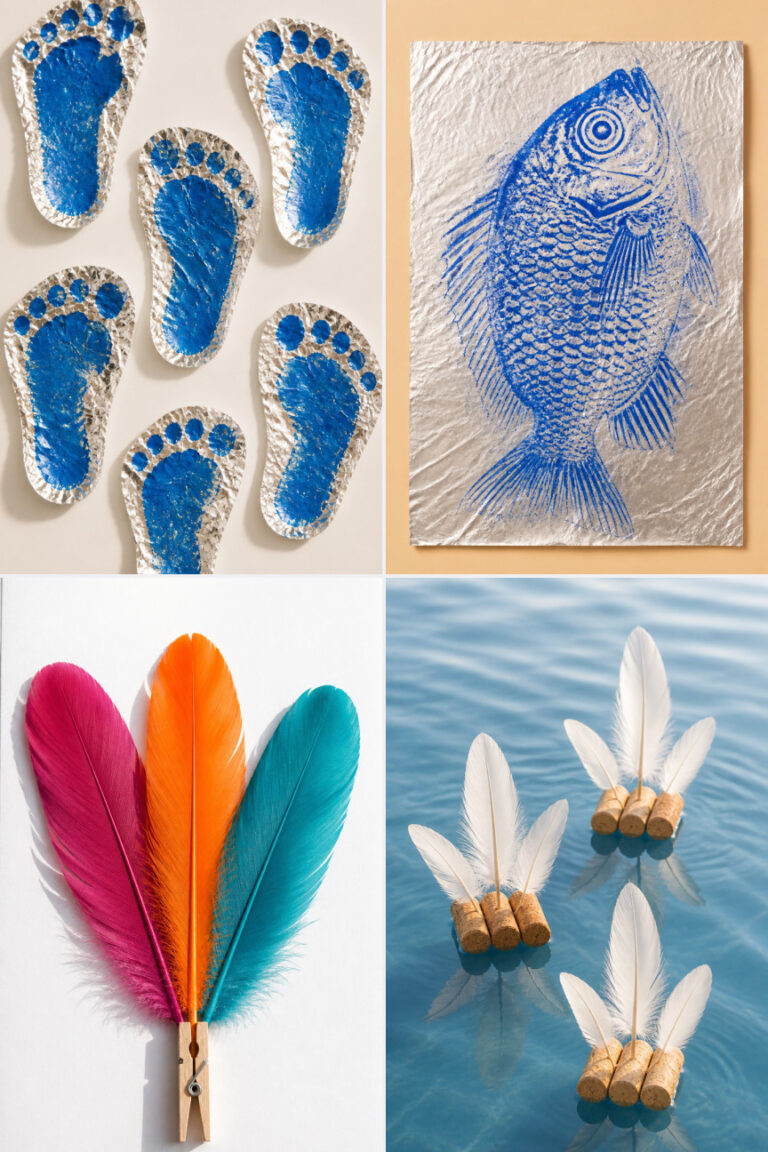
14. Feather and Bead Bracelets
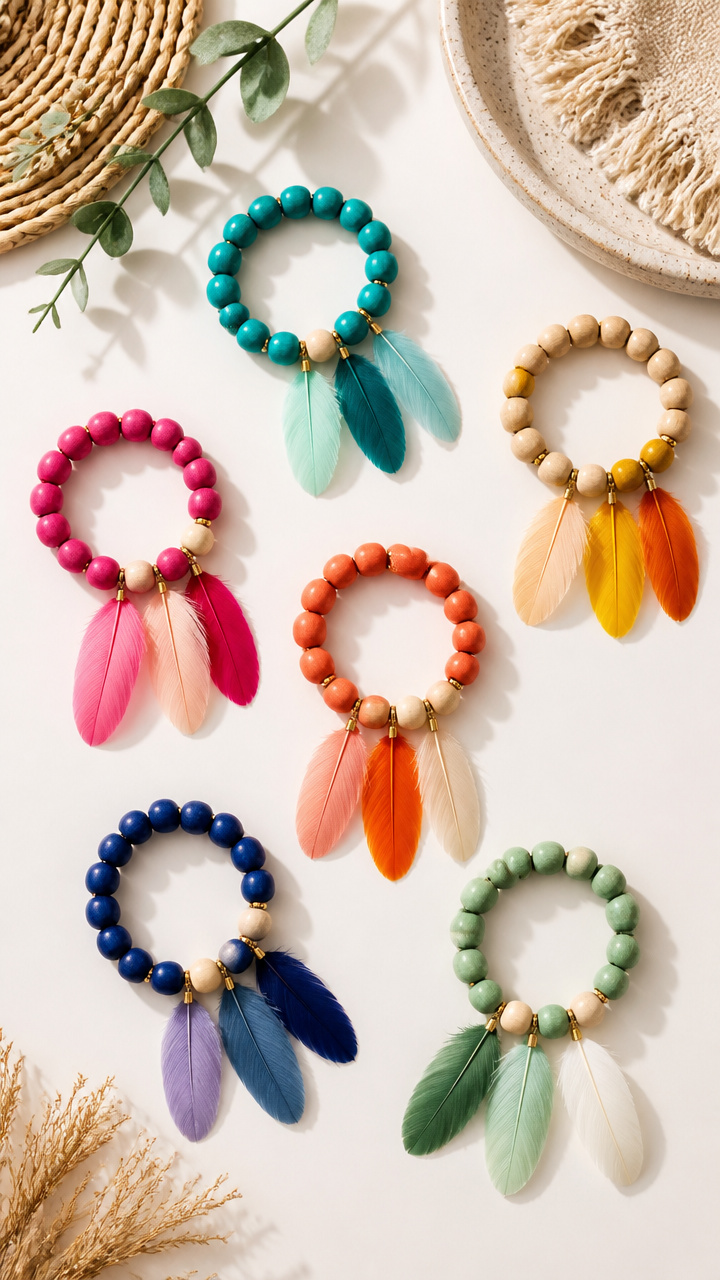
Soft feathers and large beads slide onto elastic cord to create wearable art. These stretchy bracelets fit wiggly wrists and stay put.
Materials Needed
- Elastic cord (12 inches, 1 per child)
- Large wooden beads (6 per child, assorted colors)
- Small dyed feathers (3 per child)
- Scissors
How to Make It
- Thread one bead onto the cord, followed by one feather, sliding the quill end first.
- Continue alternating beads and feathers until six inches of cord remain.
- Tie the ends together in a tight double knot and trim excess cord within half an inch.
15. Chalk Rock Faces
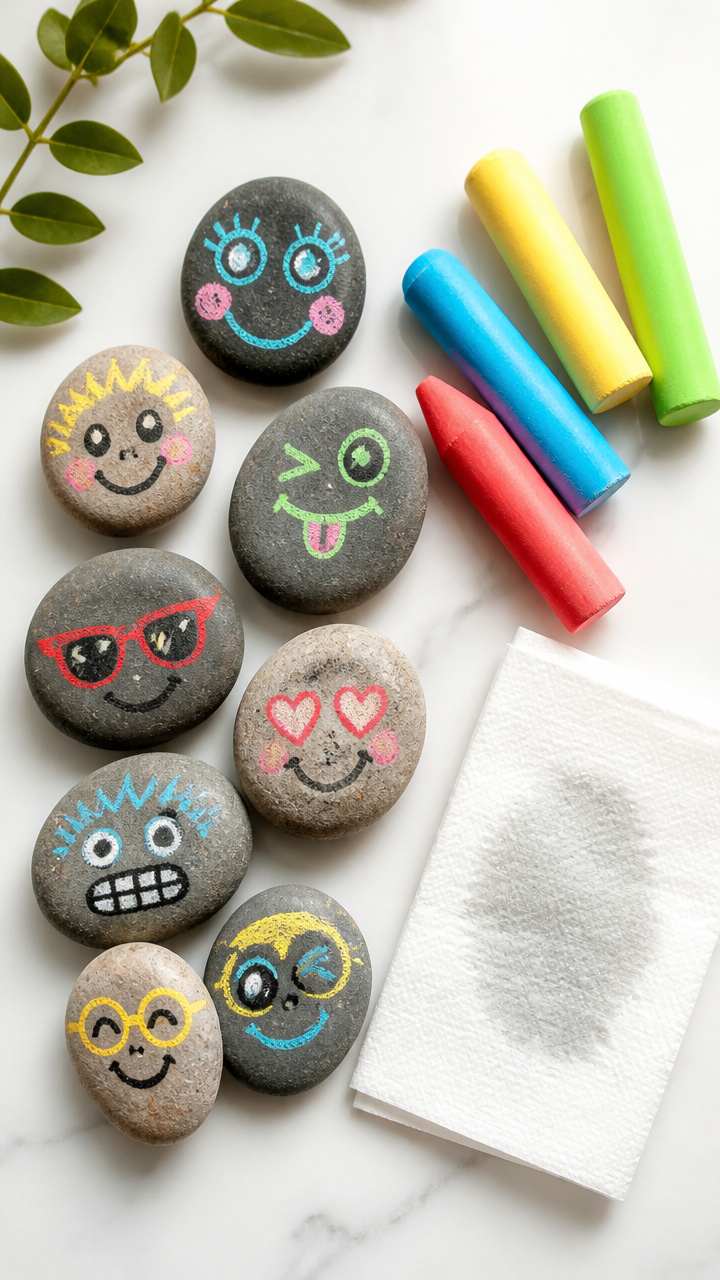
Smooth river rocks become silly faces drawn with chunky sidewalk chalk. They wash off cleanly and can be redesigned again and again.
Materials Needed
- River rock (2 inches long, 1 per child)
- Jumbo sidewalk chalk sticks (red, blue, yellow, green)
- Damp paper towel
How to Make It
- Use the red chalk to draw a wide mouth on the rock, pressing gently to avoid breaking the tip.
- Add eyes with blue and yellow chalk, drawing circles near the top.
- Make hair with green chalk above the eyes and erase with the damp towel when ready for a new design.
You’ve got everything you need right now to start crafting with joy and ease. Grab a few supplies and watch their faces light up with what they make.