15 Rainy Day Summer Crafts Made With Stuff You Already Have
Rain taps at the window and the kids are restless. That slow, sticky summer energy needs a creative outlet and you don’t need fancy supplies to make something wonderful.
These crafts use what’s already in your drawers, cabinets, and closets. No prep, no shopping, just simple joy made with your hands.
1. Sock Puppet Theater
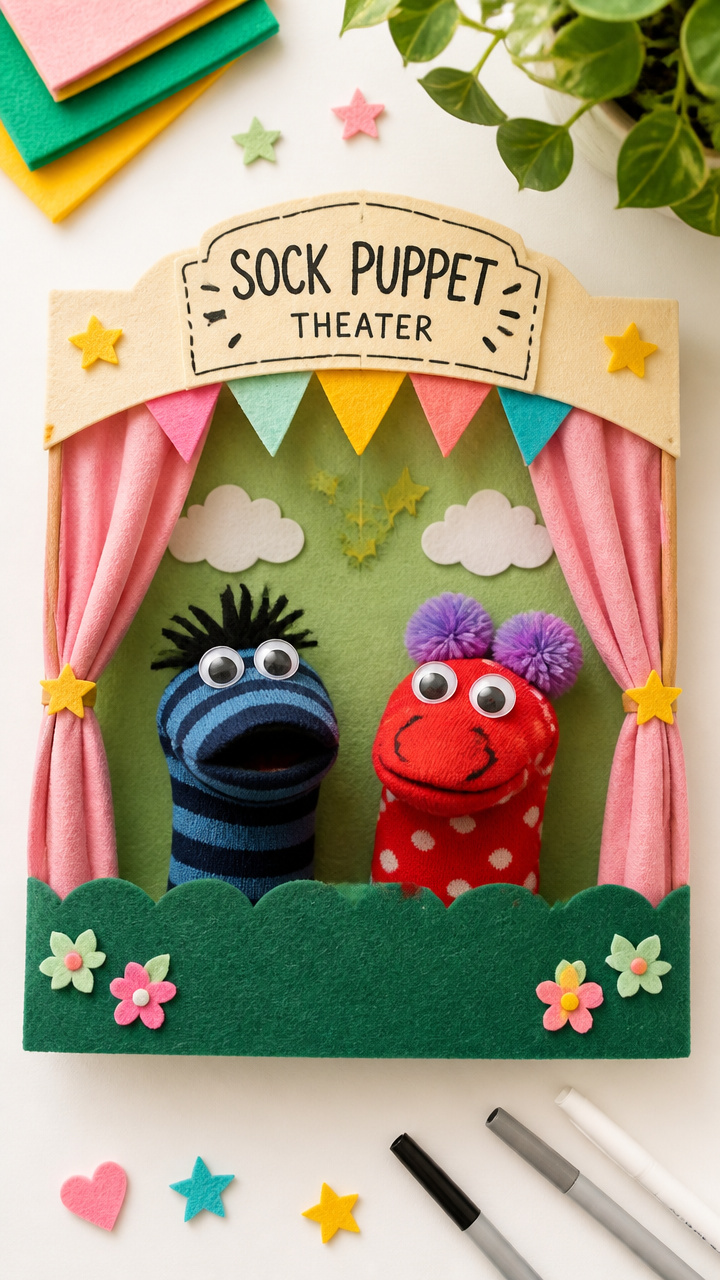
Soft, silly characters that spark storytelling and laughter during long afternoons. Perfect for acting out favorite scenes or making up new ones.
Materials Needed
- 2 clean mismatched socks
- 4 googly eyes (1 inch diameter)
- black permanent marker
- scrap of felt (6×6 inches)
- fabric glue
- craft scissors
How to Make It
- Cut two triangle ears from the felt and glue them to the top of one sock for animal ears.
- Glue on the googly eyes just above the toe seam where the face will be.
- Use the black marker to draw a mouth and nose on the sock below the eyes.
- Cut a small strip of felt for a scarf or mane and glue it around the neck area near the cuff.
2. Cereal Box Photo Frames
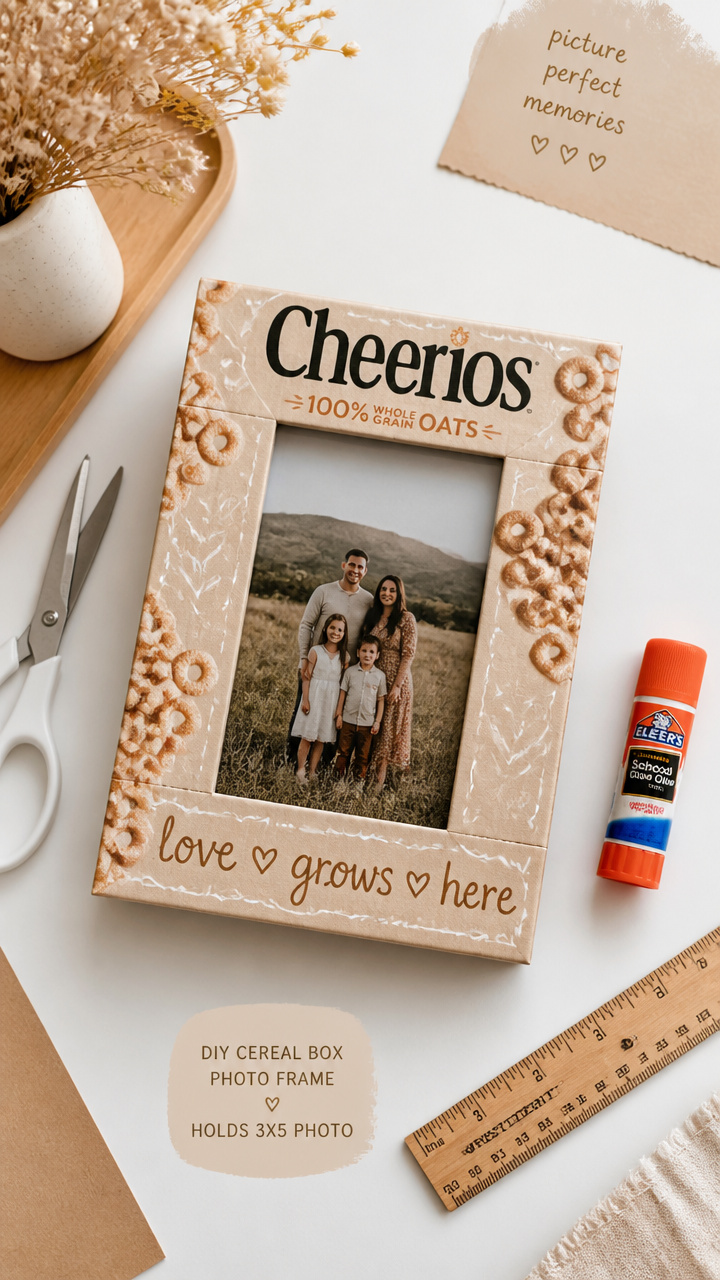
Sturdy frames with a retro look that hold small memories. Turn empty packaging into keepsakes for desks or shelves.
Materials Needed
- 1 empty cereal box
- ruler
- pencil
- craft scissors
- glue stick
- family photo (3×5 inches)
- colored masking tape (1/2 inch wide)
How to Make It
- Lay the cereal box flat and cut a 4×6 inch rectangle from the front panel.
- Cut a 3.5×4.5 inch window centered in the rectangle using the craft scissors.
- Apply glue to the back edges of the photo and position it behind the window.
- Wrap colored masking tape around the outer edge of the frame to finish and reinforce the border.
3. Tin Can Wind Chimes
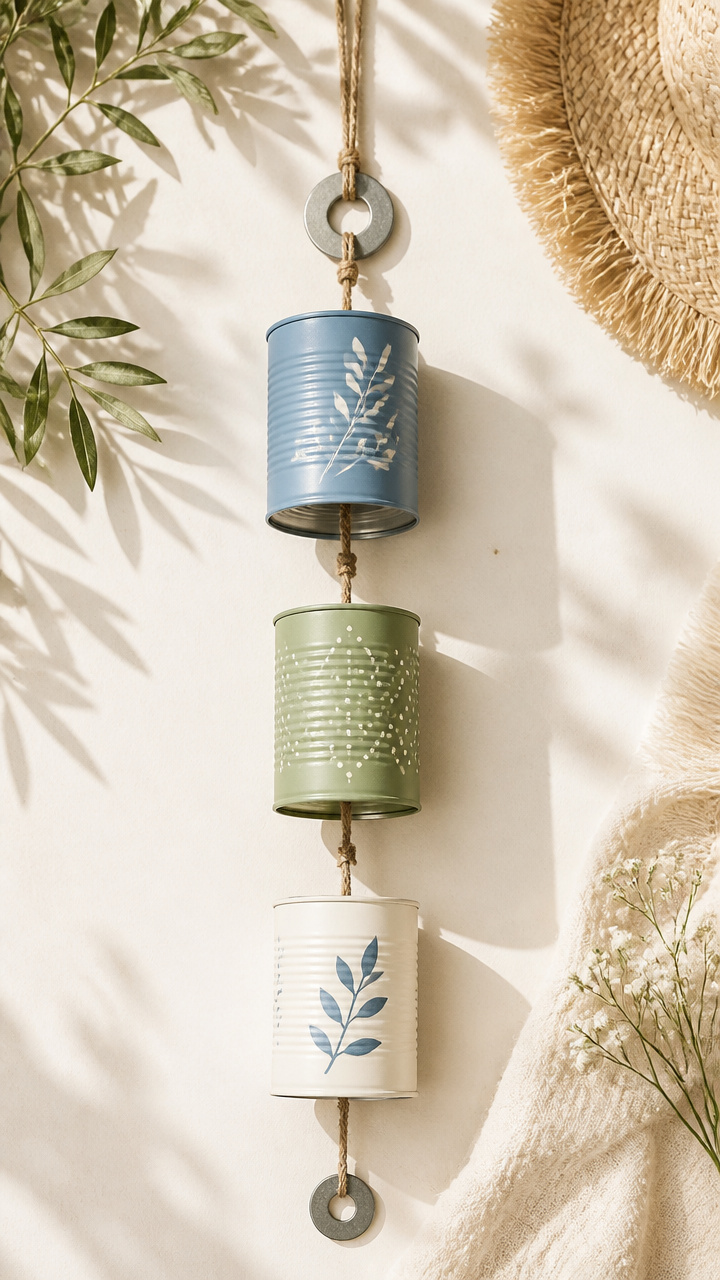
Light, clinking sounds that turn breezes into music. Hang them by a window or porch for gentle outdoor charm.
Materials Needed
- 3 clean tin cans (various sizes, labels removed)
- acrylic paint (blue, green, white)
- paintbrush (medium flat)
- 18-inch length of thick string
- drill with 1/8 inch bit
- metal washer
How to Make It
- Paint each can with a different color using the acrylic paint and let dry for 30 minutes.
- Drill one hole near the rim of each can and another hole in the center of the washer.
- Cut three 12-inch strings and tie one end through each can's hole, then knot securely.
- Tie the loose ends of all three strings to the hole in the washer to form a hanging cluster.
4. Paper Plate Sailboats
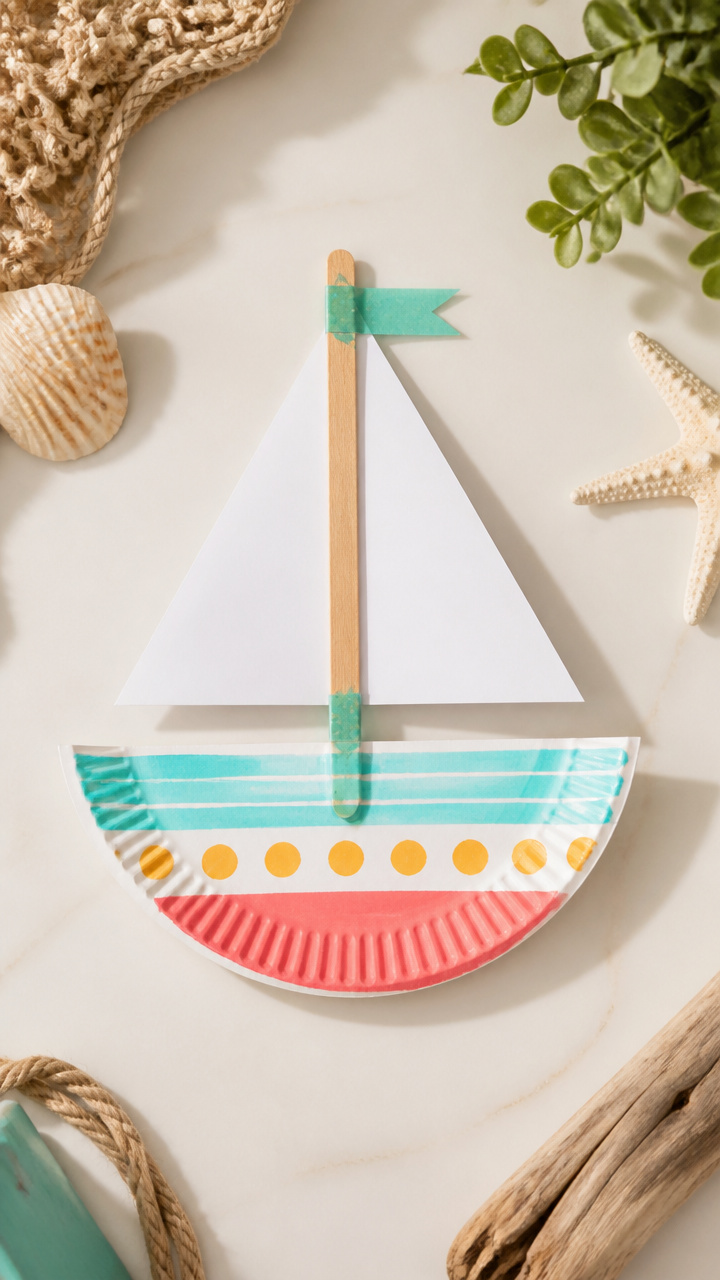
Bright boats ready for bathtub or puddle adventures. Lightweight and fun to customize with flags and sails.
Materials Needed
- 1 paper plate (9 inch)
- 1 wooden craft stick
- 1 sheet white printer paper
- tape
- crayons
- scissors
- plastic straw
How to Make It
- Fold the printer paper diagonally and cut to make a triangle sail, then decorate with crayons.
- Tape the straight edge of the sail to the craft stick halfway up.
- Slide the bottom of the stick into a slit cut on the rim of the plate to stand upright.
- Insert a short piece of straw under the stick base to help it sit flat on the plate.
5. Egg Carton Sea Creatures
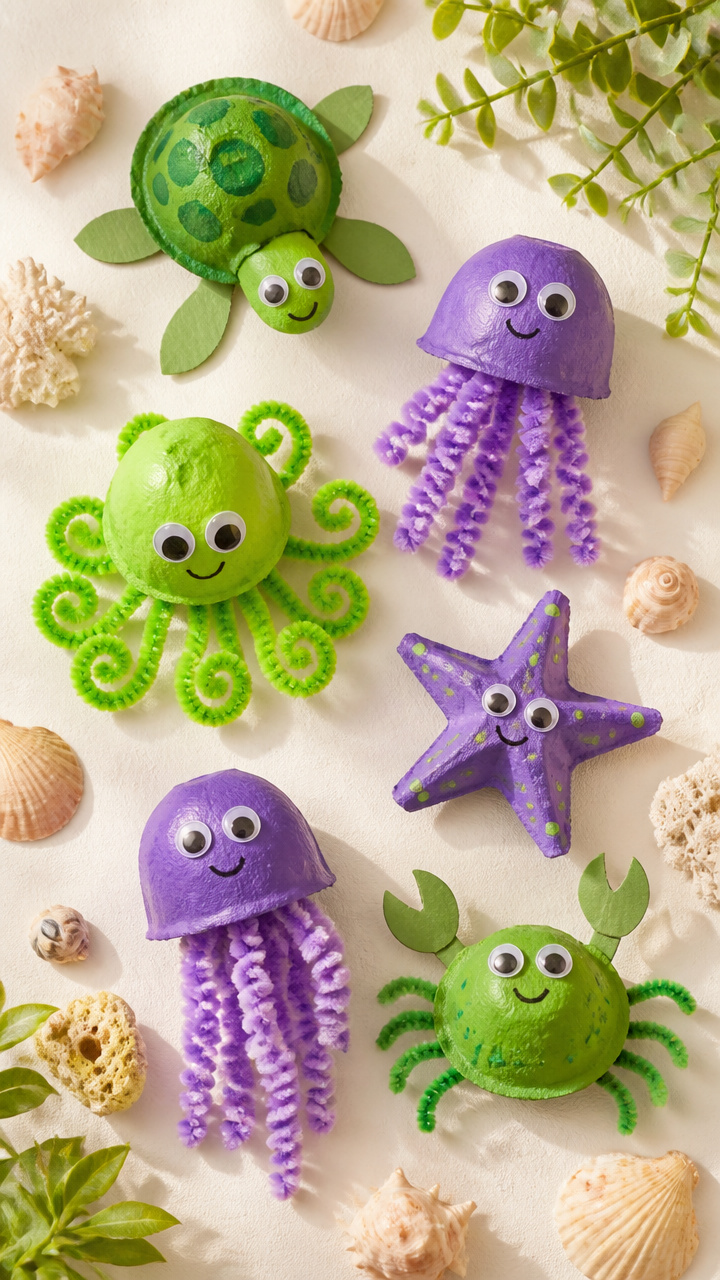
Bumpy textures become octopuses, jellyfish, and crabs. These little critters float well in water play or sit proudly on a shelf.
Materials Needed
- 1 cardboard egg carton
- scissors
- green and purple acrylic paint
- paintbrush
- 8 pipe cleaners (purple)
- 2 wiggly eyes (0.75 inch)
- white glue
How to Make It
- Cut two connected cups from the carton for an octopus body and tentacles.
- Paint the entire piece purple and let dry for 20 minutes.
- Glue two wiggly eyes near the top edge of one cup.
- Slide eight pipe cleaners between the two cups so they fan out like tentacles and secure with a dab of glue.
6. Straw Stamp Prints
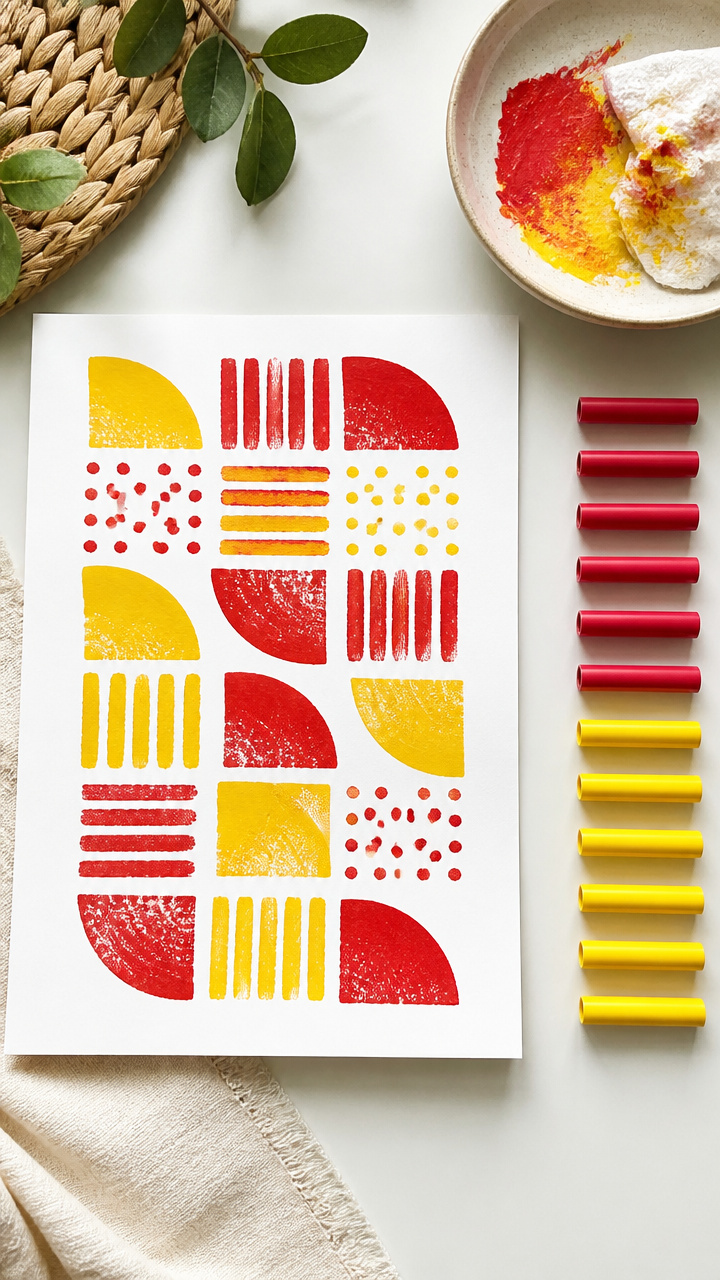
Bold geometric patterns made by dipping cut straws in paint. Create custom wrapping paper or wall art in minutes.
Materials Needed
- 10 plastic drinking straws
- scissors
- red and yellow tempera paint
- shallow dish
- A4 white drawing paper
- paper towel
How to Make It
- Cut each straw in half to make 20 short tubes, then flatten one end slightly with scissors.
- Pour a spoonful of red paint into the dish and dip the flattened end of a straw into it.
- Press the painted end firmly onto the paper to make a circle stamp, then wipe the straw on the towel.
- Repeat with yellow paint and vary spacing to create a polka dot pattern across the page.
7. Laundry Clip Butterflies
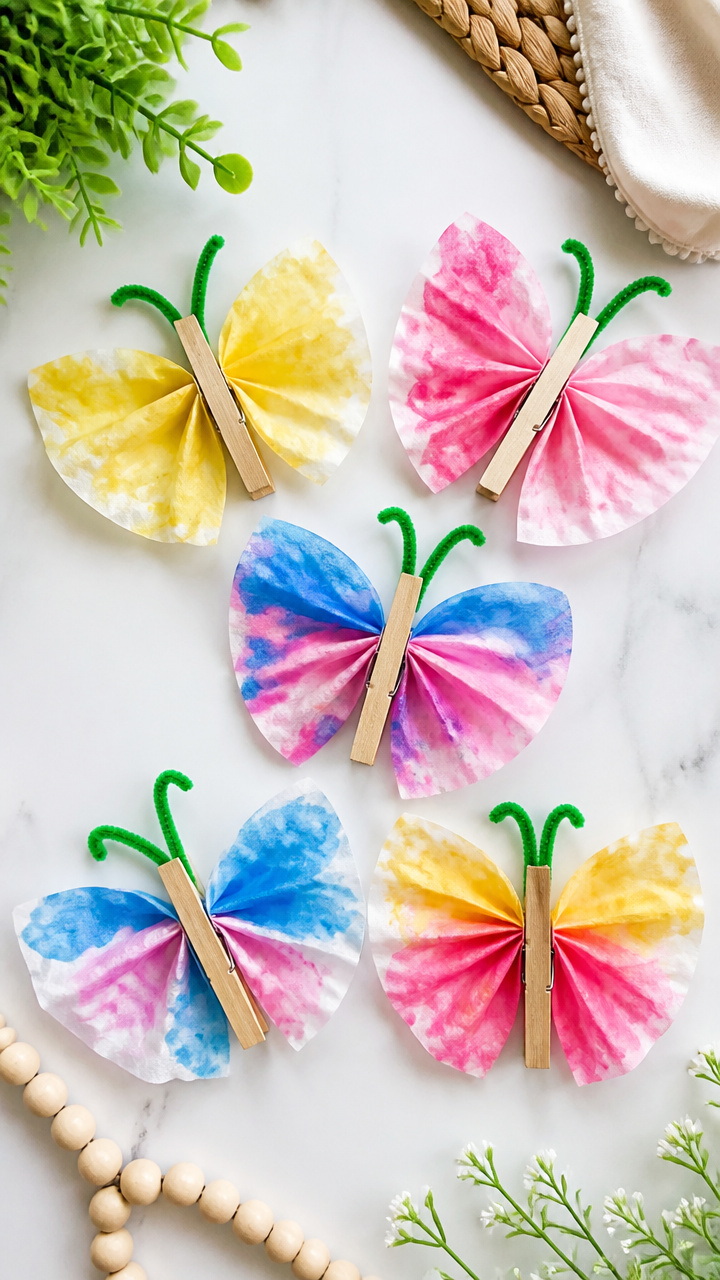
Fluttering decorations that hang from windows or lights. The wooden clips become bodies that hold colorful wings.
Materials Needed
- 2 wooden clothespins
- 2 coffee filters
- watercolor paints (pink, blue, yellow)
- paintbrush
- glue
- pipe cleaner (green)
- scissors
How to Make It
- Flatten the coffee filters and paint swaths of color across them, letting hues blend slightly at edges.
- Let the filters dry completely on a flat surface for 25 minutes.
- Fold each dried filter in half and sandwich the spring end of a clothespin between the layers.
- Twist the pipe cleaner around the neck of the clothespin to form antennae with small curls at the ends.
8. Toilet Paper Roll Binoculars
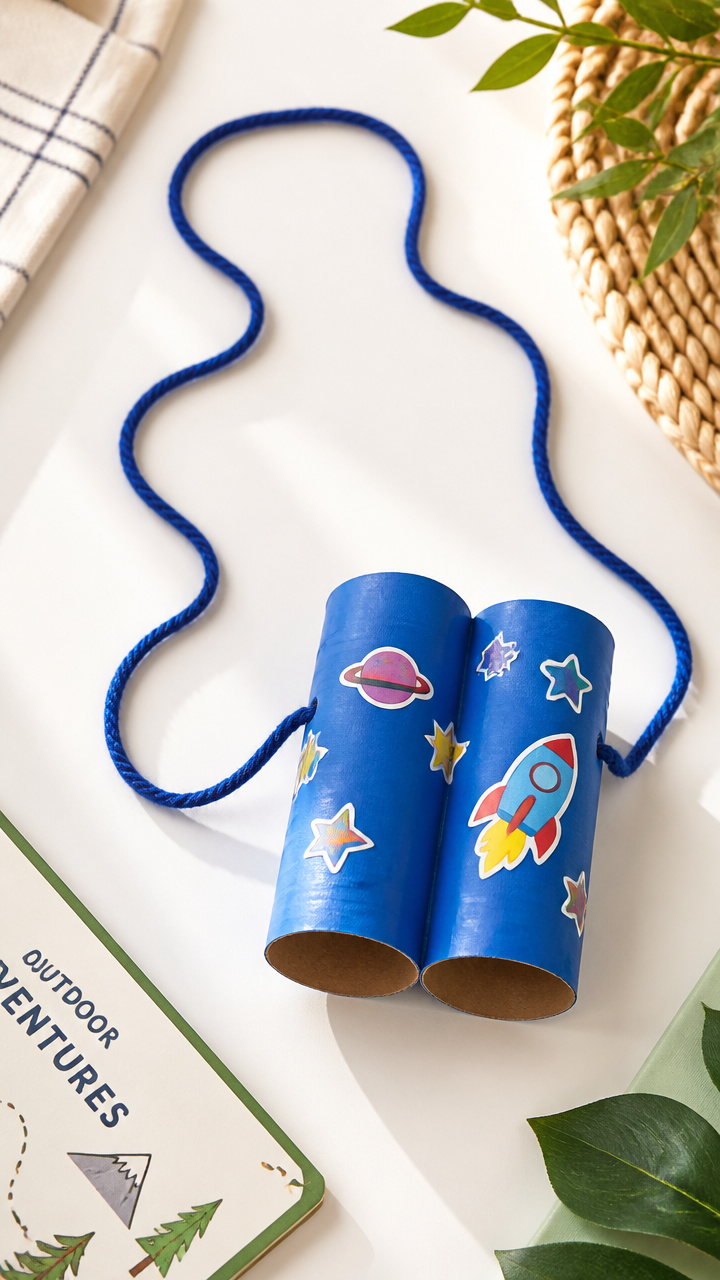
Peek at birds, clouds, or imaginary faraway lands. A pretend-play essential made in under ten minutes.
Materials Needed
- 2 empty toilet paper rolls
- duct tape (blue)
- hole punch
- 18-inch yarn
- stickers
How to Make It
- Place the two rolls side by side and wrap duct tape around both to bind them together.
- Punch one hole on each outer side of the rolls at the same height.
- Thread the yarn through both holes and tie knots inside to secure as a neck strap.
- Decorate the outside with stickers showing stars, animals, or adventure symbols.
9. Bottle Cap Magnets
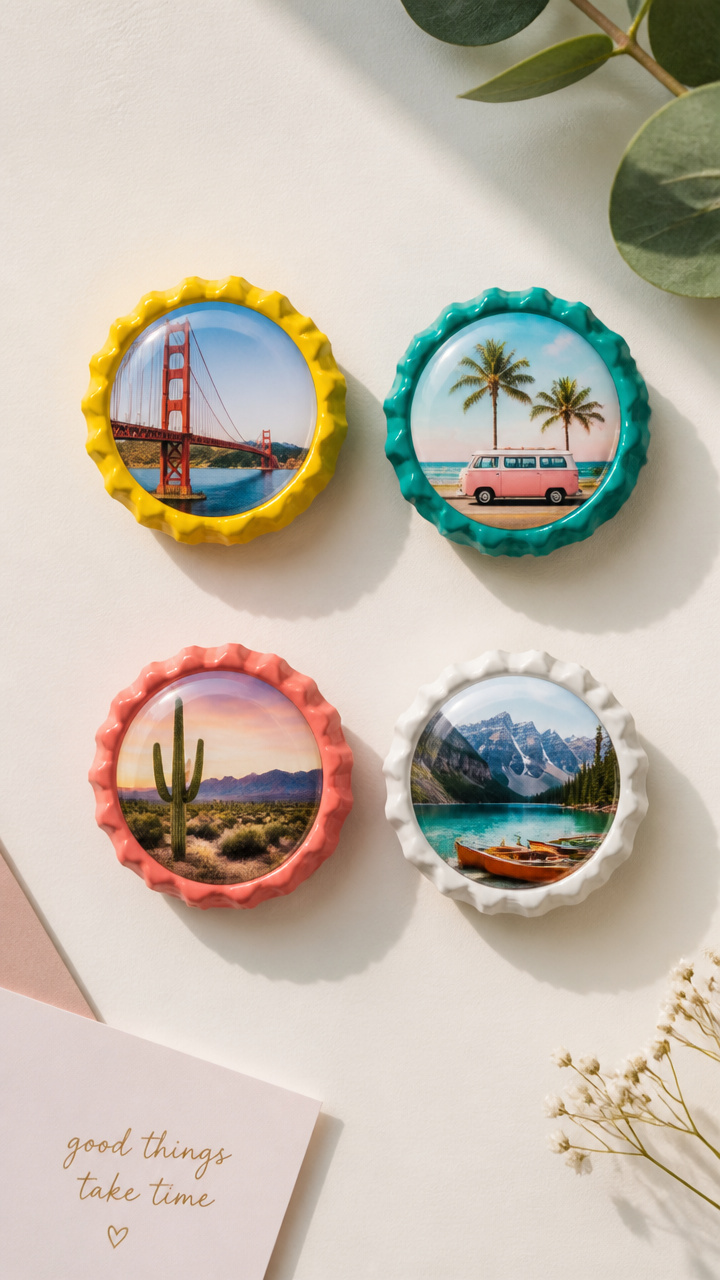
Tiny metal tokens that hold notes or photos on the fridge. Turn soda caps into cheerful mini displays.
Materials Needed
- 4 aluminum bottle caps
- small printed photos (1 inch square)
- clear self-adhesive laminating sheets
- round magnet discs (1 inch, 4 count)
- hot glue gun
- scissors
How to Make It
- Cut four 1 inch squares from the laminating sheet and place one over each photo.
- Press each laminated photo into a bottle cap, smoothing out air bubbles.
- Apply a small dot of hot glue to the back of each cap.
- Press a magnet disc into the glue and hold for 10 seconds until set.
10. Shoebox Lid Marble Maze
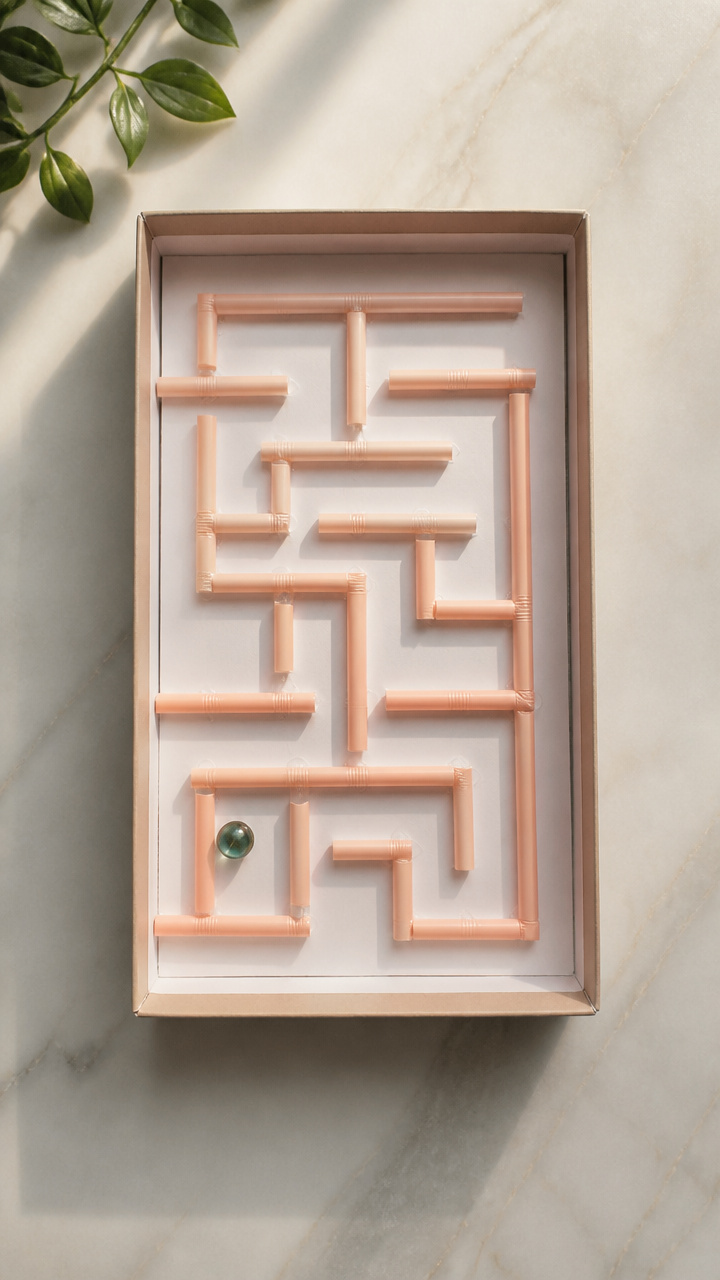
A twisting track game built with glue and straws. Tilt the lid to guide a marble from start to finish.
Materials Needed
- 1 shoebox lid
- 12 plastic straws
- hot glue gun
- 1 marble
- ruler
- pencil
How to Make It
- Sketch a winding path on the inside of the lid using the pencil and ruler to plan the maze walls.
- Cut straws into 1 to 3 inch lengths and arrange them along the drawn lines to form barriers.
- Glue each straw piece down with the hot glue gun, holding briefly until secure.
- Test the maze by tilting the lid and rolling the marble through the completed path.
11. Washi Tape Coasters
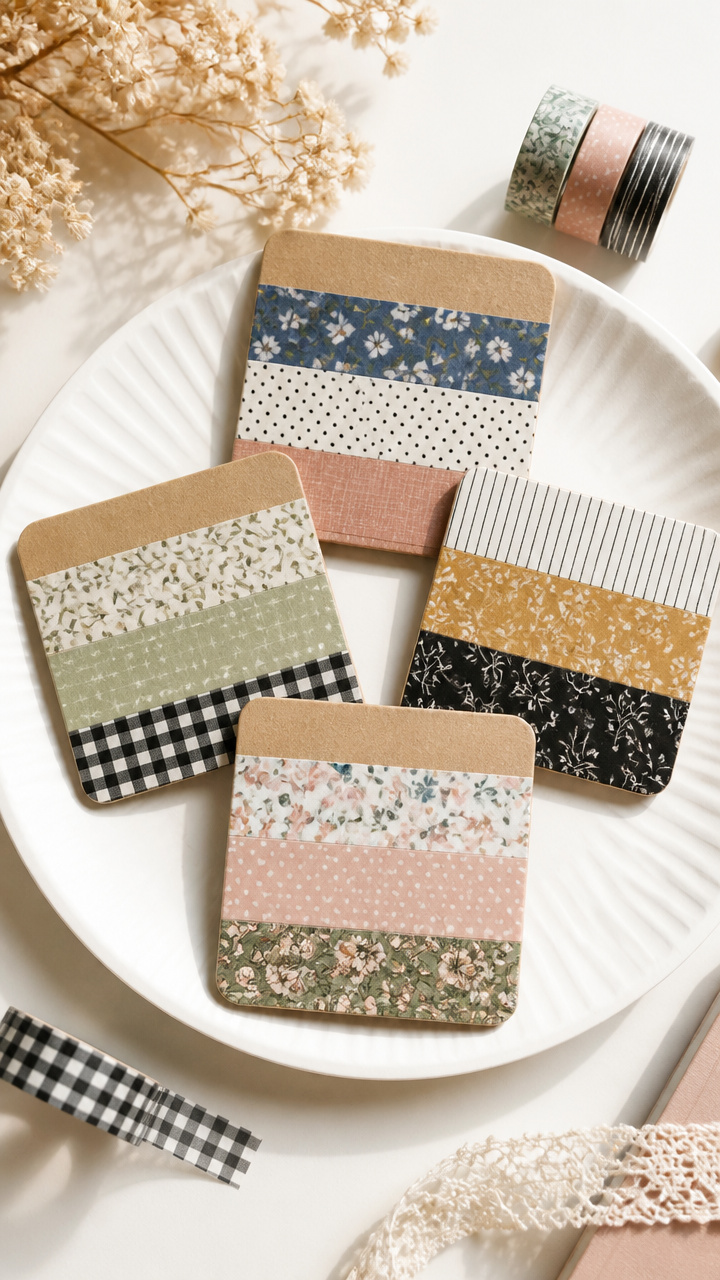
Water-resistant pads that protect tables in style. Layered tape creates bold, modern designs without mess.
Materials Needed
- 4 cardboard squares (4×4 inches)
- washi tape (three patterns, 0.5 inch wide)
- mod podge
- foam brush
- paper plate
How to Make It
- Cover each cardboard square completely with overlapping strips of washi tape, pressing out air bubbles.
- Trim excess tape from the edges using scissors for a clean border.
- Brush a thin layer of mod podge over the entire surface and let dry for 20 minutes.
- Apply a second coat and let cure for 1 hour before using.
12. Yarn-Wrapped Puzzle Boxes
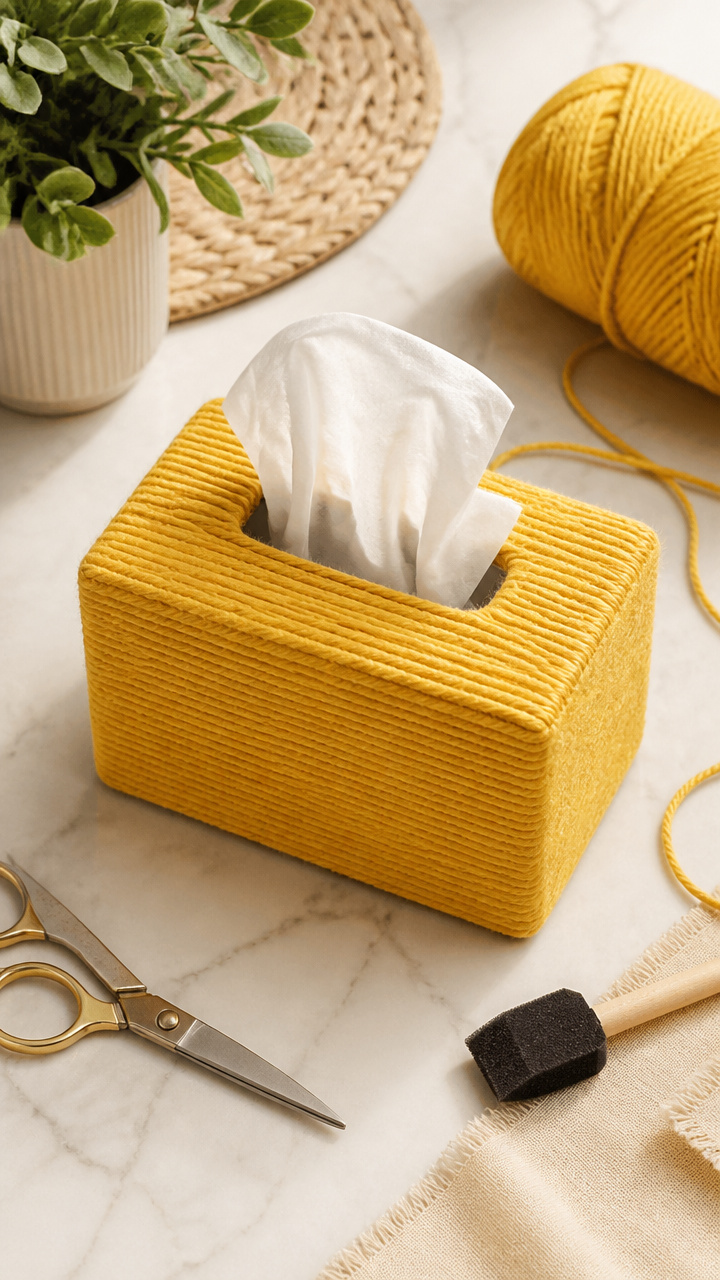
Small treasures hidden inside decorated tissue boxes. Wrapping yarn adds texture and turns plain cubes into keepsake chests.
Materials Needed
- 1 small empty tissue box
- yellow craft yarn
- white glue
- foam brush
- scissors
How to Make It
- Mix a small puddle of white glue with a few drops of water on the paper plate to thin it slightly.
- Wrap the yarn around the box continuously, brushing on thinned glue every few wraps to adhere it.
- Keep wrapping until the entire box is covered and the yarn feels snug.
- Let dry completely for 2 hours before placing a small note or trinket inside.
13. CD Spinner Art
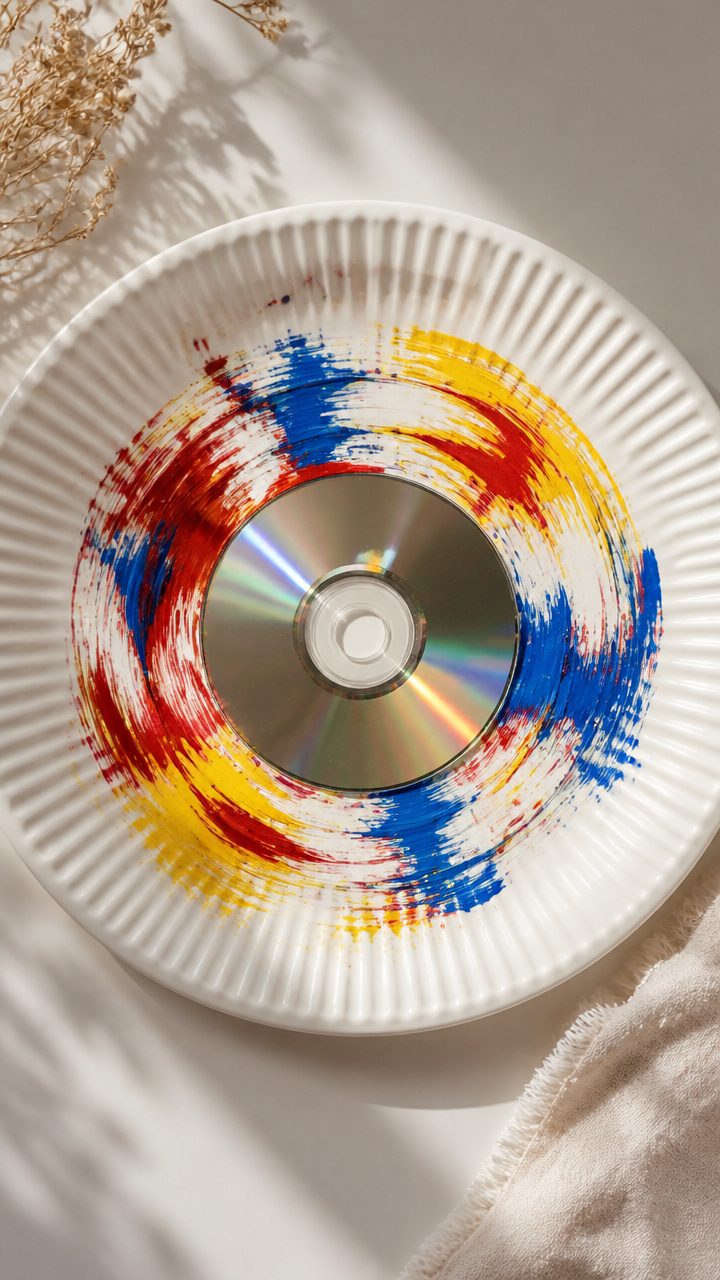
Swirling paint designs that spin like planets. Old discs become dazzling display pieces with a flick of the wrist.
Materials Needed
- 1 used CD
- 3 colors of liquid watercolor (red, blue, yellow)
- eyedropper
- paper plate
- push pin
- pencil with eraser
How to Make It
- Place the CD shiny side up on the paper plate and push the pin through the center hole into the pencil eraser.
- Use the eyedropper to place 5 drops of red watercolor near the center of the CD.
- Quickly add 5 drops each of blue and yellow in a circular pattern around the red.
- Spin the CD by twirling the pencil between your palms for 15 seconds until paint spreads outward in spirals.
14. Popsicle Stick Picture Frame
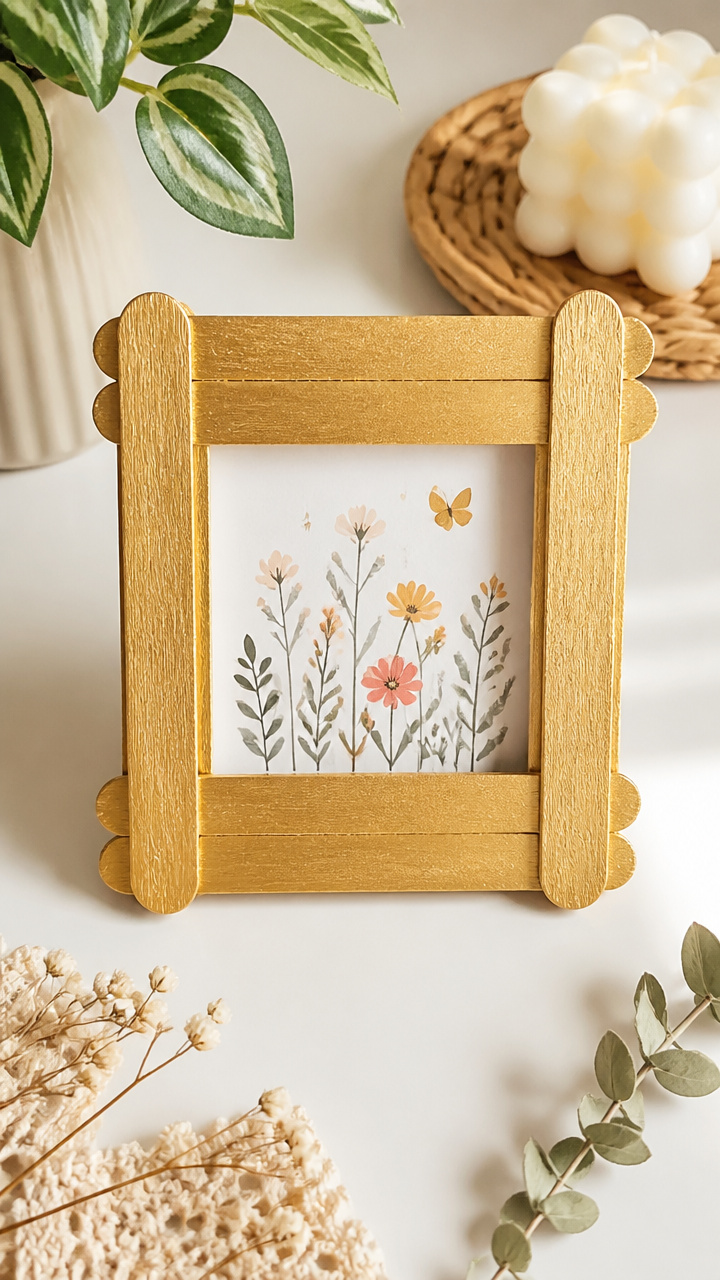
A chunky wooden border for tiny drawings or snapshots. Sturdy and simple, perfect for gifting to family.
Materials Needed
- 8 jumbo popsicle sticks
- school glue
- 3×3 inch drawing or photo
- craft paint (gold)
- paintbrush
- clothespin
How to Make It
- Paint all eight sticks with gold paint and let dry for 30 minutes on a flat surface.
- Lay two sticks vertically and evenly spaced on a table to form the sides of the frame.
- Glue two sticks horizontally across the top and bottom, overlapping the ends to make a rectangle.
- Clip the corners with a clothespin while drying and tape the photo to the back once fully set.
15. Newspaper Fort Walls
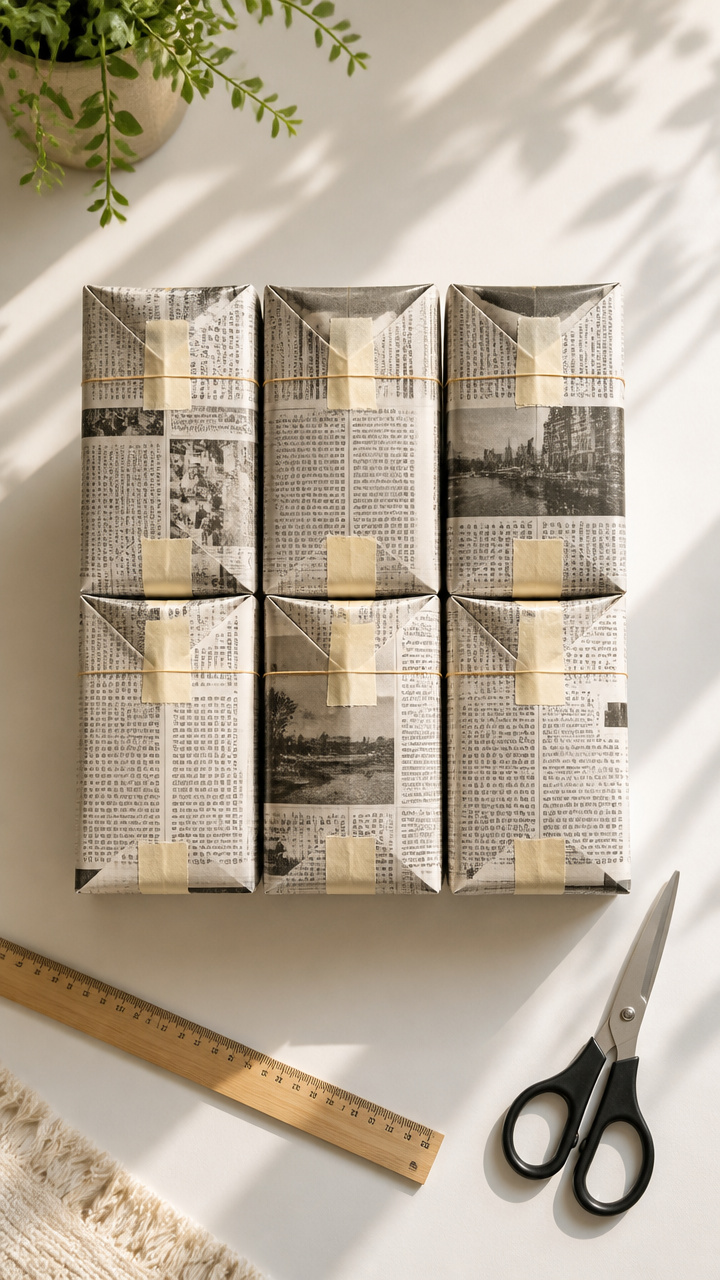
Tall, freestanding panels that link into secret hideouts. Rolled sheets become strong, lightweight supports.
Materials Needed
- 6 full newspaper sheets
- masking tape
- ruler
- scissors
- large rubber bands (3 count)
How to Make It
- Roll each newspaper sheet tightly from short edge to short edge to make a long tube.
- Secure each end with a rubber band to keep it tight.
- Lay three tubes side by side and tape them together at both ends with 3-inch strips of masking tape.
- Stand the panel upright and connect additional sections by taping the ends together at right angles.
Grab a few things from around the house and start creating. You’ll be surprised how much magic fits in a sock, a box, or a roll of tape.