15 Easy Summer Crafts for Toddlers Using Dollar Store Supplies
Summer days with toddlers call for simple, hands-on activities that spark joy without breaking the bank. With just a trip to your local dollar store, you can gather everything you need for creative projects that are safe, engaging, and perfect for little hands.
Each of these crafts uses basic materials in clever ways. They keep kids busy while building fine motor skills and confidence through play.
1. Popsicle Stick Puppets
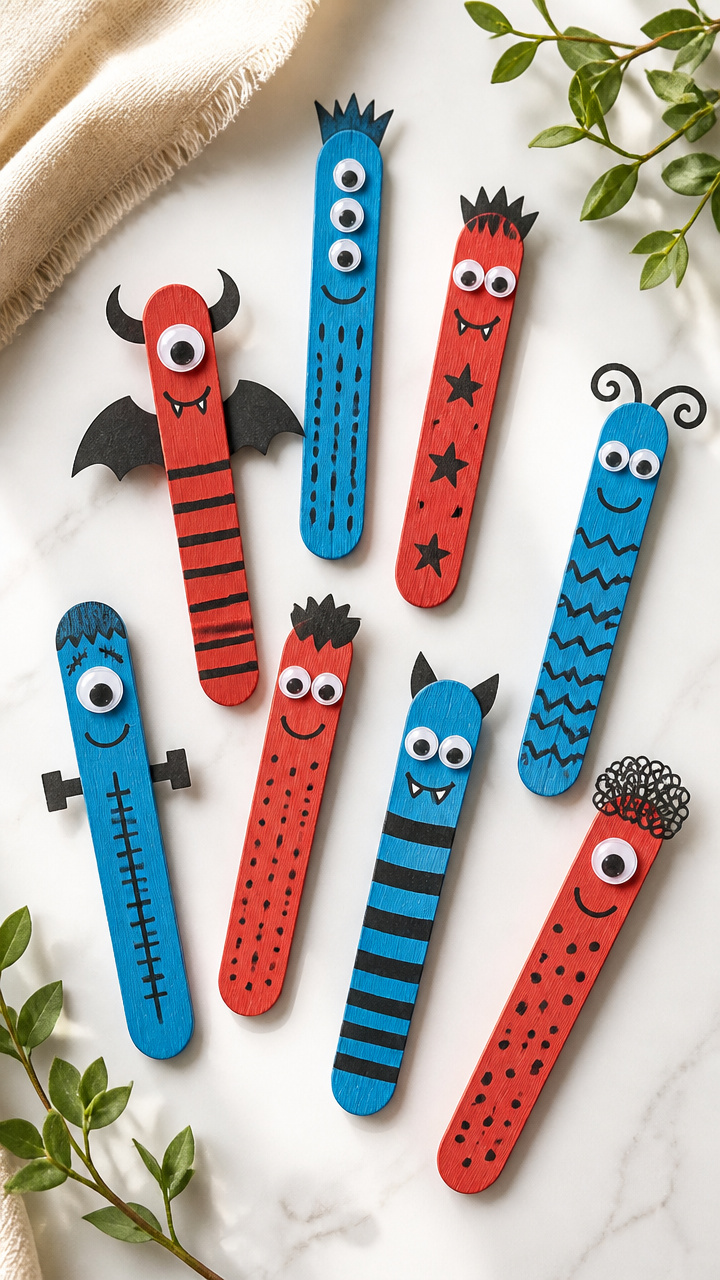
Brightly colored puppets let toddlers act out stories and practice talking. These stick figures are easy to assemble and inspire hours of imaginative play.
Materials Needed
- 6 flat wooden craft sticks
- Washable red acrylic paint
- Washable blue acrylic paint
- Googly eyes, 1-inch diameter, pack of 12
- White school glue
- Black washable marker
- Small foam craft buttons, 0.5-inch, 6 pieces
- Paintbrush, size 4
How to Make It
- Paint one craft stick red using the paintbrush and let it dry completely on a paper plate for 20 minutes.
- Draw a face on the dried stick with the black marker, adding a smile and hair above the eyes.
- Glue two googly eyes just below the drawn eyes and press gently to secure.
- Glue three foam buttons down the center of the stick to make a shirt.
- Let the glue dry for 30 minutes before playing with the puppet.
2. Paper Plate Sun Masks
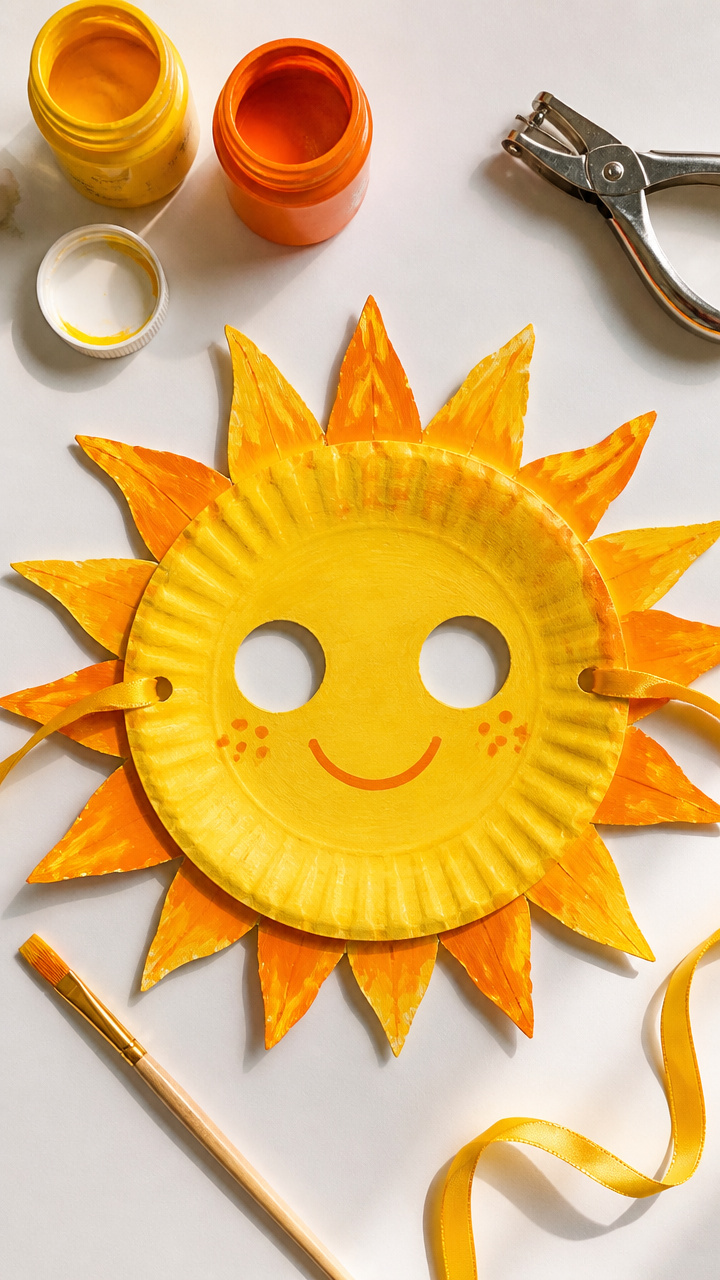
Sunny faces with wavy rays fit over toddler heads for backyard parades. Lightweight and colorful, they double as decorations when hung up with string.
Materials Needed
- 1 white paper plate per child
- Yellow tempera paint
- Orange tempera paint
- Hole punch
- Ribbon, 1/4-inch wide, 24 inches long
- Paintbrush, size 6
- Scissors
- Black construction paper, 8.5 x 11 inches
How to Make It
- Cut out the center of the paper plate with scissors, leaving a ring with tabs around the edge.
- Paint the outer ring yellow and the inner tabs orange, then let dry flat for 25 minutes.
- Use the hole punch to make two holes on opposite sides of the plate edge.
- Cut two 12-inch lengths of ribbon and tie one into each hole.
- Draw eyes and a mouth from black construction paper and glue them to the front.
3. Cotton Ball Cloud Art
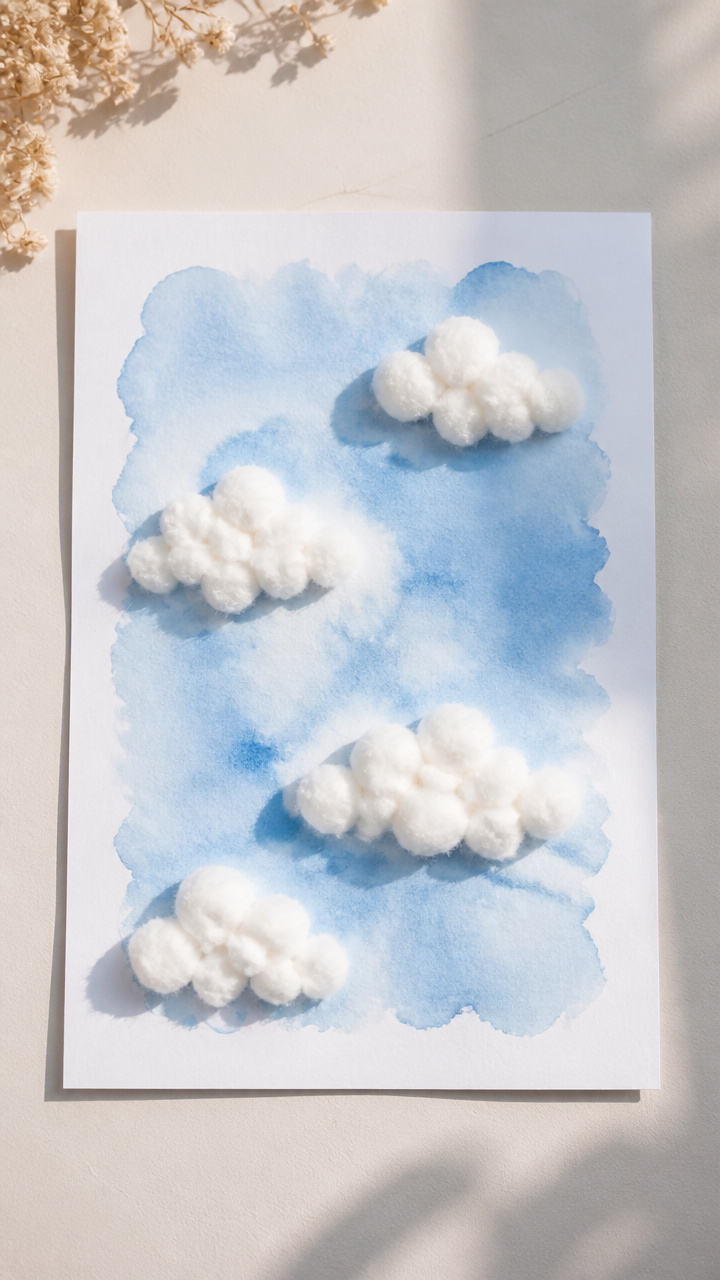
Soft clouds made from cotton balls give texture and depth to a sky scene. This no-mess project builds hand-eye coordination with tearing and placing.
Materials Needed
- A4 white cardstock
- Blue liquid watercolor paint
- Cotton balls, regular size, 10 per child
- White school glue
- Paintbrush, size 5
- Small plastic tray
How to Make It
- Pour blue watercolor paint into the plastic tray and brush it across the top half of the cardstock.
- Tear each cotton ball into three smaller fluffs using fingers.
- Dip fingertips into glue and press one fluff at a time onto the dry painted area.
- Place three to four groupings of fluffs across the sky section.
- Let the artwork dry face-up for 40 minutes before display.
4. Pool Noodle Name Letters
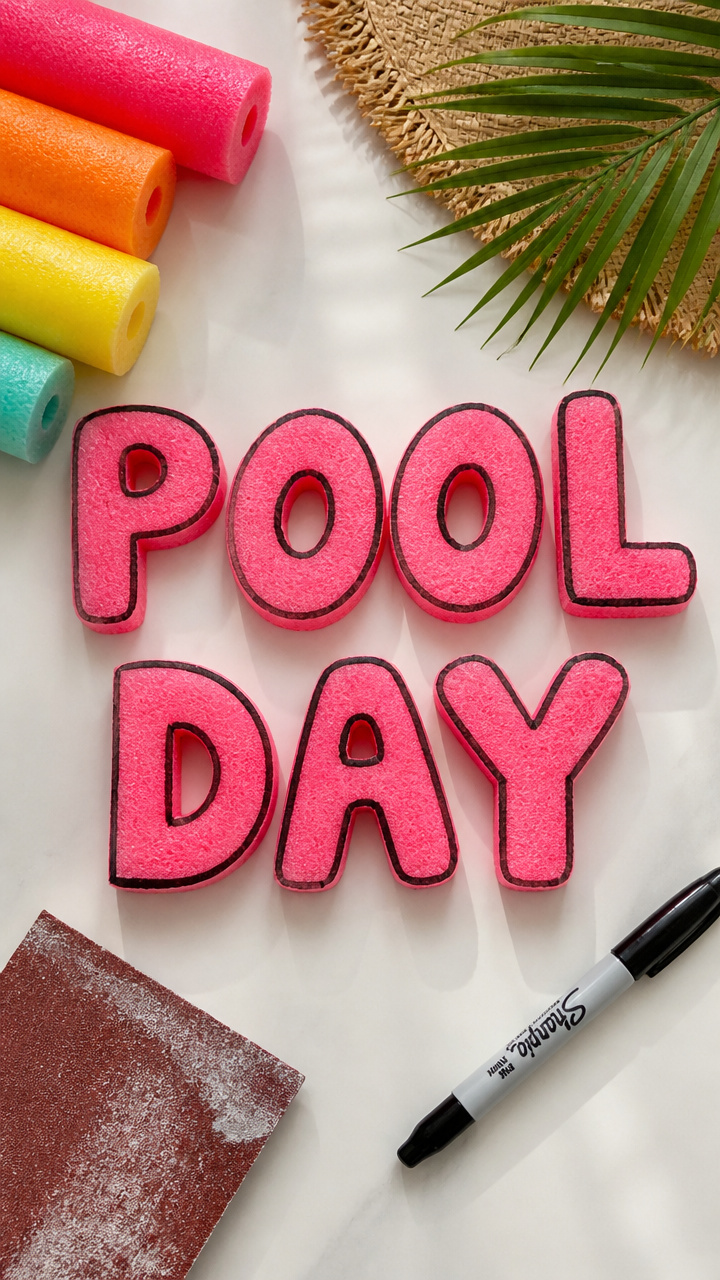
Firm foam letters shaped from pool noodles spell out names and boost letter recognition. Bouncy and bright, they stand up on shelves or float in water.
Materials Needed
- 1 straight neon pink pool noodle
- Black permanent marker
- Sharp kitchen knife
- Cutting board
- Sandpaper, medium grit
How to Make It
- Draw the first letter of your child’s name on the end of the noodle with the marker.
- Cut through the noodle along the line using the knife and cutting board.
- Smooth any rough edges by rubbing with sandpaper in small circles.
- Repeat for each letter in the name, rotating noodle colors if desired.
- Stack or line up letters on a flat surface for play.
5. Plastic Lid Ladybugs
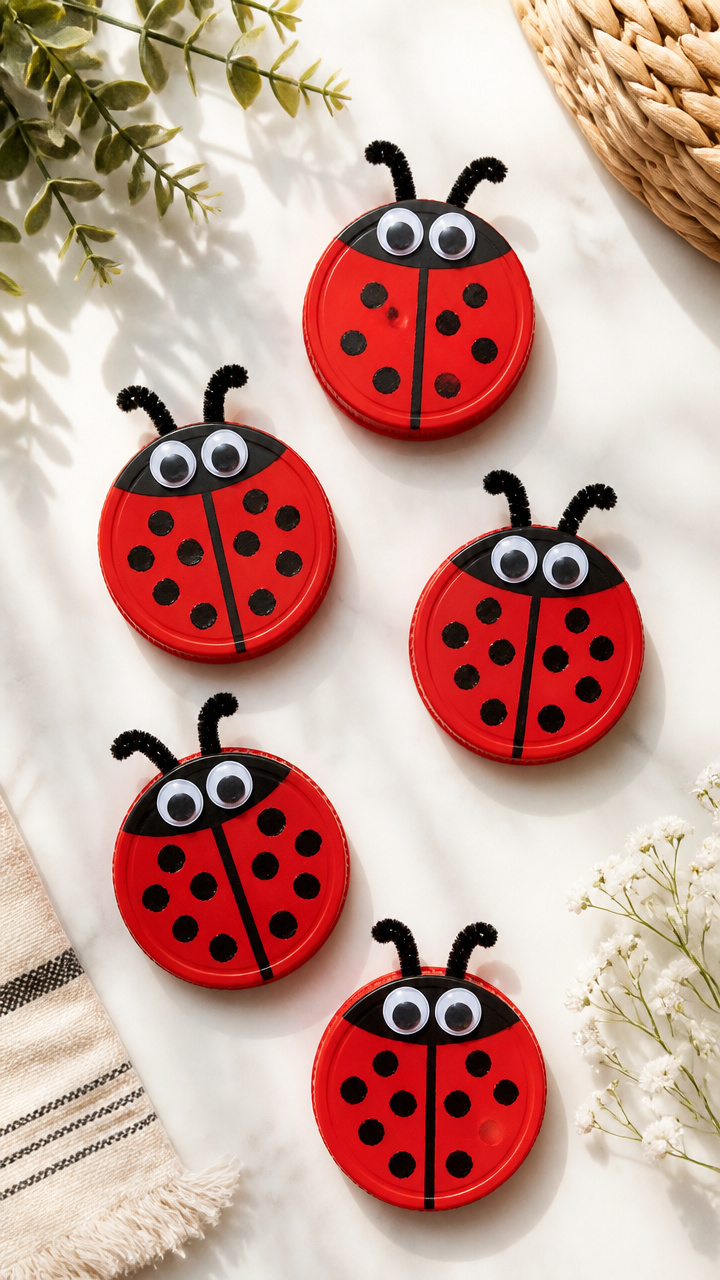
Red lids with black dots become garden bugs that toddles love to decorate and slide across tables. Simple painting builds early counting skills.
Materials Needed
- 8 red plastic drink lids
- Black acrylic paint
- Paintbrush, size 2
- White school glue
- Black pipe cleaners, 6 inches long, 4 pieces
- Googly eyes, 0.75-inch, 16 pieces
How to Make It
- Paint seven black dots on each lid with the small brush and let dry for 15 minutes.
- Glue two googly eyes near the top edge of each lid.
- Cut each pipe cleaner in half and bend one end of each piece to make antennae.
- Glue one antenna on each side above the eyes.
- Set aside for 30 minutes to fully dry before sliding them on surfaces.
6. Yarn-Wrapped Cardboard Boats

Sturdy boats made from cereal boxes sail imaginary seas with yarn masts. Wrapping helps strengthen finger control and patience.
Materials Needed
- Empty cardboard cereal box
- Scissors
- Green yarn, size 4
- White school glue
- Craft knife
- Ruler
- Pencil
How to Make It
- Cut the cereal box down one side and lay it flat to trace a triangle sail shape 6 inches tall.
- Cut out two identical sails and one rectangular base 4 x 8 inches.
- Glue the sails upright along the center line of the base, one in front and one behind.
- Wrap yarn tightly around one sail from bottom to top, pressing ends into glue at base.
- Let dry for 45 minutes before setting sail on the floor or table.
7. Beaded Pipe Cleaner Bracelets
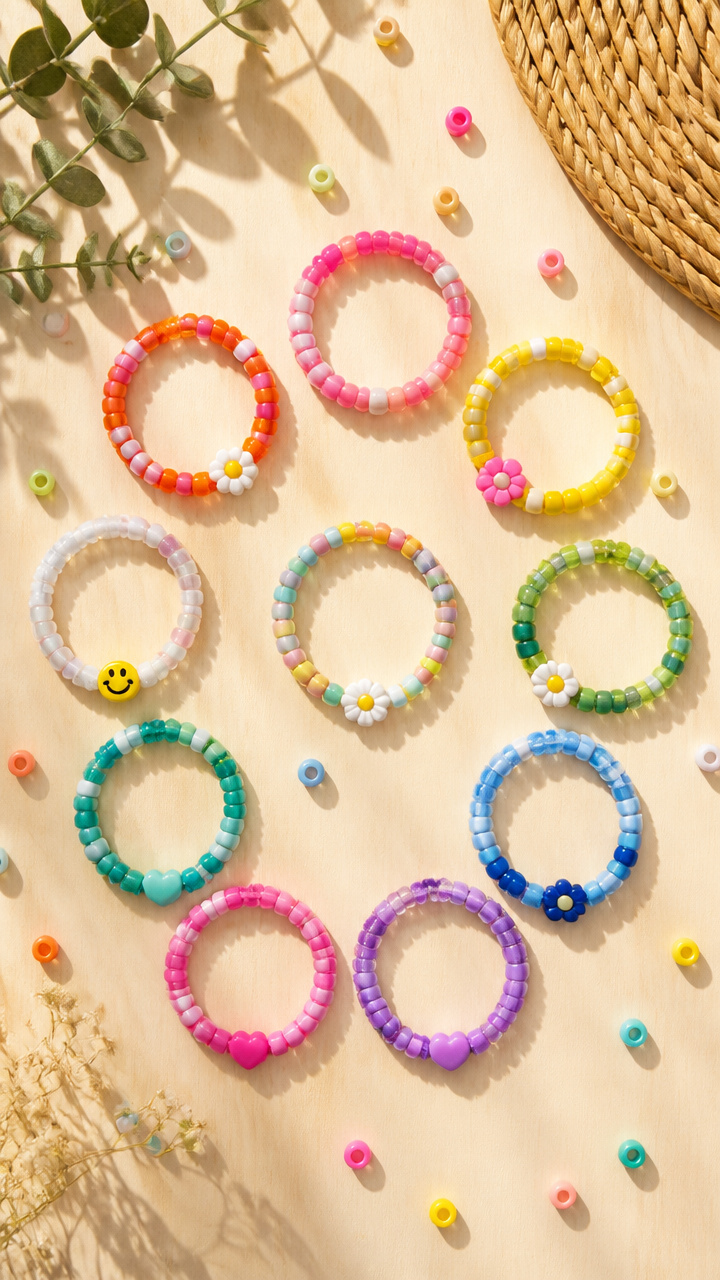
Colorful beads slide easily onto soft wire for wearable art. Making bracelets supports pincer grip and color sorting.
Materials Needed
- Assorted plastic pony beads, 100 count
- Chenille stems, 12 inches long, 6 pieces
- Scissors
How to Make It
- Pick one chenille stem and bend one end into a small loop to stop beads from falling off.
- Slide five large beads onto the stem, alternating colors as you go.
- Bend the far end of the stem into another loop once all beads are on.
- Twist the loops closed with fingers to prevent snagging.
- Make additional bracelets using different bead patterns.
8. Shaving Cream Marble Paper
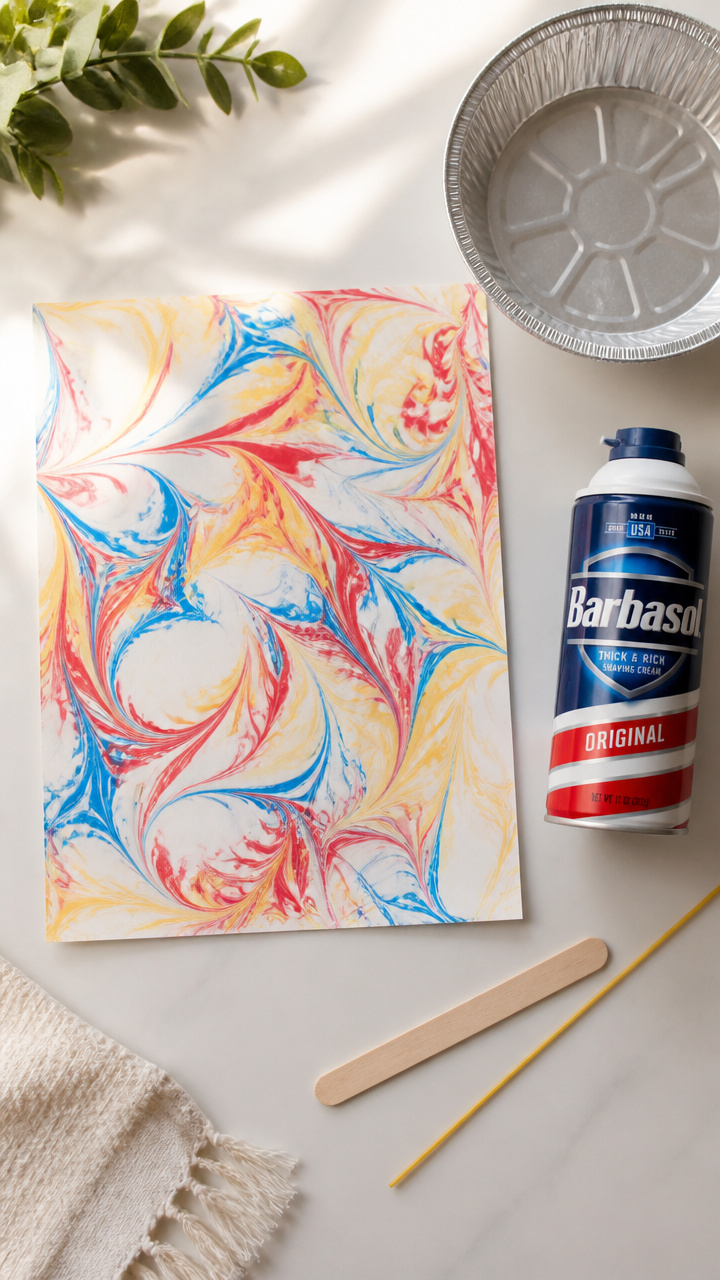
Swirled designs appear like magic when paper meets colored shaving cream. A sensory hit, this activity teaches color blending safely.
Materials Needed
- Shaving cream, 8 oz can
- Food coloring, red, blue, yellow
- Pie tin
- A4 white drawing paper
- Popsicle stick
- Spaghetti, uncooked, 1 piece
- Paper towels
How to Make It
- Spray shaving cream into the pie tin to fill it 1 inch deep.
- Add five drops each of red, blue, and yellow food coloring to the top.
- Drag the spaghetti strand through the colors to swirl them gently.
- Lay a sheet of paper face-down onto the mixture and press evenly for 10 seconds.
- Lift the paper and wipe excess cream with paper towels to reveal the design.
9. Egg Carton Ocean Creatures
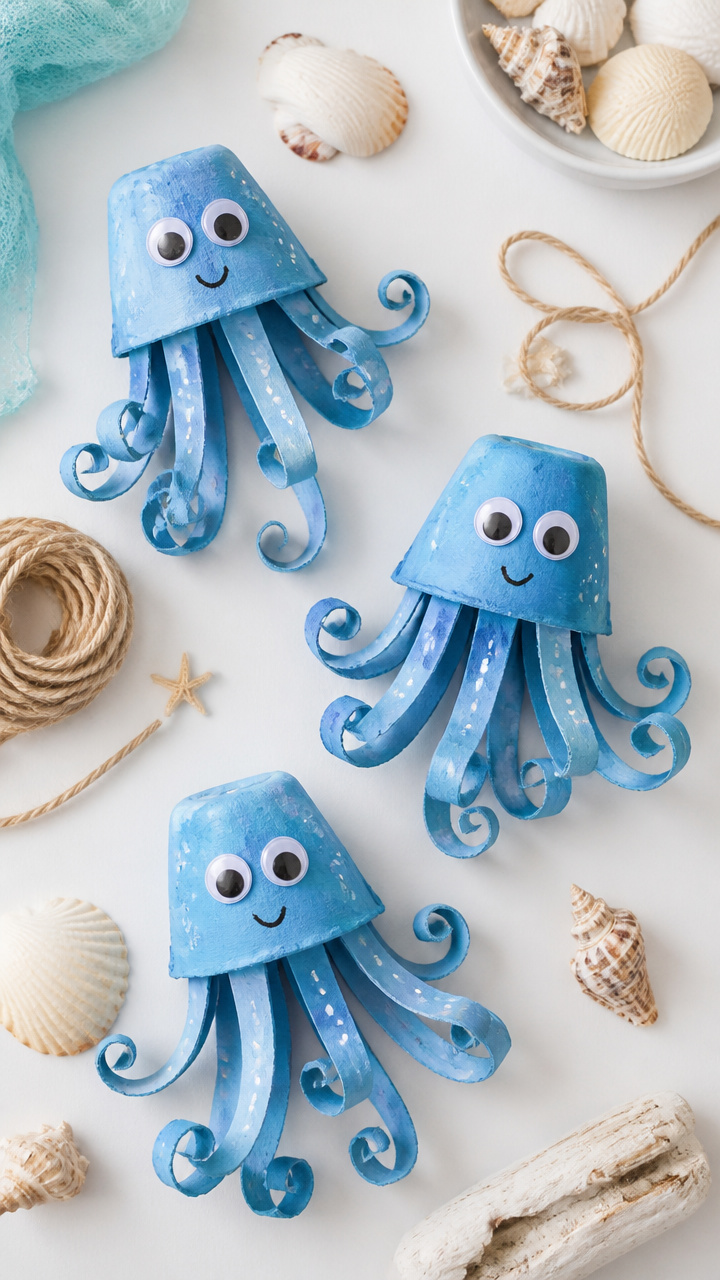
Sea animals rise from egg cups with tentacles and fins. Cutting and gluing help develop dexterity while sparking ocean tales.
Materials Needed
- Cardboard egg carton, 12-cup
- Scissors
- Blue acrylic paint
- Paintbrush, size 3
- White school glue
- Googly eyes, 0.5-inch, 12 pieces
- Orange pipe cleaners, 6 inches, 3 pieces
How to Make It
- Cut three egg cups from the carton using scissors.
- Paint each cup inside and out with blue paint and let dry for 20 minutes.
- Glue six googly eyes into one cup to make an octopus.
- Cut one pipe cleaner into six equal parts and push two into each side of the octopus cup.
- Let dry 30 minutes before playing with the creatures.
10. Tissue Paper Wind Socks
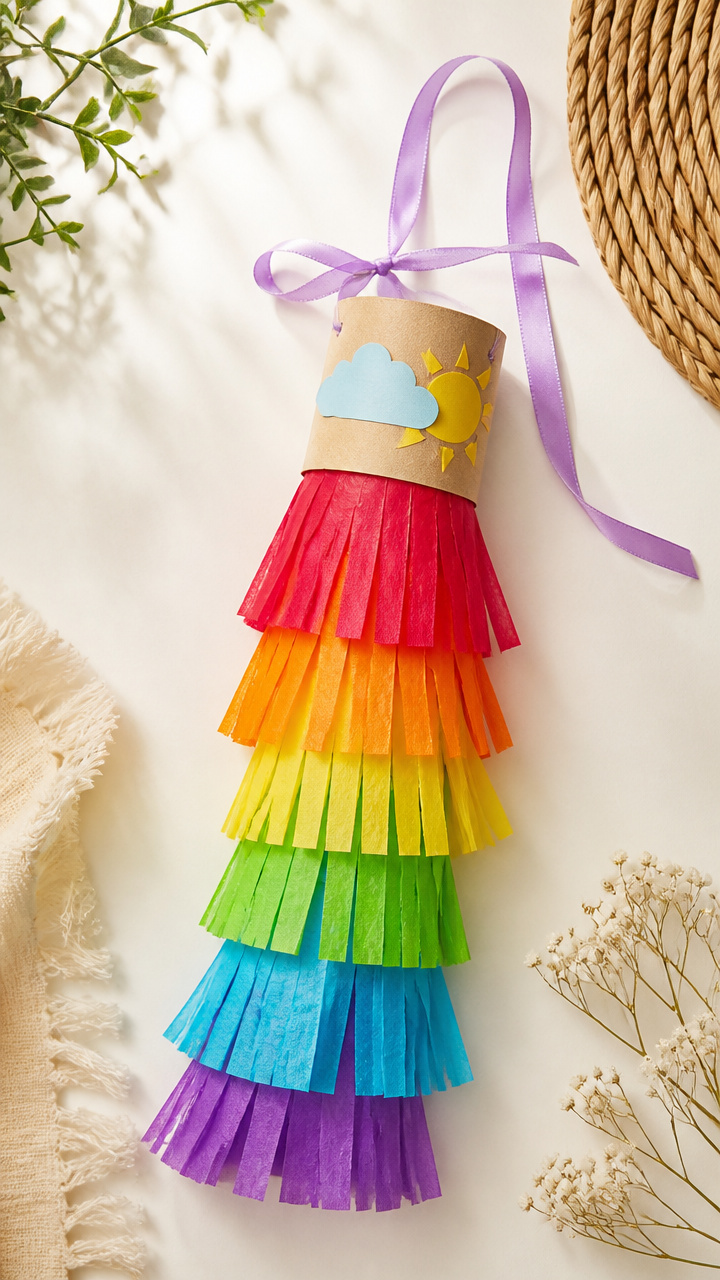
Fluttering strips of tissue paper stream from a decorated tube. Hanging in a breeze, they teach movement and color mixing.
Materials Needed
- Cardboard paper towel roll
- Tissue paper sheets, assorted colors, 6 sheets
- White school glue
- Ribbon, 1/2-inch wide, 12 inches
- Hole punch
- Scissors
- Glue stick
How to Make It
- Cut tissue paper into 1-inch wide strips, each 6 inches long.
- Glue one end of each strip to the bottom edge of the paper roll with white glue.
- Overlap strips slightly so they cover the entire bottom rim.
- Punch two holes near the top edge and thread ribbon through both for hanging.
- Let dry for 35 minutes before hanging near a window or door.
11. Clothespin Butterfly Wings
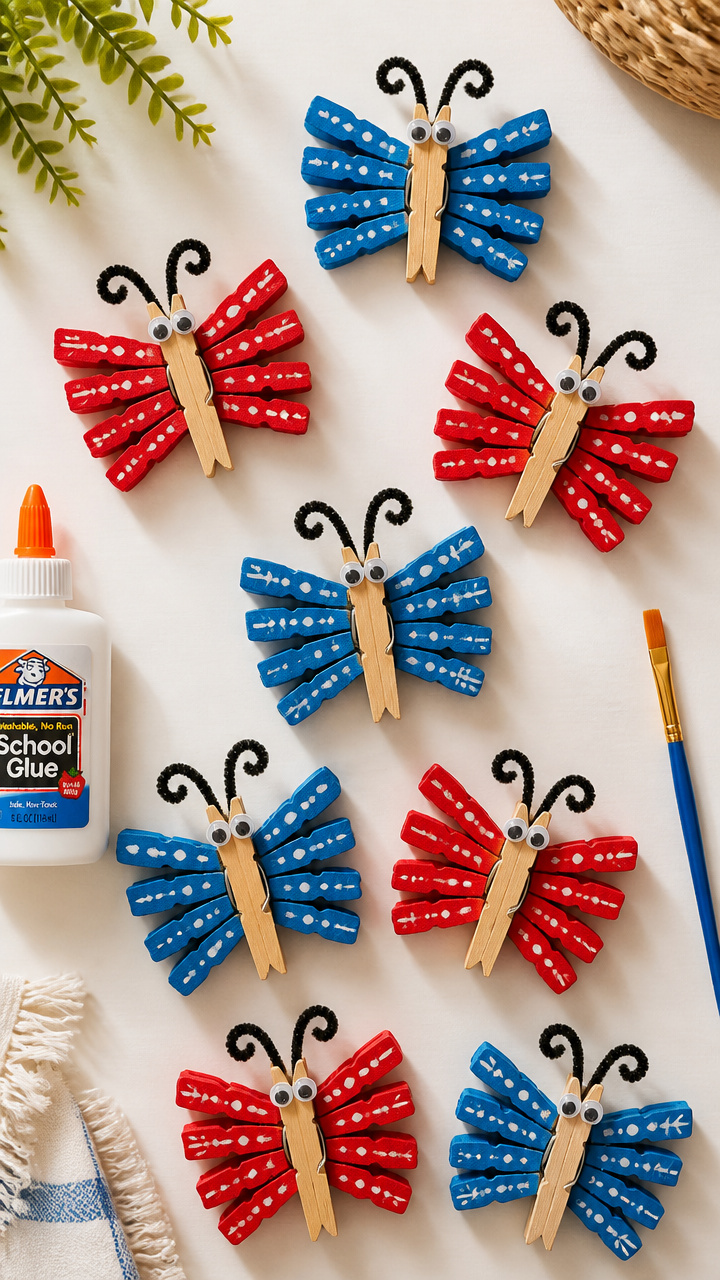
Butterflies flap their wings when clothespins hold painted clothespin bodies. Bright and lightweight, they clip to strings or walls.
Materials Needed
- Wooden clothespins, unpainted, 6 pieces
- Red watercolor paint
- Blue watercolor paint
- Paintbrush, size 4
- Googly eyes, 0.5-inch, 12 pieces
- White school glue
- Black pipe cleaner, 12 inches
How to Make It
- Paint the rounded end of each clothespin red and let dry for 15 minutes.
- Turn the pin over and paint the flat part blue, then dry another 15 minutes.
- Glue two googly eyes near the tip of the rounded end.
- Cut the pipe cleaner in half and twist one piece into antenna shapes.
- Glue each antenna just above the eyes and let dry 20 minutes.
12. Paper Cup Flower Garden
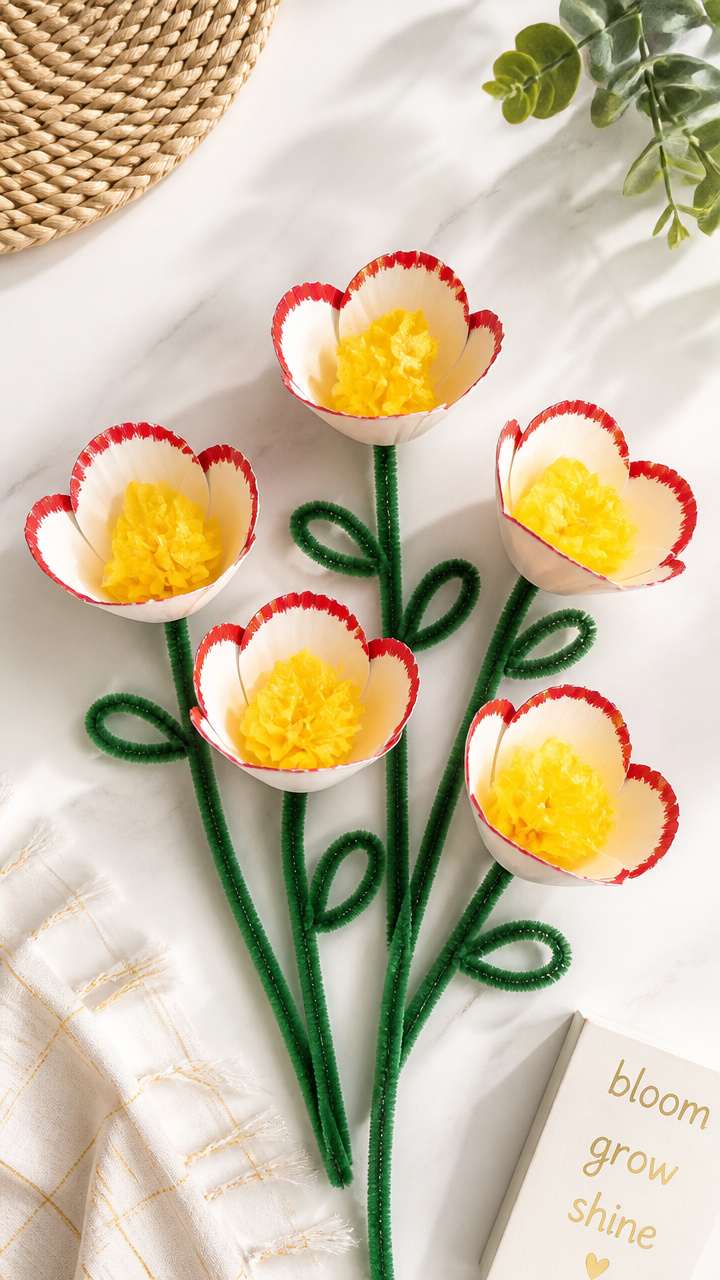
Cups bloom into cheerful flowers with crinkled centers and green stems. Group them in a row to make a pretend windowsill garden.
Materials Needed
- 5 white paper cups
- Yellow tissue paper
- Green pipe cleaners, 6 inches, 5 pieces
- Scissors
- White school glue
- Red acrylic paint
- Paintbrush, size 3
How to Make It
- Cut the yellow tissue paper into 2-inch squares.
- Crumple each square into a small ball and glue it into the bottom of a cup.
- Paint the outside of each cup red and let dry for 20 minutes.
- Cut one pipe cleaner in half and twist one piece vertically into a stem.
- Push one stem into each cup and arrange in a sunny spot.
13. Straw Stained Glass Windows

Colored cellophane squares taped to cardboard sparkle in sunlight. Toddlers build color awareness while making pretend church windows.
Materials Needed
- Black poster board, 9 x 12 inches
- Clear tape
- Cellophane sheets, red, blue, yellow, 8.5 x 11 inches each
- Scissors
- Ruler
- Pencil
How to Make It
- Draw a large rectangle on the poster board with pencil, 8 x 10 inches.
- Divide the rectangle into eight uneven sections with straight lines.
- Cut cellophane sheets into 2 x 2 inch squares.
- Tape one square inside each section, covering completely with clear tape.
- Hang near a window to see light shine through the colors.
14. Pinecone Bird Feeders
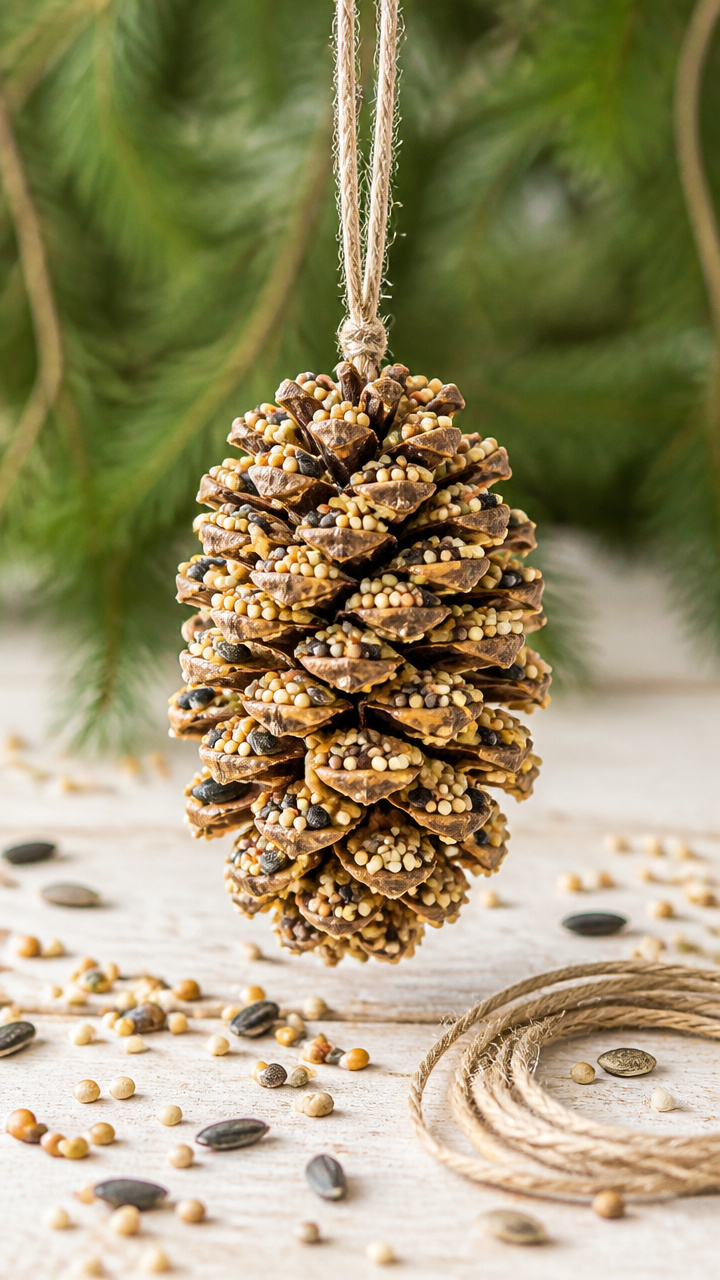
Pinecones slathered in peanut butter become homes for birds. String them outside and watch feathered friends visit your yard.
Materials Needed
- Large pinecone, 4 inches long
- Creamy peanut butter
- Birdseed, 1/2 cup
- Butter knife
- Bowl
- Twine, 18 inches
- Shallow dish
How to Make It
- Tie twine around the top of the pinecone and knot securely.
- Spread peanut butter into the crevices using the butter knife.
- Pour birdseed into the shallow dish and roll the pinecone in it.
- Press gently to help seeds stick in all pockets.
- Hang outside on a tree branch and wait for birds to arrive.
15. Rock Monster Faces
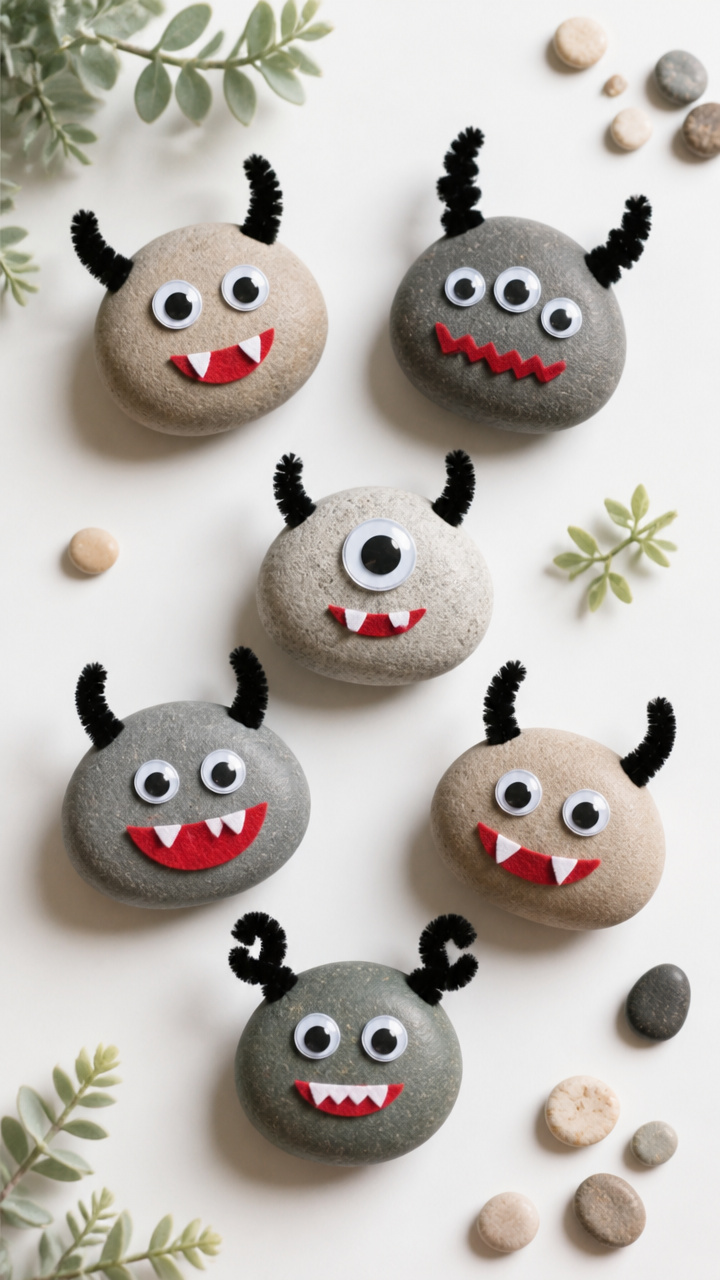
Smooth river rocks turn into grinning monsters with glued-on features. Keep them in a sensory bin or garden for surprise discoveries.
Materials Needed
- 5 smooth river rocks, 2-3 inches wide
- White school glue
- Googly eyes, assorted sizes, 10 pieces
- Black pipe cleaners, 6 inches, 3 pieces
- Red felt scraps
- Scissors
How to Make It
- Glue two googly eyes near the top of each rock and press gently.
- Cut small triangles from red felt and glue them below the eyes for mouths.
- Cut pipe cleaners into 1-inch spikes and glue them along the top edge for hair.
- Use larger eyes or multiple small ones for silly expressions.
- Let each monster dry for 40 minutes before play.
You’ve got everything you need right at the dollar store to fill summer afternoons with color, texture, and happy messes. Grab a basket and start crafting with your little one today.