15 Backyard Nature Crafts for Kids Using Sticks, Leaves, and Rocks
There’s magic in the ordinary when you’re small. A stick becomes a wand, a rock turns into treasure, and leaves transform into delicate art supplies. These simple backyard finds open up a world where imagination leads and nature provides.
Each of these crafts uses only sticks, leaves, and rocks—collected from your yard or nearby path. No fancy kits, no long lists—just real materials, clear steps, and plenty of room for creativity.
1. Stick Picture Frame
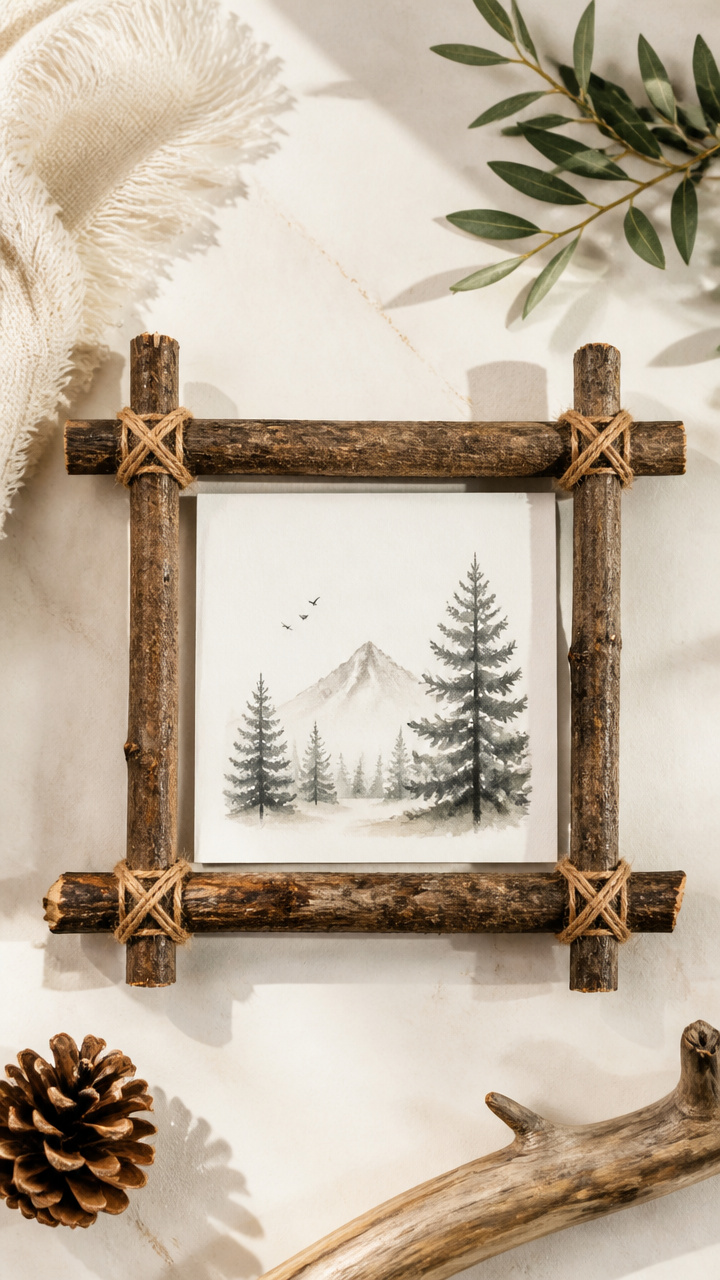
Rough-hewn twigs wrap around a photo to create a rustic frame that holds memories and attention. This craft turns a handful of straight sticks into a keepsake sturdy enough to display on a shelf.
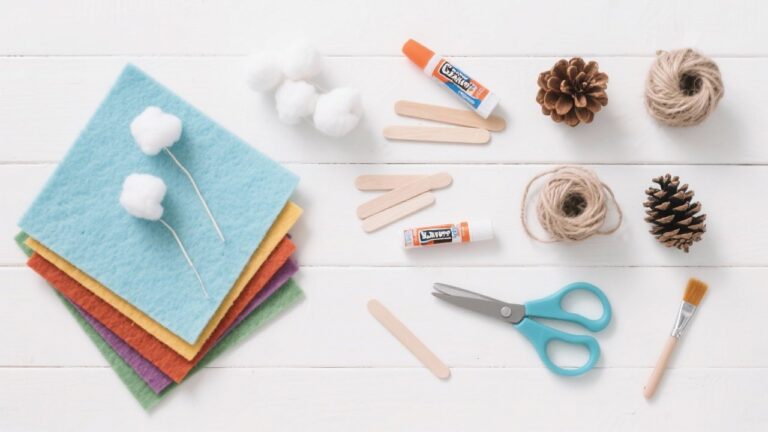
Materials Needed
- 8–10 straight sticks, each 6–8 inches long
- 4-inch square photo or cardstock drawing
- white school glue
- small clothespin
- scissors
How to Make It
- Lay two sticks vertically along the left and right edges of the photo, aligning them with the sides.
- Place two more sticks horizontally across the top and bottom edges, forming a rectangle around the photo.
- Glue each corner where the sticks meet, holding them in place with the clothespin for 2 minutes until set.
- Let the frame dry flat for 30 minutes before displaying.
2. Leaf Print Tote Bag
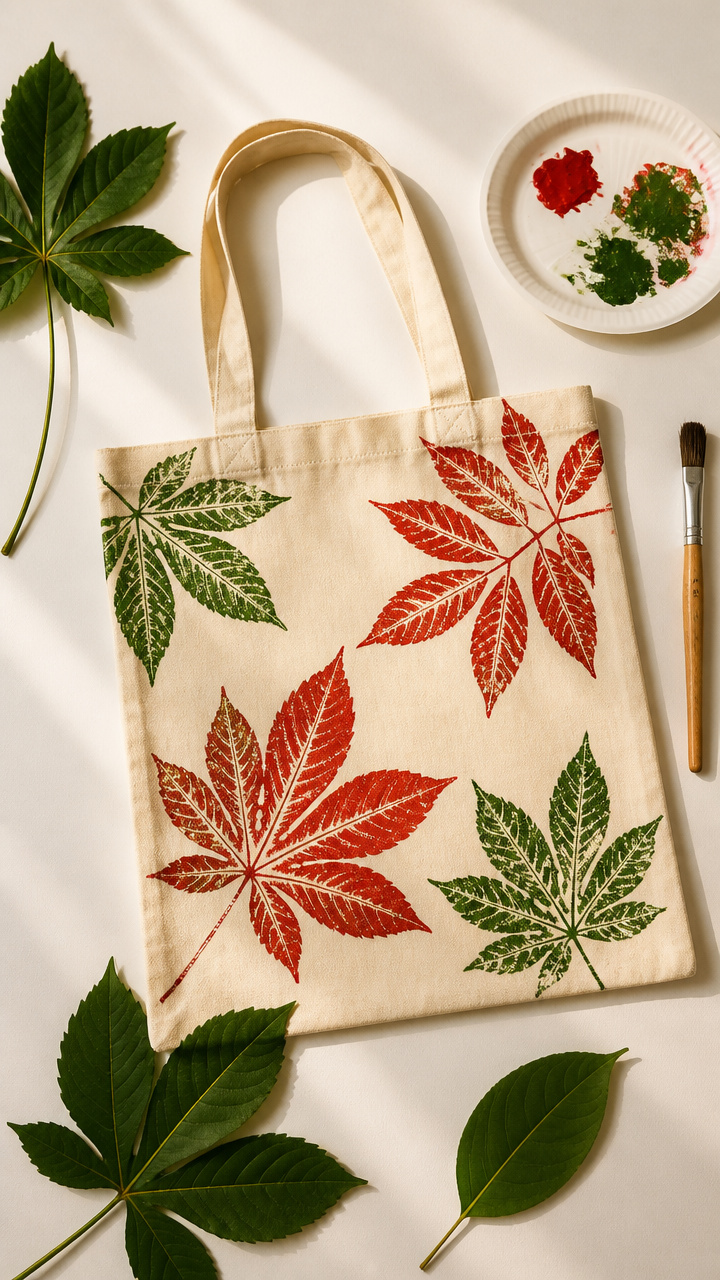
Fresh leaf shapes stamp bold patterns onto fabric using homemade paint. The result is a reusable bag decorated with nature’s own designs, perfect for carrying shells or snacks.
Materials Needed
- 1 plain cotton tote bag
- 5 large smooth leaves, like maple or magnolia
- 2 tablespoons red acrylic paint
- 2 tablespoons green acrylic paint
- paper plate
- paintbrush
- pencil
How to Make It
- Lay the tote flat on a protected surface and place a sheet of paper inside to prevent bleed-through.
- Pour paint onto the plate and use the brush to coat the back of one leaf completely.
- Press the painted side of the leaf firmly onto the tote, then lift straight off to reveal the print.
- Repeat with different leaves and colors, letting the bag dry for 1 hour before use.
3. Rock Balance Sculpture
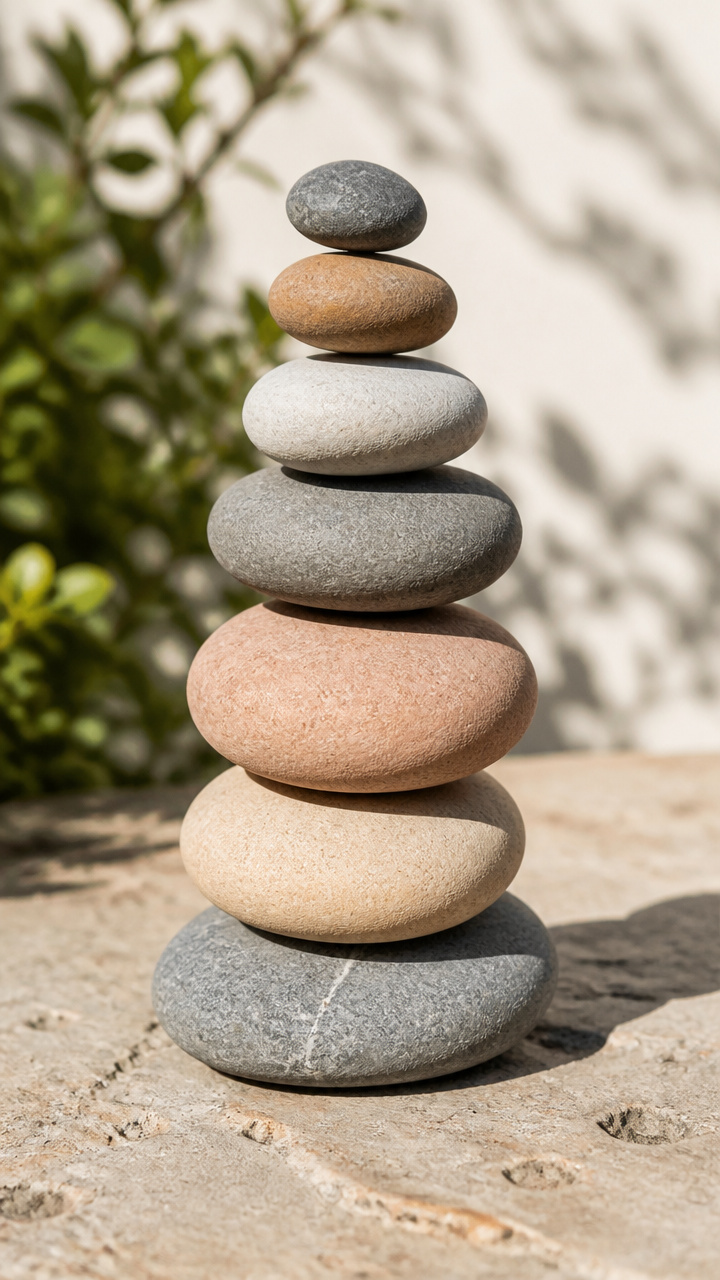
Stacked stones form a wobbly tower that teaches patience and fine motor control. Each sculpture is unique, shaped by balance and focus, not glue or tools.
Materials Needed
- 7 smooth river rocks, varying sizes from walnut to golf ball
- flat outdoor surface
How to Make It
- Choose the flattest, largest rock for the base and set it on a stable surface.
- Hold a medium rock in your fingertips and gently roll it on the base until it finds a balanced point.
- Add smaller rocks one at a time, adjusting slight shifts with light touches until the tower stands on its own.
4. Stick Raft Float
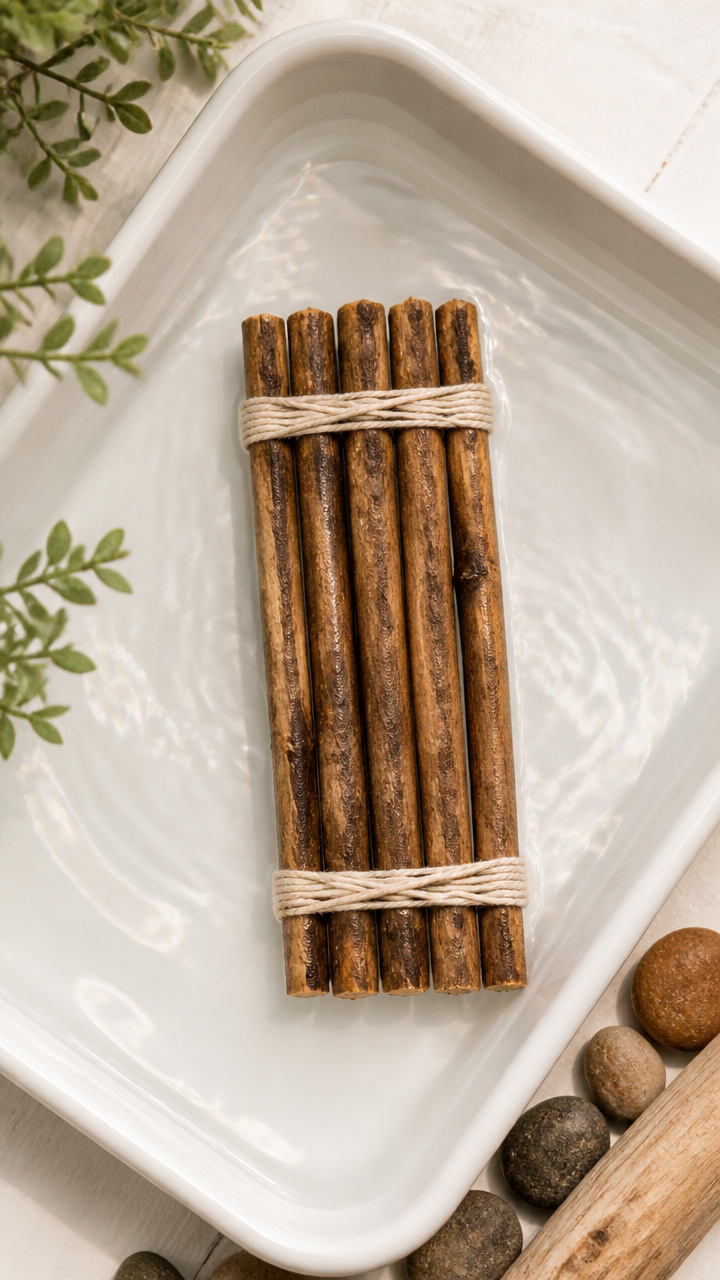
Parallel twigs bound by string form a floating raft that sails in puddles or creeks. It’s a working toy built with symmetry and simple knots.
Materials Needed
- 6 straight sticks, each 8 inches long and pencil-thick
- 12-inch length cotton string
- scissors
- shallow tray of water or calm puddle
How to Make It
- Lay three sticks side by side, spaced evenly about half an inch apart.
- Tie one end of the string around the outer stick, just past the end.
- Wrap the string tightly around all three sticks, crossing over every half inch, then tie off at the far end.
- Repeat on the opposite side with the second bundle of three sticks, then float in water.
5. Leaf Mosaic Art
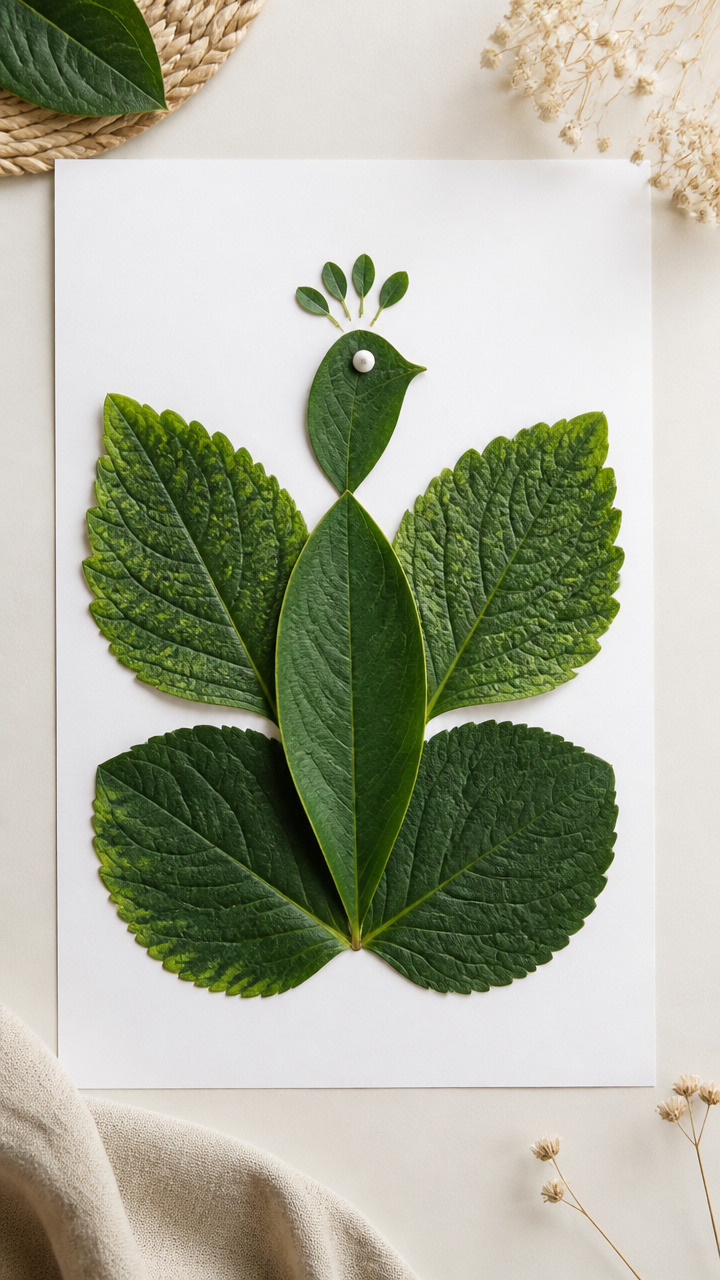
Torn leaf pieces in different greens assemble into a textured landscape on stiff paper. The layered effect mimics forest canopies and invites close looking.
Materials Needed
- A4 white cardstock
- 5 green leaves, various textures
- white school glue
- plastic knife
- small bowl
How to Make It
- Tear each leaf into irregular 1-inch pieces using the plastic knife for clean edges.
- Spread a thin layer of glue on one corner of the cardstock with your fingertip.
- Press leaf pieces close together onto the glue, overlapping slightly to fill the space.
- Let dry completely for 2 hours before touching.
6. Stick Alphabet Letters
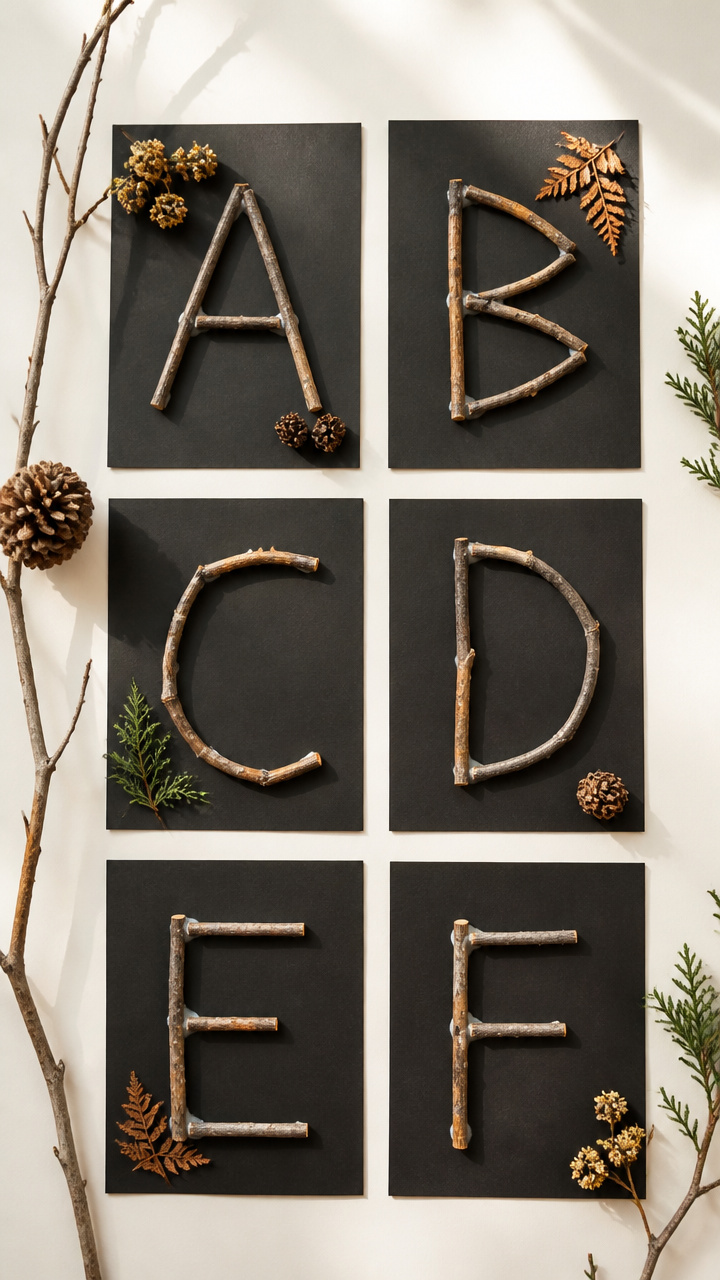
Bent and broken twigs snap into letter shapes that spell names or favorite words. These tactile letters double as spelling tools and wall decor.
Materials Needed
- 15 small twigs, 2–4 inches long
- PVA glue
- letter stencil set (optional)
- black construction paper, 9×12 inches
How to Make It
- Arrange twigs on the paper to form a capital letter, breaking some to fit curves or angles.
- Glue each piece down with a dot of PVA glue under both ends.
- Let dry for 45 minutes, then repeat for additional letters.
7. Rock Stack Garden Marker

Three stacked stones labeled with plant names stand upright in soil like tiny signs. These markers are weather-resistant and blend naturally into garden beds.
Materials Needed
- 3 flat-bottomed rocks per marker, palm-sized
- fine-tip black permanent marker
- outdoor herb or vegetable seedling
How to Make It
- Stack the rocks in order from largest to smallest, ensuring each sits level on the one below.
- Write the plant name clearly on the top rock using the marker.
- Press the base rock into the soil next to the correct seedling.
8. Stick and Leaf Kite
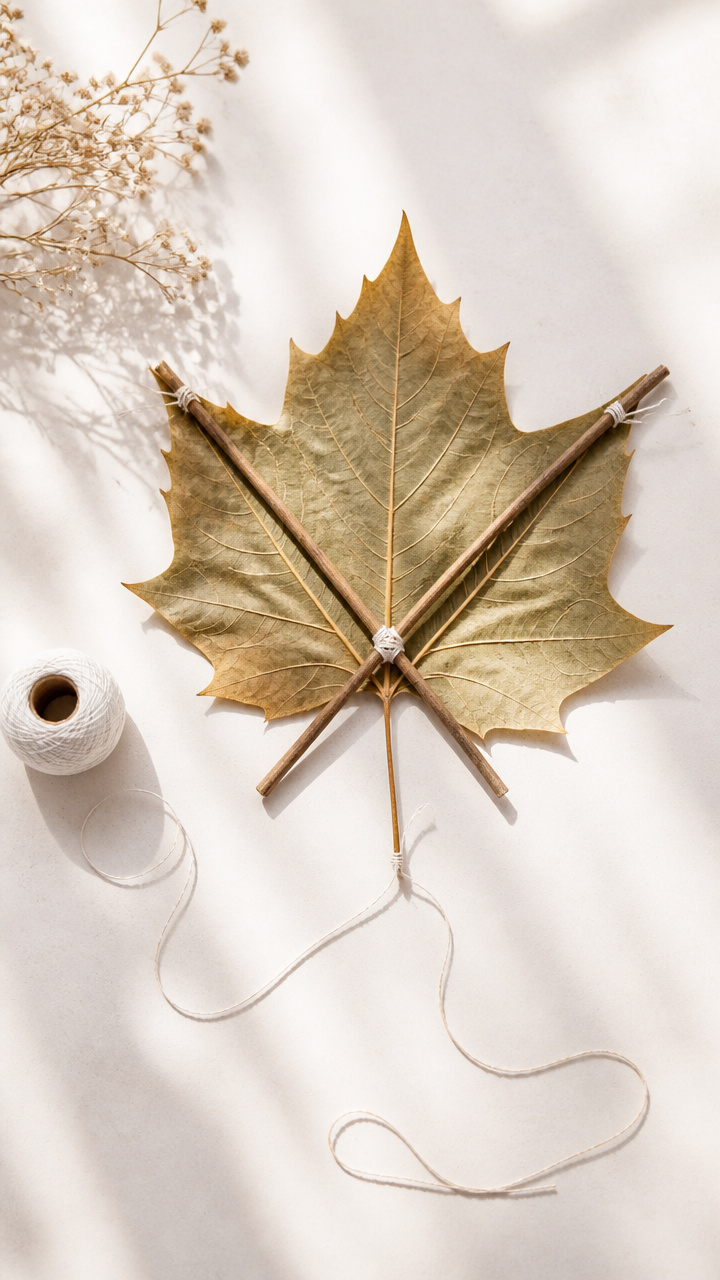
Two crossed sticks support a leaf sail that flutters in breeze-filled yards. This lightweight kite flies short distances on string and imagination.
Materials Needed
- 2 straight sticks: one 10 inches, one 8 inches
- 1 large flexible leaf, like sycamore
- 18-inch nylon thread
- tape
- hole punch
How to Make It
- Lay the sticks in a cross shape, with the shorter stick one-third down the longer one, and tape securely at the center.
- Use the hole punch to make two holes near the stem end of the leaf.
- Thread the nylon through both holes and tie to the intersection of the sticks.
- Run with it in an open area to catch the wind.
9. Rock Painting Faces
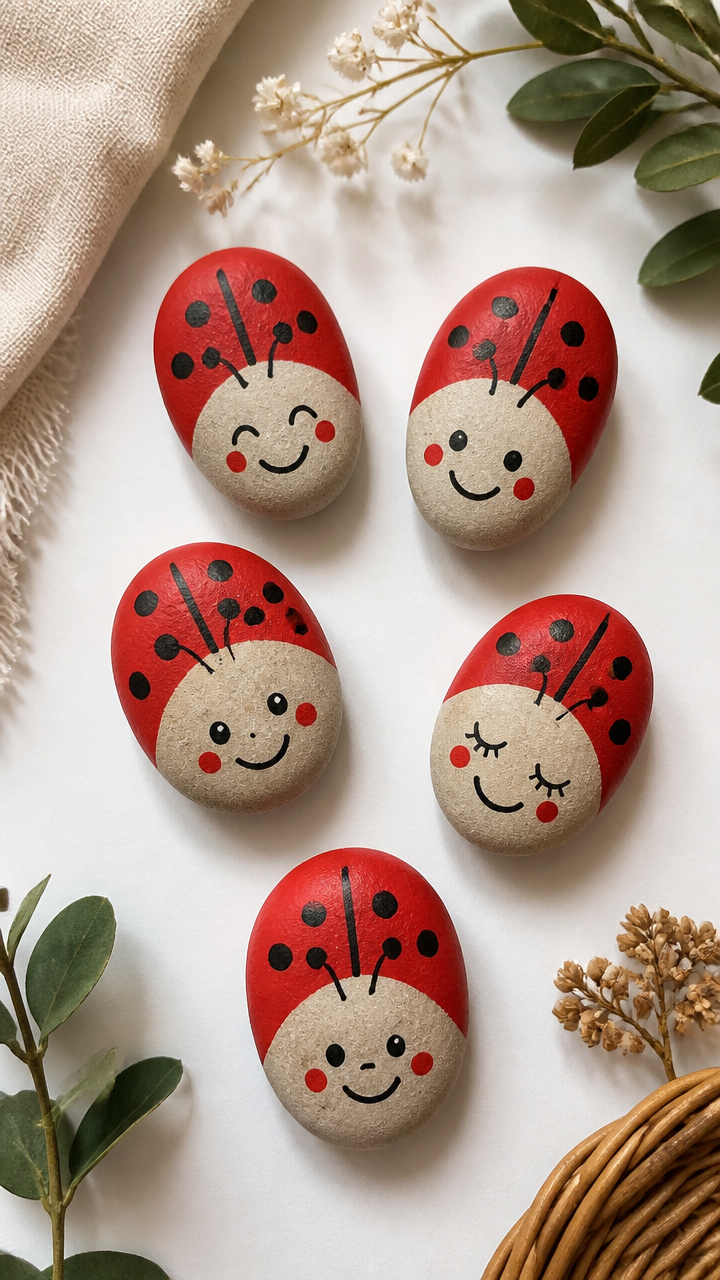
Smooth stones become characters with eyes, mouths, and hats drawn in vivid color. Each face reflects a mood or story, turning a collection into a stone family.
Materials Needed
- 5 smooth oval rocks, egg-sized
- red acrylic paint
- black permanent marker
- paintbrush
- paper towel
How to Make It
- Paint a full face shape in red on one broad side of the rock, let dry 10 minutes.
- Draw two eyes and a smiling mouth with the marker, pressing lightly for clean lines.
- Add a hat or hair with leftover paint using the tip of the brush.
- Set aside for 20 minutes to fully dry.
10. Stick Tripod Lantern
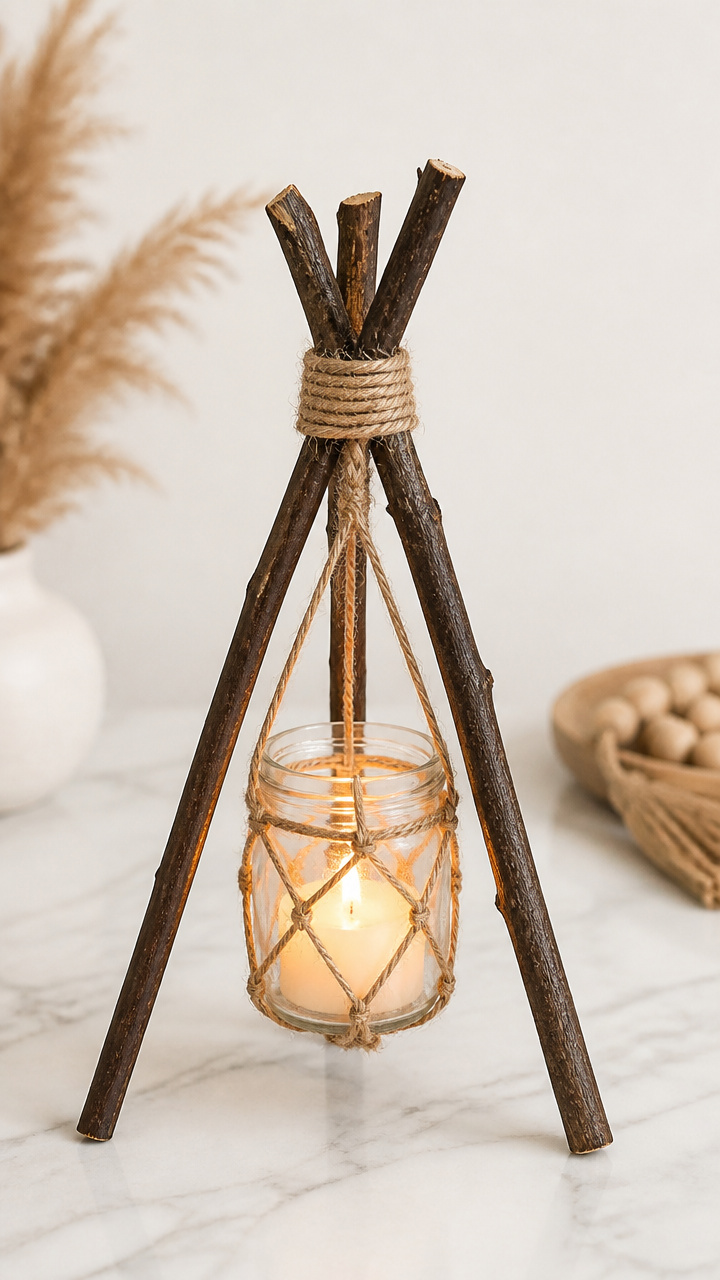
Three sticks lashed into a pyramid hold a jar candle safely off the ground. This structure casts flickering shadows and glows like a campsite beacon.
Materials Needed
- 3 straight sticks, each 12 inches long
- 15-inch jute twine
- jar candle
- matches
- scissors
How to Make It
- Tie the twine around all three sticks two inches from one end, knotting tightly.
- Spread the sticks into a tripod, letting the free ends touch the ground in a triangle.
- Adjust so the tied end forms a stable peak, then place the jar candle underneath.
- Light the candle only when supervised and on non-flammable ground.
11. Leaf Skeleton Rubbing
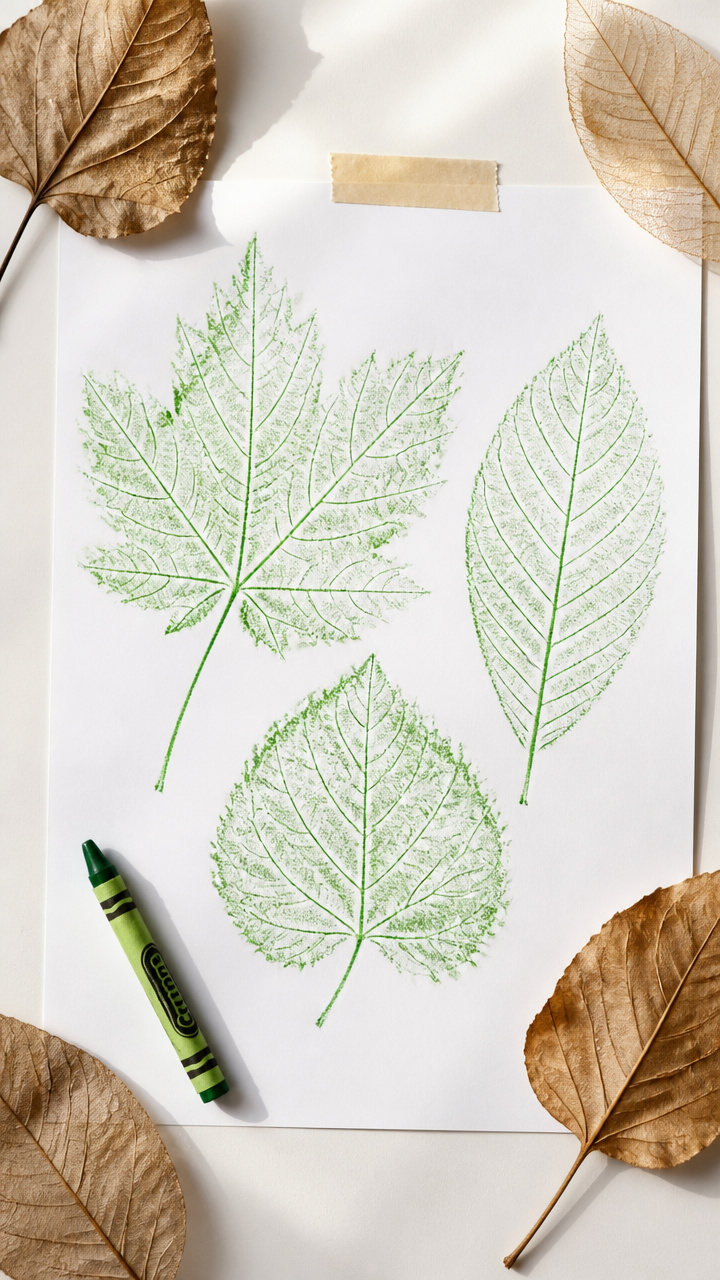
Veins of dried leaves press texture into paper through crayon rubbings. The result captures intricate natural patterns in soft color layers.
Materials Needed
- 3 dried brown leaves with visible veins
- A4 white printer paper
- peelable green crayon
- tape
How to Make It
- Place one leaf vein-side up under the printer paper and tape the paper corners to the table.
- Color firmly over the leaf with the side of the crayon until the vein pattern appears.
- Repeat with new leaves and fresh paper to compare structures.
12. Stick Fence for Doll Garden
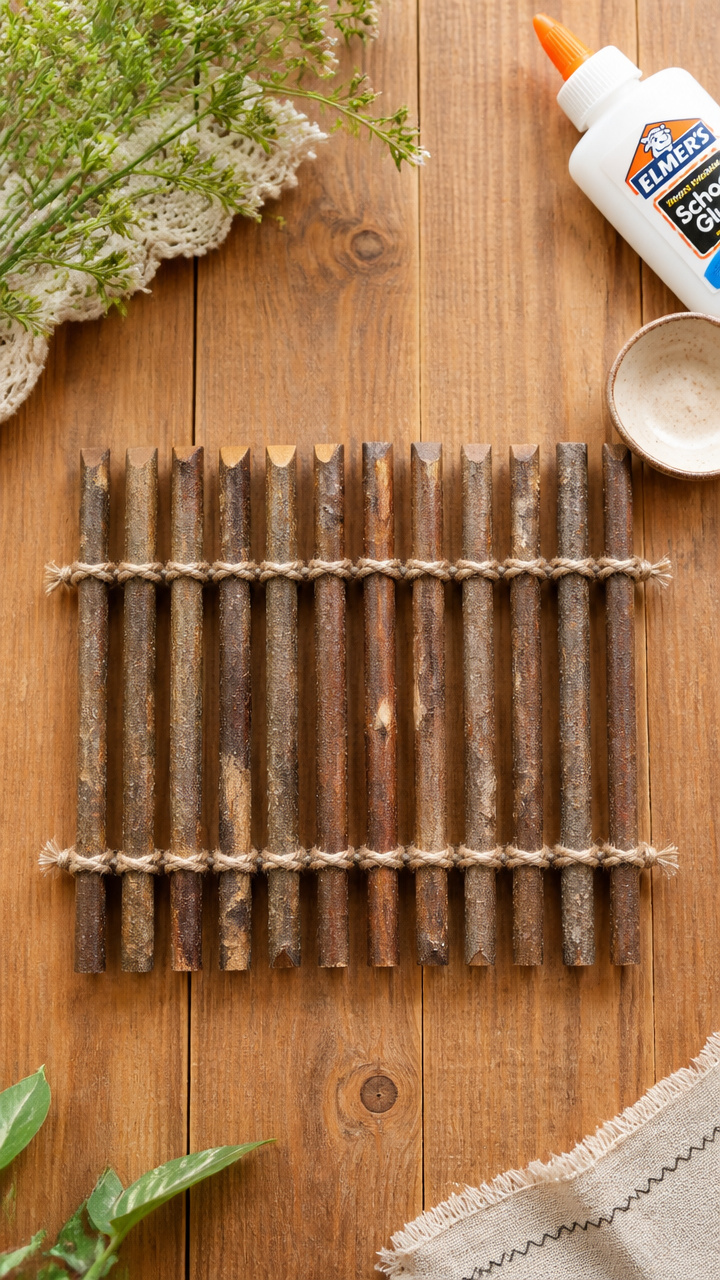
Mini logs linked by twine form a picket fence that encloses pretend play spaces. This boundary defines a tiny world for toys and moss pets.
Materials Needed
- 12 twig segments, each 3 inches long and finger-width
- 10-inch hemp string
- white school glue
- small dish
How to Make It
- Lay six twigs in a row, ends aligned, on a flat surface.
- Run a line of glue along the top and bottom third of each twig.
- Press the string into the wet glue, stretching it straight across all twigs.
- Let dry for 1 hour, then repeat with the second row to form a gate section.
13. Rock Number Path
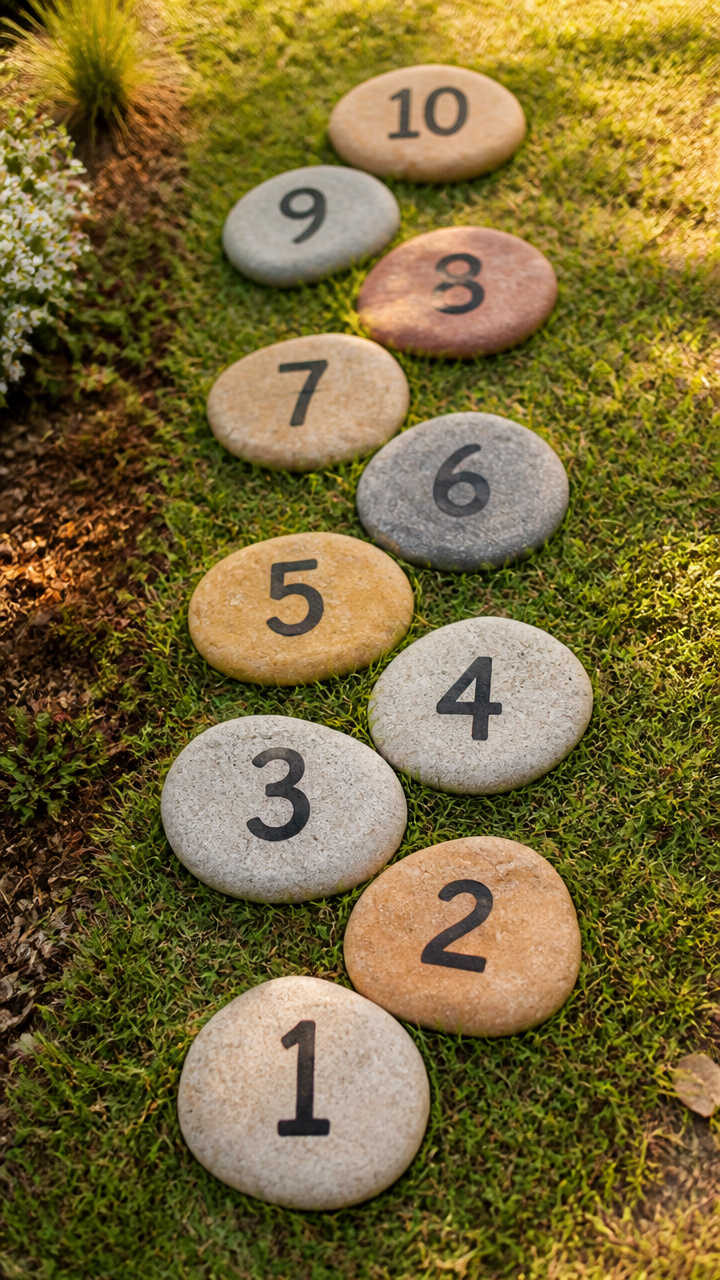
Flat stones painted with numbers create a learning trail for hopping math games. Use it to practice counting or skip by twos outdoors.
Materials Needed
- 10 flat stepping-size rocks
- black acrylic paint
- paintbrush
- stencil numbers 1–10 (optional)
How to Make It
- Clean each rock with a damp cloth and let air dry for 5 minutes.
- Paint a large number clearly on the top surface using the brush and black paint.
- Let each rock dry for 30 minutes before placing them in a winding path on grass or soil.
14. Stick Star Shape
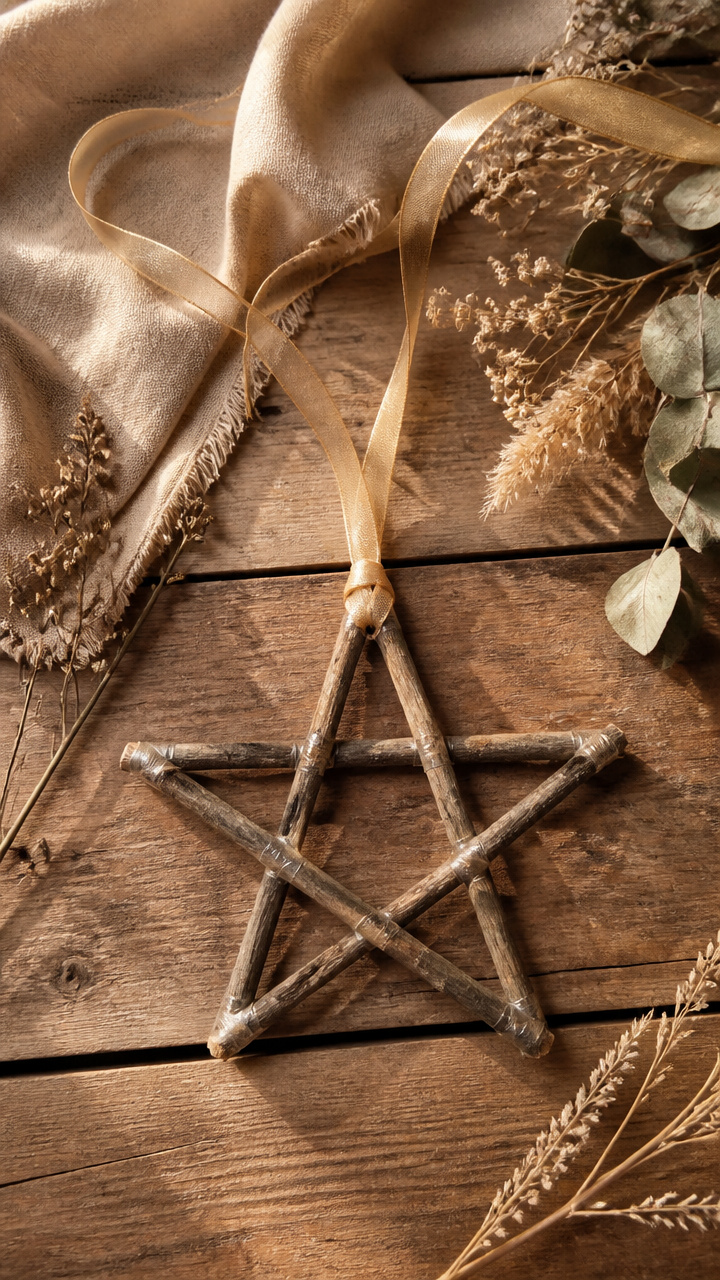
Five sticks joined at angles form a star outline that hangs in windows or trees. Sunlight passes through the gaps, casting wooden constellations.
Materials Needed
- 5 straight sticks, each 6 inches long
- clear tape
- hole punch
- 12-inch ribbon
How to Make It
- Lay one stick vertically, then place a second stick at a 72-degree angle from the top end.
- Overlap each new stick at the ends, forming a five-pointed star, and tape all five joints firmly.
- Punch a hole at the top point and thread the ribbon through to hang.
15. Leaf Crown Weave
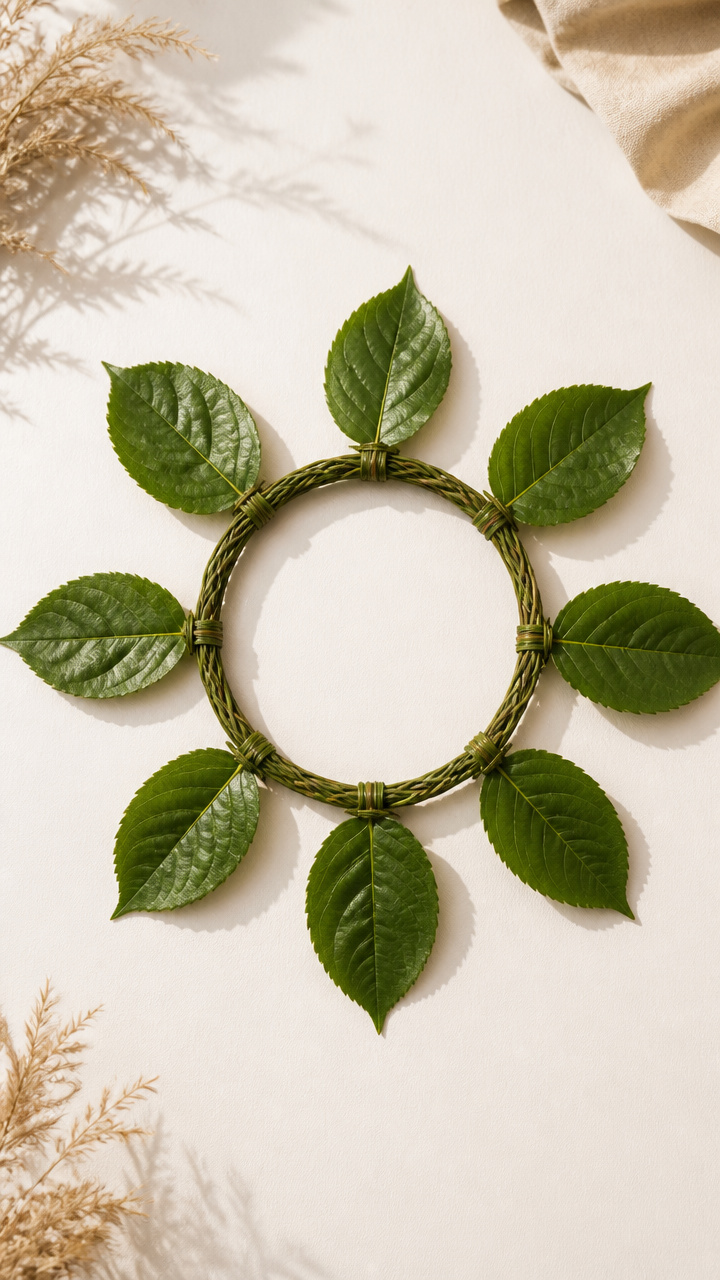
Flexible stems threaded through leaves make a wearable band for outdoor adventures. Lightweight and breathable, it stays put during play.
Materials Needed
- 1 long green vine or bendable stem, 18 inches
- 8 large leaves with intact stems
- scissors
How to Make It
- Cut a slit near the base of each leaf stem, just big enough to thread the vine through.
- Slide the vine through the first leaf’s slit, pulling until the leaf rests in the middle.
- Continue threading the vine through each stem, spacing leaves evenly along its length.
- Tie the ends of the vine together behind the head to fit like a crown.
You don’t need a craft store to start creating. Step outside, gather what’s underfoot, and let your child lead with curiosity. These projects grow from simple parts but leave lasting impressions.